Followers, Guestbook, & Comments

My followers are being shown in the right column. My Guestbook is at the bottom. Please follow, comment on posts, & sign my guest book. Your comments encourage me to keep sharing my work. I love hearing from you all.

When you leave a comment, I have to moderate it before it will be posted. So if you have a questions or comments, feel free to ask & if necessary note that you don't want your comment posted.

Tuesday, December 28, 2010

My 1st Imagine Project: Thank You Card

This was a really quick test project.  It's not perfect, but I'm happy with it for not playing with my machine at all.  All I did was select the images, load the paper, print, & cut.
Background paper, oval frame, & color for Thank You are from the Imagine More Cart.  The Thank You is from the Sweethearts Cart.
Thanks for looking. Questions & comments are always welcomed. Lori

Fleur de Lis Glittered Etching Glass Block

I made this glass block for my grandmother for Christmas.
I etched the Fleur de Lis onto the glass block.  I then filled in the etched area with Paper Glaze.  The Paper Glaze stayed inside of the etched lines.  I then poured glitter all over the face of the glass block.  Let it dry over night.  Remove all excess glitter & save it.  Paint the glittered design with Glossy Mod Podge.  This keeps the glitter sparkly & seals it all in so that the glitter will  not flake off.
Thanks for looking. Questions & comments are always welcomed. Lori

Dry Erase Frames

I made these for my daughter & 3 nieces for Christmas.
Live Simply for the frames, Storybook for name, Ashlyn's Alphabet for fans, Twinkle Toes for I Heart & Music bars & notes, Robotz for 2, Smiley Cards for Sing
 
 Don Juan for name, Smiley Cards for smileys, Winter Woodland for frames
Feeling Groovy for name, Don Juan for photography, Locker Talk for camera, Lacy Labels for frames
Calligraphy Collection for name, Lacy Labels for frames, Lyrical Letters for monogram
Thanks for looking. Questions & comments are always welcomed. Lori

Sunday, December 26, 2010

Bittersweet Christmas

For those of you that may not know, my dad passed away rather suddenly on September 27, 2010.  He is and will always be in our hearts.  So he was with us for all of Christmas celebrations.  However, we all did miss his physical presence.
Also, so many of you know about the September 14, 2010 release of the Cricut Imagine on HSN.  Well, I found out yesterday that he bought it for me.  My mom gave it to me yesterday & told me that my dad bought it for me during the first showing of it during the release.
I can't wait to learn all that my Imagine can do & the possibilities of what I can do with it.
So now I have a Baby Bug, Expression, Gypsy, & an Imagine.  All, except for my Gypsy was given to me from my mom & dad.  In the beginning - most of my carts were gifts from them as well.

I hope that all of you had a very Merry Christmas & Blessed rest of Your Holidays!!!

Thanks for looking. Questions & comments are always welcomed. Lori

Friday, December 17, 2010

Glittered Snowman Ornaments & Giftbags

I make the favors for the holiday parties for my daughter's class.  This year I decided to do the glittered ornaments that have been going around for the past couple of years.  Then I saw a video that Momo made.  She did the glittered ornaments & decorated them to look like snowmen.  I just loved the idea & thought that the kids would enjoy them too.
The way I made the faces was:  For the charcoal eyes & mouth, I used black Liquid Embossing.  I painted on the carrot nose with acrylic paint.  Then to protect the nose & give it some shine & dimension, I added some Aleen's Paper Glaze over it.
I also used a pipe cleaner for the loop to hang it on the tree.
To glitter the inside of the ornament, I used the Pledge with Future Shine and Martha Stewart Fine Crystal Glitter. - I JUST LOVE THIS STUFF!!!!!!
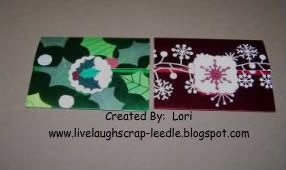
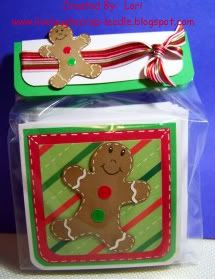
 I also had to make the gift bags for the ornaments.  I used the 3 1/4 x6 3/4 bags from Michaels.  For the snowman (I just thought that since i was giving a snowman ornament, that it was cute to use the snowman holding an ornament. - Ha Ha - I'm so easily amused!!  LOL) I used the Jolly Holidays cart.
For the topper I scored a 2 x 3 1/4 piece of cardstock in half.  Stamped Happy Holidays (Recollection Stamp Set:  Sugar & Spice).  On the back side we just wrote From:  Alexis.  I folded down the top inch of the bag & stapled it shut.  Then adhered the topper to the folded flap of the bag.
I used my Gypsy and Cricut to design & create the gift bag part of this project.
Thanks for looking. Questions & comments are always welcomed. Lori

Wall Letters "W" Wyatt, "L" Mrs. Luminais, & "G" Mrs. Guidry

Wyatt is a 4 yr old boy that likes cars, trains, & trucks.
Carts Used:  Mickey Font for the name, cars for the car & tractor, Mickey & Friends for the truck, & Create A Critter for the train
Mrs. Luminais is a 3rd grade teacher.
Carts Used:  All Mixed Up for the name, Dreams Come True for the book, & Locker Talk for the globe, microscope, & ruler
Mrs. Guidry is a 4th grade computer teacher.  Most of the children's work is done on the computer.
Carts Used:  Ashlyn's Alphabet for the name, Locker Talk for the computer, Printing Press for the computer sign, & Zoo Day for the BYTES & RAM signs
I used my Gypsy and Cricut to design & create these projects.
Thanks for looking. Questions & comments are always welcomed. Lori

Tuesday, December 7, 2010

MPS is an Angel: Playtime Thank You Card

I made this card for Robyn aka My Pink Stamper.  She is truly an angel sent from heaven.  Without going into all of the details & to get to the point:  She sent me the Playtime Cartridge that came with her Cricut Expression that she bought at Wal-Mart on Black Friday!!!  Yay - how generous is she?!!!!
So I made her this easel card using the Playtime Cartridge. (There was no angel on the cart so I used the princess.)
Card Details:
I used my Gypsy & Cricut to design & create this card.
Easel card base: 11 x 4.25 & scored at 2.75 & 5.5
Playtime Cart: Princess & Swirl
Lacy Labels: Shapes for stamping the easel stand
Cuttlebug w/ Polka Dots embossing folder
MPS Everyday Occasions Stamp Set
Gellyroll Pen & Bic Mark-Its (I need to find the fine point ones) for the pen stitching & hair
This was a really simple card, not too much embellishing, but right to the point.  I really hope Robyn likes it & I just love that cart!!!!!!
Thanks Robyn!!!!!!

Thanks for looking. Questions & comments are always welcomed. Lori

Tuesday, November 30, 2010

"J" Jordyn & "J" Jaslynn Letters for Twins

My cousin wanted a set of letters for some twins that were born recently.  Their room is done in Tinkerbell colors.  These are the designs that I came up with.
Jordyn:
Jaslynn:
Thanks for looking. Questions & comments are always welcomed. Lori

More Gift Card Holders

These are some more gift card holders that I had made.  The image on the front is adhered with Pop-Dots to the lower part of the holder.  The image holds down the top flap of the holder.
My aunt wanted some for the gift cards she is giving to all of the kids in the family.
Single Pocket Gift Card Holders:
Double Pocket Gift Card Holders:
The assembly for these is the same as the ones above.  The only thing different is that I folded an envelope in half, adhered the halves together, cut off the top edges of the envie (to make pockets).  Then adhered the envie inside the holder.
Thanks for looking. Questions & comments are always welcomed. Lori

Thursday, November 18, 2010

Owl B-Day Card

I made this card for a very special little girl that is turning 11 today.  Her name is Kennedy & she is the daughter of a very good friend of ours.  When I did the craft fair in September, she had told me that she loved owls.  So when I found out that her today was her b-day I had to make her an owl b-day card.
I used my Gypsy and Cricut to design & created this card.
Owl - Hoot & Hollar Cart (Lite)
Sentiment - Smiley Cards
Cuttlebug with the Polka Dots Embossing Folder for the background.
Thanks for looking. Questions & comments are always welcomed. Lori

Tuesday, November 16, 2010

4x4 Christmas Notecard Set

This is one card from a set of 12.  My friend's mother wanted a set of Thank You cards.  She is part of  birthday swap at her work.  Since her birthday in Dec. 23rd, she wanted her Thank You's to be Christmas themed.  The inside is stamped with the sentiment:  Thank You for the Gift.

Here it is with packed in the cello bag with matching topper.

I used my Gypsy and Cricut to design & create this project.
The gingerbread man was cut from the Just Because Cart.
Faux stitching was added around the card & gingerbread man.
Glossy Accents was added to the buttons & icing trim.
Thanks for looking. Questions & comments are always welcomed. Lori

Christmas Gift Card / Money Holders

Here a couple of  Christmas Gift Card / Money Holders that I am making this year.
The tabs that hold down the flap are adhered to the bottom with dimensional adhesive.
Tag shape & snowflake were cut from the Winter Woodland Cart.  The Tree was cut from the Christmas Cheer Cart.  The snowflake & tree top were glittered using Martha Stewart Fine Glitter.  On the inside flap I used a 1 inch circle punch to cut out a 1/2 circle notch for ease in removing the gift card or money.
I used my Gypsy and Cricut to design & create these projects.
 

Thanks for looking. Questions & comments are always welcomed. Lori

Monday, November 15, 2010

"R" Ryleigh & "R" Reed

This set of letters were made for some friends with twins.  They are fraternal twins, a boy & a girl.  The green was added to both letters to tie in the room color, since they share a room.
Ryleigh:  Pink & Sage Green, Girly
Reed:  Blue & Sage Green, Variety of Sports
I used my Gypsy and Cricut to design & create these projects.
Thanks for looking. Questions & comments are always welcomed. Lori

Hannah's Skate Party Invitations

I made these invitations from a very good friend's daughter.  Not to mention Hannah is one of my daughter's very best friends.  When they said that she was having a skate party, I immediately knew I wanted to make the invitations.
I did not have a cartridge with a decent skate on it so I put my Gypsy to work.  I used the hockey skate from the Sports Mania cart.  I hid contours & cut off some pieces.  I added circles from the George & Basic Shapes cart for the wheels.  I welded the circles to the hockey skate to make the shadow & base layers.  Then paper pieced the top layers together.  I adhered the skate with pop dots to give it some dimension.  The graffiti style "skate" word came from the Dude (Lite) cart.
Thanks for looking. Questions & comments are always welcomed. Lori

Thursday, November 11, 2010

Saints Themed Wreath

This wreath was made for a new baby that will be here soon.  The room is done is a sports theme & the parents are huge Saints fans.  This will, I'm sure hang in Austin's room for a long time to come.
I used my Gypsy & Cricut to design & create this project.
Carts Used:
Sports Mania - Football
Accent Essentials - Fleur de lis
Everyday Paper Dolls - Football Player
Varsity Letter (Lite) - Name,Saints & 9 (name & saints welded on Gypsy)
Disney Pooh Font Set - WhoDat (welded in gypsy)
All pieces (attached to the outside of the wreath) were cut from 140 lb. watercolor paper, painted with acrylic paint & sealed with Krylon Preserve It.
The center pieces were cut from cardstock & adhered to the back of the wreath.
Thanks for looking. Questions & comments are always welcomed. Lori

Personalized Composition Notebook "Fallyn"

This was one of the altered composition notebooks that I had for my craft fair.  One of my friends really wanted it, but decided to wait on it.  Her daughter, 7 yrs old, loves to write.  She wanted it for her to write her stories in & to have for her own personal use, writings that she could keep to herself.  I guess she wants it to be like a personal journal or diary for her.  So since I knew she wanted it, I personalized it with her name & some butterflies.  I am giving it to her as a gift.
I welded the letters & butterflies together using my Gypsy.
The butterflies are from the Lacy Labels (Lite) cartridge.
The letters for the name are from the Lyrical Letters Cartridge.
I also cut duplicate butterflies (in pink), pan them through my Cuttlebug with the polka Dots Embossing Folder, & inked the edges w/ purple ink.  They are adhered down only on the body portion so that the wings are dimensional.  I also cut off the antennae of the pink butterflies.  This lets the purple show & less to have to line up.
Thanks for looking. Questions & comments are always welcomed. Lori

Wednesday, November 10, 2010

"P" Letter for Patricia (Mickey Mouse)

I made this one for my friend's aunt.  She just loves Mickey Mouse.
Instructions:
1)  White wooden letter -painted with acrylic paint, stamped with stars, sealed with Krylon Preserve It
2)  Mickey Font Cartridge for the name.  I used my Gypsy to weld the shadow & top layer letters & layered
them.
3)  Mickey and Friends Cartridge for all of the images.  I use my Gypsy to size all of the pieces to make sure they will fit nicely on the letter.
4)  I seal each image (after being assembled) with the Krylon Preserve It, Then adhere all pieces to the letter.
This is the same process for all letters that I make.  The only thing that might be different is if the letters are not welded.
Thanks for looking. Questions & comments are always welcomed. Lori

Monday, November 8, 2010

"B" Braden, "G" Gia, "G" Gabriella, & Wreath "Haskel Eugene"

"B" Braden:  This one is for a friend's son.  His school & favorite NFL team's colors are Black & Gold.  Favorite team (Fleur de Lis), School Mascot (Yellow Jackets) & H, he plays football, basketball, and swims.
"G" Gia:  This one is for my friend's niece.  Pink & Purple with a girly theme.
"G" Gabriella:  This one is for another friend's niece.  She had seen another letter that I had done that was very similar to this one.  Pink & Purple with butterflies.
"Haskel Eugene" Baby Boy Wreath:  This one is for my friend's niece that is having a baby boy.
If anyone has questions about the cartridges or techniques used on any of these projects, please leave a comment.  I will look up & try to remember any information that I can.
Thanks for looking. Questions & comments are always welcomed. Lori

I'm Back in the Blog Posting World & Craft Fair Pics!!!

OK, so it's been a while.  I 've had some drama in my life for the past month & a half.  I found the cable for my camera so now I can post pics of the projects that I have been working on again.  Some of the projects I don't have pics for, but what I do have I will be posting.
I want to start with the pics from my first Craft Fair.  This was back in September.  But for those of you that have still been stopping by  - you know that my dad passed away the very same weekend as my craft fair.  Then I lost my camera cable.  So anyway - here are those pics.  Sorry for the quality.

Thanks for looking. Questions & comments are always welcomed. Lori

Friday, October 15, 2010

Ready To Start Posting Again

Well, I'm ready.  Feeling a little back to myself.  But now I have just one problem.  I can't find the USB cable for my camera so that I can upload pics.  So, I guess it will be a little more time.
Lori

Thanks for looking. Questions & comments are always welcomed. Lori

Friday, October 8, 2010

Update - Unusual Post

I would like to start out by saying that this is a very unusual post for me.  I rarely, if ever post anything personal on my blog.

I just want to apologize for not being here for a while & it may take a little longer for me to get back.
I'm sorry to those that have been wanting to see & hear about my first craft fair.  Well it went absolutely great.  I think I did well for my first one & I even received a call inviting me to another one in November.  I will post pics from my craft fair when I am back to myself.

Here is the personal side of this post & explanation as to why I have been absent.

My craft fair was on Sat. 9/25.  Then in the middle of the night Sunday 9/26 / Monday 9/27, my dad passed away very suddenly.  I have been there for my mother and now just have to take some time to myself to get back to being me.
Thanks for understanding.

Thanks for looking. Questions & comments are always welcomed. Lori

Thursday, September 9, 2010

My Cricut Cartridges Updated Page

On my "My Cricut Cartridges" Page, I have listed all of the carts that I own.  For each cart there is a link to the handbook or sample pics of that particulat cart.
Some of the links have not been working so I went in & fixed the ones that were not.  They should all be working well now.
I hope this is a great help for looking for specific images or just to see what might be on a certain cart.

Thanks for looking. Questions & comments are always welcomed. Lori

Craft Fair Update & Inventory Status

Well the first craft fair that I was scheduled for was cancelled.  They are sending out a letter, but I'm hoping that it will be re-scheduled.  This does open up a little free crafting time though - which is greatly needed.  It also means that my inventory can be used for the 1 big craft fair that i do have going on.  It is a little bit of a relief.
Inventory is coming along.  But, as I have never done this before - I'm not sure how much to bring.  Since my projects are fairly small, it still looks like I don't have much.  So, I keep on working to make more.  I still have to organize it all into categories to see exactly what I have.  Hopefully this weekend that will get done.  I want to post pics of what I have done too.  Hopefully I'll get some feedback as to what is going right & what I might need to change or add.
Thanks for reading my rambling today!!!

Thanks for looking. Questions & comments are always welcomed. Lori

Monday, August 23, 2010

Giftbag & Wall Letter "H" for Harrison

My nephew just turned 8 & loves dinosaurs.  I made his wall letter for him & this gift bag.
Details:
I used my Gypsy & Cricut to design & create this letter.
Dino on gift bag is from Create A Critter.
Happy Birthday is from Stamping.
Harrison is from Robotz.
All dinos on the letter are from Paper Doll Dress Up.
Letter & all pieces are sealed with Krylon Preserve It.
Thanks for looking. Questions & comments are always welcomed. Lori

Tuesday, August 17, 2010

"M" Wall Letter Saints Themed

My cousin needed a present for a little girl turning 2.  Her parents are huge Saints fans.  So she wanted me to make a letter with Saints colors & theme.  This is what came of that idea.  My cousin loved it & said that parents would too.
Details:
I used my Gypsy & Cricut to design & create this letter.
White Wooden Letter for Hobby Lobby - I painted it with black acrylic paint, painted the edges & "sponge" painted (using a crumpled up plastic bag) the front with gold acrylic paint.
All of the embellishments were cut from water color paper & painted with acrylic paint.
"Morgan" - Micky Mouse Font Cart.
"N.O. SAINTS" - Varsity Cart
Football - Sports Mania Cart & run through the Cuttlebug using the Swiss Dots Embossing Folder
Fleur de Lis - ? Cart  (I have to check my G - don't have it with me)
"Who Dat" - ? Cart (I have to check my G - don't have it with me)
The letter & all pieces were sealed with Krylon Preserve It.
Thanks for looking. Questions & comments are always welcomed. Lori

Friday, August 13, 2010

Jungle (Safari) Picture Frame

I am making some of these frames for my craft fair.  But a friend of mine told me that her neighbor was having a baby boy in the very near future.  The bedding for the room is Safari (Jungle) themed.  So I made this frame for her to give to the new parents.  I love the way it came out.
Details:
I used my Gypsy & Cricut to design & create this frame.
I painted the frame a light blue with acrylic paint.
The animals are all from the Create A Critter Cartridge.
The leaves are from the Life Is A Beach Cartridge.

Thanks for looking. Questions & comments are always welcomed. Lori

Circus Frame

I made this frame for my Godson's (nephew) 1st birthday.  This is only the 2nd scene frame that I have done, but I am really enjoying it.
Details:
I used my Gypsy & Cricut to design & create this piece.
All of the images came from the Carousel (Lite) Cartridge.
For the background I tore up pieces of cardstock, ran them through my cuttlebug (browns - Swiss Dots) (blues - Devine Swirls).  I also inked around all of the ripped up pieces.  The browns are to represent the dirt ground at the circus & the blues the sky.

Thanks for looking. Questions & comments are always welcomed. Lori

Monday, August 2, 2010

Slow Posting for a While

I will not be posting much for a while.  I am getting ready for a craft fair in September & have A LOT of inventory to get together.  Actually there might be 2 craft fairs. One is fairly small & I might just take orders (not sure yet).  The other is a big rather popular craft fair.  They are both in September & only a week apart.  I do have some things that I am also making for some friends, so I might be able to get some of that posted, but it won't be much.  I just wish I had a lot of vacation time to get some of this done.  I'm starting to stress.  I only have a little over 7 weeks to go for the bigger craft fair.  Wish me luck!!!!
Thanks for looking. Questions & comments are always welcomed. Lori

Monday, July 26, 2010

"G" Gracie

What I had to go on for this one was:  Pink, Purple, Girly, & Butterflies.  So here it is:
Details:
I used my Gypsy & Cricut to design the letter.
I painted the letter then stamped butterflies & flowers w/ acrylic paint to make a background.
Cartridges used:  A Child's Year (Name), Graphically Speaking (Butterfly - lower left), Tinkerbell & Friends (Butterflies - 2 on the right)
It's hard to see in the pic, but there are 2 layers of the name.  The lower layer is purple & the top is pink.  They are just a little off set.  I used my Cuttlebug w/ an embossing folder for the pink layer of the name.  I also added some pink & purple rhinestones at the top & bottom for some extra sparkle & accents. All pieces & the letter is sealed with Krylon Preserve It.
Thanks for looking. Questions & comments are always welcomed. Lori

Friday, July 23, 2010

Wall Letter: E - Elise

Here's yet another wall letter.  This one is for a little girl that is 8 years old.  She likes soccer, dogs, & butterflies.  Her room is a peachy color.  This is the letter that I came up with to represent her.  Sorry the pic doesn't show some of the detail.  I used water colors to tint the flowers & give them some shading & dimension.  I also added some Glossy Accents and MS Fine Crystal Glitter to the edges of the flowers to make them look dewey & sparkle.  Also the eyes on the dogs are glossy too (the dalmatian's don't even show up in the pic).
Details:
Cartridges Used:  Accent Essentials & George & Basic Shapes (Flowers), George & Basic Shapes (Name), Everyday Paper Dolls (Grass & Brown Dog), Create A Critter (Dalmatian & Butterflies), & Sports Mania (Soccer Ball)

Thanks for looking. Questions & comments are always welcomed. Lori