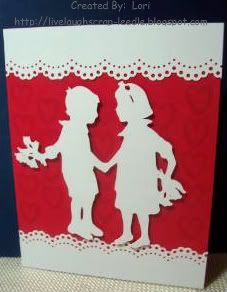
Followers, Guestbook, & Comments

My followers are being shown in the right column. My Guestbook is at the bottom. Please follow, comment on posts, & sign my guest book. Your comments encourage me to keep sharing my work. I love hearing from you all.

When you leave a comment, I have to moderate it before it will be posted. So if you have a questions or comments, feel free to ask & if necessary note that you don't want your comment posted.

Monday, May 31, 2010

Cricut Cut Swap from Joyce (1fotojoy)

Here is what Joyce (1fotojoy) sent to me for our Swap.  I just love all of it.  She sent sooooo much.
This is the card that she sent me.  I just love how she made the note card actually flip open.  So So Cute!!!!  Thanks so much Joyce.  I would love to keep in touch with you and definitely would love to swap again with you 1 on 1.  If you ever need anything don't hesitate to ask.
 Sentimentals:
 Love Struck:
 
 Stand and Salute:
 Mother's Day 2010:
 And she even sent the scraps left over and negative cuts.
 
This was such a great swap.  Again a big Thanks to Momo for hosting it.  I had a wonderful partner with Joyce, so a huge Thanks to her too.  I love all of the cuts that you sent.  I can't wait to Make Some Time to play with them.
Thanks for looking. Questions & comments are always welcomed. Lori

Cricut Cut Swap for Joyce (1fotojoy) on YouTube

Momo from MadeByMomo hosted a Cricut Cut Swap. I was lucky enough to get in it. I was paired up with Joyce (1fotojoy) on YouTube. This is what I am sending her. Now, these pics aren't very exciting to see, but let me explain. Joyce is very talented - check out her YouTube channel to see for yourself. The cuts that she wanted, she wanted left plain & cut in either white, black, manila, brown or grey. she is going to decorate & embellish them to fit the projects she will be using them on. So I made multiples of all of the cuts. I do have some extras that I don't have pics of yet.

Joyce I am so sorry that these are getting to you a little late (explained in my email). Since they cannot go out into the mail until tomorrow due to the holiday I am making some extras for you too. I also have a surprise for you, SO IF YOU DON'T WANT A SPOILER - LOOK NO FURTHER!!!!!!!
Here are the cuts that I have pics of for her.


HERE IS HER SURPRISE:
It is a sign for her craft room (space). I really hope she likes it. I had a ton of fun making it. The pic is OK, but it truly does look so much better in person. I can't wait for her to see it.
Here is the tag that I made for her too. I just wrote a note on the back for her.
Special thanks to Momo for hosting such a fun swap. I also want to thank Kathy Orta YouTube & Paper Phenomenon for THIS tutorial. I just had a ball making these roses. I cut mine at 1", 1 1/2", & 2". I will show close ups in a later post.
To see what everyone is making for this swap click on the title of this post.
Thanks for looking. Questions & comments are always welcomed. Lori

Friday, May 21, 2010

Bookmark Challenge @ PDE

I made this bookmark for the Challenge #2 at Pause Dream Enjoy. We had to make a bookmark - any theme, color, style, or medium. I used the little deer on the Create A Critter Cart. At my daughter's school, D.E.A.R stands for Drop Everything And Read. This is what they call their in class reading time. So I used the little deer as a play on that acronym.
Thanks for looking. Questions & comments are always welcomed. Lori

Challenge to Use 5 Buttons

I love buttons.  Who would have thought this would be a challenge.  But, boy was it! The card turned out OK, it was fun to make, but still not sure I'm satisfied though.  I made this card for Challenge #6 at Craft Your Passions.
Thanks for looking. Questions & comments are always welcomed. Lori

Monochromatic Card Challenge

I don't usually do monochromatic, so this was truly a challenge.  I do like how it turned out though.  I made this card for the Monochromatic Challenge at Kaboodle Doodles.  I also found a tutorial on how to make your own photo corners.  I made mine kind of plain, but you can do them up a little fancier.  Thanks Lorraine for the tutorial.  You can check it out HERE.
Thanks for looking. Questions & comments are always welcomed. Lori

Patterned Paper Challenge

This card was made for the Patterned Paper Challenge at Practical Scrappers.  I used Tinkerbell and Friends for the flower and the sentiment.  The patterned paper that I used was a challenge to find something to do with it.
Thanks for looking. Questions & comments are always welcomed. Lori

3D Project Using Black

Yet another Teacher Appreciation Week gift.  I made this for Challenge Me Monday #10 at Fantabulous Cricut.  The challenge was to make something that is 3D and to use the color black.  Oh, and it is filled with covered Hershey's Nuggets.  So here is my entry:

Front View:

 Side View:
Thanks for looking. Questions & comments are always welcomed. Lori

Something Round & Recycle, Renew, Reuse

I made this for my daughter's teacher for Teacher Appreciation Week.  It fit for 2 challenges.  They are:
Practical Scrappers May Monthly Challenge - Recycle, Renew, Reuse and Cute and Some - Showcase #7.
For the monthly Challenge at Practical Scrappers we had to recycle something.  I used an old spool from some ribbon.  For the Showcase #7 for Cute and Some we had to use something round.  So this fit the bill on both challenges.
Side 1:
Side 2:
Thanks for looking. Questions & comments are always welcomed. Lori

1 Card - 2 Challenges

I made this card for 2 challenges.  They are:
Laura's Sketch #52 on 2 Sketches 4 You and for the May MCPT on the Cricut MB

Thanks for looking. Questions & comments are always welcomed. Lori

Tuesday, May 18, 2010

Happy Birthday Giftcard Holder Card

My husband's birthday was this past Friday.  This is his card.  I want to thank Yoliebean and Momo for this idea.  I am always looking for new giftcard holder ideas and this one is perfectYolie, my daughter loves the saying "There are no mistakes in crafting, only chances to embellish."  Well girlie, you definitely showed us how to make something from a "happy little accident".  Momo, thanks for making a video on this & showing your take on this project.  Here is mine.
When I saw this patterned paper the saying just popped into my head.  And look the giftcard even matches - LOL.  So, I typed it up on the computer & printed it out on cardstock, trimmed it up & adhered it to the card.
Front:
Inside:
Thanks for looking. Questions & comments are always welcomed. Lori

Kindergarten Teacher Wall Letter

A friend of mine wanted a special "End of School Year' gift for her daughter's Kindergarten teacher.  So she asked me to make one.  The school colors are dark green and red.  This is the final result.
Lisa, thank you and I hope she likes it.
Details:
Carts, A Child's Year, Locker Talk, and Pooh Font Set
Everything is sized to fit the letter by using my Gypsy and is cut with my Cricut.
I used Liquid Embossing on almost all of the pieces.
The letter is painted with acrylic paint & sealed with Krylon Preserve It.
All of the cardstock pieces are also sealed with Krylon Preserve It.
Thanks for looking. Questions & comments are always welcomed. Lori

Teacher Appreciation Week Day 1

I made this card for my daughter to give to her teacher. This is the first card I have done using the Just Because Cards Cart. I used my Gypsy to size & cut all of the pieces including the envie (not pictured). The largest size that the envie would fit on a 12x12 mat was 6 1/2" (I think). So all pieces were cut @ 6 1/2". I honestly think the sentiment could have been a little smaller. But, I do like how the card turned out and her teacher loved it. We also sent her the apple paperclip bookmark, see HERE. I used the Cuttlebug w/ the Swiss Dots Embossing Folder for the "EWE" and the Divine Swirls Embossing Folder for the sheep's fur (debossed). I them Pop dotted the sheep to the card.

Thanks for looking. Questions & comments are always welcomed.Lori

Terrier Card: Paper Cutz Challenge #41

I made this card for Challenge # 41 over at Paper Cutz. We had a little Yorkshire Terrier for just over 15 years. She passed away this past January. When I came across this challenge & saw this little terrier on the Create A Critter Cart. I just knew this was the image I was going to use.
Details:
Create A critter cart for the terrier & Ruff
Pop dotted the dog to the front
Cuttlebug w/ Herringbone Embossing Folder on the words
Heat Embossed the words with UTEE.
Inked & doodled on the edges of the card.
Added ribbon with a knot
Thanks for looking. Questions & comments are always welcomed. Lori

Thursday, May 13, 2010

Paper Cutz Challenge # 40: Zoo Animal

This shape card was done for Challenge #40 over at the Paper Cutz Challenge Blog.  The challenge was to make something (anything) for a child's birthday using a zoo animal.  I'm not sure if everyone has Koala Bears in their zoos, but we do.
I had this card made in my Gypsy, but had never cut it.  Thanks Mary for this challenge.  It gave me a reason to do this card.  Inside is stamped "Happy Birthday" with a Heidi Swap stamp.  I don't know why I made her blue, other than I just wanted her a little different.  I'm happy with how she turned out.
Details:
Designed & welded using my Gypsy.
Create A Critter Cart.
Glitter Glue for some sparkle & dimension
.gypsy File
Thanks for looking. Questions & comments are always welcomed. Lori

Cricut Cardz Challenge #24: 3 Circles

Cricut Cardz Challenge Blog is having it's 24th Challenge.  This challenge is to make a card using 3 circles.  Anything else goes.  This was super fun, but it was a challenge for my anyway.  This is why we have a winter card in May - LOL.  So this is what I came up with.
Details:
George & Basic Shapes Cart. for the circles
Winter Woodland Cart for the trees
Studio G stamp for the sentiment
Cuttlebug w/ Divine Swirls Embossing Folder on the cirlces

Thanks for looking. Questions & comments are always welcomed. Lori

Cuttlebug Challenge: A Child at Heart

I made this card for the Cuttlebug Challenge Blog. This challenge is A Child at Heart. We were to make a card for a child in our life.
This challenge was in perfect timing for me. It is for my daughter. She is 9 years old & we have been having some power struggles lately. (Those with daughters - I'm sure you know what I mean - at any age.) So, I made this card & wrote a personal note to her inside. Basically, just to tell her that she is unconditionally loved.
Details:
Butterfly - Graphically Speaking Cricut Cart.
Stamp - From Michael's $1 Bin
Pearl Ex on the butterfly (not showing well in the pic)
Fiskar's Wavy Crimper (Joann's clearance for $2.97) Yay me!! I never find those deals!!!


Thanks for looking. Questions & comments are always welcomed.Lori

Pause Dream Enjoy: ATC Challenge

This is the 1st ATC that I have ever made. I made it for the 1st ATC challenge over at the Pause Dream Enjoy Blog. An ATC (Artist Trading Card) has to be 2 1/2" x 3 1/2" in size. ATCs are not sold. They are traded amongst other artists. They are generally limited in number by style. For example, if you make 50 of one style they would be numbered 1 of 50, 2 of 50, & on. You usually put some kind of info about yourself on the back. This info will vary among artists. I would put my name, my blog address, the month & year that I made them, # of cards, and if made for a particular convention, meeting, or swap - the name of that convention, meeting, or swap.
For this challenge anything goes. Other than size it could be decorated in any theme, style, or medium of our choice.
I used an idea that I got from Momo. I didn't realize that I didn't use any cricut on this until I went to post it.
I had fun with this challenge. I think it cam out good for my 1st one. But, I hope to get better with the more that I make. It was quick, easy & a great way to use up scraps.
Details:
Martha Stewart Doily Punch, Ribbon, Studio G Stamp
Thanks for looking. Questions & comments are always welcomed. Lori

Wednesday, May 12, 2010

Practical Scrappers Challenge: Punches

This card was made for the Practical Scrappers Challenge Blog. This challenge was to use punches of any kind on your project, you can check it out HERE.
I used my new, A Child's Year Cart., that I got for Mother's Day for this card. The punch that i used was the Martha Stewart Doily Punch. I used it to make a border along the top & bottom of the cart. Thinking the background was a little plain, I added some heart stamps (Studio G) to make a pattern on the background.
Thanks for looking. Questions & comments are always welcomed.Lori

PTW Challenge: Shiny, Sparkly, & Special

This card was made for the Papertake Weekly Challenge Blog. you can find this particular challenge HERE. The challenge was to add something shiny &/or sparkly to your project. it could be metal, gems, glitter, or whatever you want to use. Your project can be in any medium or form.
For this card I used my Gypsy with the Gypsy Wanderings Cart. I used my Cuttlebug with the Divine Swirls Embossing Folder on the background piece. In the center of the flower I added iridescent glitter glue. To add a little dimension & "something else", I wrapped some ribbon around the background paper.
Thanks for looking. Questions & comments are always welcomed.Lori

Made By Momo Challenge #3: Child or Teen B-Day Card

I made this card for the #3 Challenge on Momo's Blog.  The challenge is to make a child or teen's birthday card.  Thank You Momo for this challenge.  It was super fun!!!!
I had recently gotten the Robotz Cricut Cart. and thought this would be the perfect project to use it on.  I stepped out of my comfort zone with the patterned paper a bit.  Other than the red cardstock all of the paper is patterned (even the green - it is a light pattern).  Also let me tell you, this cart is perfect for using up scraps.  This robot was cut at 3.5", but there are so many tiny pieces that you can use up so many small scraps making robots.  I LOVE THIS CART!!!!!  I can see plenty of robot bookmarks & cards in my future.
Thanks for looking. Questions & comments are always welcomed. Lori

Monday, May 10, 2010

FRIENDS Wordbook - A Work In Progress

This project is a work in progress. I don't usually post about unfinished work. But Cute and Some is having its Contributors Showcase #6 this week. The guidelines for the projects are: It can be any type of project. It just has to have the colors green, or purple, or both and include a flower. When I read this, I knew I had to enter this project even if unfinished.
I am making this for my niece that is turning 13 at the end of this month. Her favorite colors are green & purple.
Cover:


Pg. 1:


Pg. 2:


I will post again about this when I have the entire book finished with details (well the details that I can remember anyway).
.gypsy File (pages only not embelishments)
Thanks for looking. Questions & comments are always welcomed. Lori

Thursday, May 6, 2010

.gypsy Files

My files are very simple, but they are all sized proportionally to fit. I have added the some of them to the left sidebar of my blog. Just look for the header My .gypsy Files. I will add more as they are tested & cut correctly.

Thanks for looking. Questions & comments are always welcomed.Lori

Locker Talk - 8th Gr. Graduation Card

I made this card for one of my son's best friends. They went to school together from Kindergarten through 5th grade when my son moved on to another school. If my son had stayed at this school, this would be his graduating class. This will be an emotional night, seeing most of the kids that we have known since they were 5, graduating 8th grade.
Details:
Cartridges Used: Locker Talk, Pooh Font, & Wild Card
Thanks for looking. Questions & comments are always welcomed. Lori

Happy Mother's Day - Flower Pot Slider

I started out making this as a shape card w/ the flowers sliding out. I had made a cupcake slider (on a base) & I liked this for the flowerpot too. I find that it helps me to keep from putting the flowers up too high, (I want it to fit into a regular envie.) & this keeps them within the correct frame.
These 2 cards are for my mom & grandmother. I am also entering this into Tracy's (Craft Junkie Too) Mother's Day Post and Cuttlebug Spot Challenge #4. So click on over HERE to check out every one's projects.
Details:
Gypsy to design & cut w/ Cricut
Flowerpot is from Walk In My Garden (blackout, welded at the bottom & edges glued) Flowerpot pieces were also cut in patterned paper & layered to the front of the blackout pot. The rim was embossed using the Cuttlebug & Floral Screen & Paisley folders.
Tag was cut using the Tags, Bags, Boxes, & More cart.
The slider & base were cut from George & Basic Shapes cart.
Flowers are from Sweet Treats, Accent Essentials, & Forever Young carts. They were made using the wet & scrunch method. I then painted them with a mixture of Pearl Ex, Gum Arabic, & water.
Inked all edges & embossed pieces before assembling. Added tag with ribbon tied around one of the flowers.
.gypsy File
Thanks for looking. Questions & comments are always welcomed. Lori