Followers, Guestbook, & Comments

My followers are being shown in the right column. My Guestbook is at the bottom. Please follow, comment on posts, & sign my guest book. Your comments encourage me to keep sharing my work. I love hearing from you all.

When you leave a comment, I have to moderate it before it will be posted. So if you have a questions or comments, feel free to ask & if necessary note that you don't want your comment posted.
Showing posts with label UTEE. Show all posts

Monday, June 28, 2010

Embossed Tag

I made this tag for the Embossed Tags Challenge at the Cuttlebug Spot.
Details:
Cartridges Used:  Tags, Bags, Boxes & More (Tag), Celebrations (Gift), George & Basic Shapes & Accent Essentials (Mini Faux Prima Roses)
Cuttlebug using Fiskars Texture Plates (Lace)
Heat embossed the gift using UTEE.
Thanks for looking. Questions & comments are always welcomed. Lori

Tuesday, May 18, 2010

Terrier Card: Paper Cutz Challenge #41

I made this card for Challenge # 41 over at Paper Cutz. We had a little Yorkshire Terrier for just over 15 years. She passed away this past January. When I came across this challenge & saw this little terrier on the Create A Critter Cart. I just knew this was the image I was going to use.
Details:
Create A critter cart for the terrier & Ruff
Pop dotted the dog to the front
Cuttlebug w/ Herringbone Embossing Folder on the words
Heat Embossed the words with UTEE.
Inked & doodled on the edges of the card.
Added ribbon with a knot
Thanks for looking. Questions & comments are always welcomed. Lori

Tuesday, March 2, 2010

Vintage Buttons & Butterflies Tag

This is the first decorative tag that I have made. I love the way it came out.
I have to thank so many people for the inspiration they have give me. Here are some of them - I am giving their YouTube links. I hope you find them as inspiring as I do.
yoliebean, LiveLoveScrap, mybutterflykisses12, roxyfur, timholtz, there are so many more and I know I will find many more in the future.
Details:
Plantin Schoolbook Cricut Cart. for the Tag
Tsukineko Walnut Stains (Spray)
Martha Stewart Butterfly Stamps
Staz-On Ink
Twine and Hemp Cording
Tim Holtz Distress Inks (Worn Lipstick & Weathered Wood)
Heat Embossed a mixture of UTEE and Iridescent glitter to the 3D Butterfly
Misc. grommet & old buttons from a can my mom gave me.

Thanks for looking. Questions & comments are always welcomed.
Lori

Wednesday, November 11, 2009

Christmas Ornaments

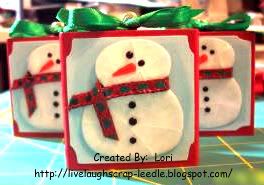
I made 10 of these ornaments for Christmas presents this year. I can see myself making many more in different designs. I had so much fun with these, I just want to keep going.

For the base I used wooden blocks that rubber stamps had been unmounted from. Thanks Kelly Scott from the Cricut MB for all of the blocks that yo did not want. Anyone else that wants to get rid of any of them, please let me know!!

I painted the blocks with acrylic paint. I screwed in the eye screws to the top of the block.
The front & back panels were cut from the Stretch Your Imagination Cart. I inked the light blue paper with white pigment ink to soften it a bit.
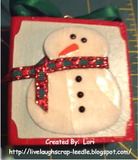
The snowmen were cut from the Doodle Charms Cart in blackout. I gave the snowmen a little dimension by edging them with light blue and white chalk. I attached the carrot noses. Using a Versamark pad, UTEE, and my heat gun I embossed the snowmen. This gave them a glass-like appearance. I then bent them to make them look like cracked ice. After all of this was set, I used black Liquid Embossing to dot on the eyes and buttons. The Liquid Embossing is shiny and raised giving even more dimension. I attached a ribbon "scarf" around each of the snowmen's necks. Thanks Tracy (Craft Junkie Too) for that idea.
I lightly painted Mod Podge onto the face of the block and the back of the blue panel & attached. When all of them were set, I added another light coat of Mod Podge and to the back of the snowmen and attached.


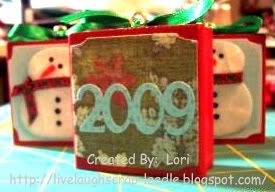
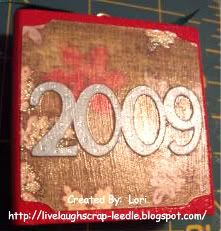
The 2009 is cut from the Alphalicious Cart. I used CDS to weld the numbers together. I attached the 2009 to the panel. Then used the same process as above to attach the panels to the blocks.
I then just tied a ribbon bow the the top of the block around the eye screw. I added a little drop of Glossy dimensions under the knot of the bow to make sure it stayed in place. (I am not the best decorative bow tying person .- LOL)

Here is a closer up view of the snowmen to show the crackled ice look. Not sure if it is showing up to good though.

And this is a close up of the back side. After the last layer of Mod Podge dried, I added some dots on the 2009 with a blue glitter pen. Again not sure if this is showing up to good in the pic.

Thanks for looking. Questions & comments are always welcomed.
Lori

Monday, October 13, 2008

Kids' Birthday Cards

I made this card for my niece's 7th Birthday. I made a flat card & put her birthday message on the back. I made it into a doorhanger & hung it on the handle of her gift bag. She absolutely loved it & so did the rest of the girls at the party.
Details:
The name & frame were cut out as one piece. Then I cut the name in purple & layered it.
Cricut Design Studio to size & weld the name & the frame
Tear Drop for the name
Stetch Your Imagination for the frame - blue flowers were cut from the corners of the frame
George & Basic Shapes for the purple flowers
Ultra Thick Embossing Enamel with a heat gun was used on the flowers then layered
Crop-A-Dile for setting the Making Memories Eyelets
Misc. Ribbon was used for the hanger

This card was made for the son of some very good friend's. It was for his 5th birthday.

Details:

The name & frame again was ust all in one piece. Then I cut the name in red & layered it.

Cricut Design Studio to size & weld the name & frame

Opposites Attract for the name

Stretch Your Imagination for the frame

Misc. Ribbon

Thanks for looking. Comments & questions always welcomed.

Lori

Proud member of The Lime Light design team.