Followers, Guestbook, & Comments

My followers are being shown in the right column. My Guestbook is at the bottom. Please follow, comment on posts, & sign my guest book. Your comments encourage me to keep sharing my work. I love hearing from you all.

When you leave a comment, I have to moderate it before it will be posted. So if you have a questions or comments, feel free to ask & if necessary note that you don't want your comment posted.
Showing posts with label Faux Stitching. Show all posts

Tuesday, November 16, 2010

4x4 Christmas Notecard Set

This is one card from a set of 12.  My friend's mother wanted a set of Thank You cards.  She is part of  birthday swap at her work.  Since her birthday in Dec. 23rd, she wanted her Thank You's to be Christmas themed.  The inside is stamped with the sentiment:  Thank You for the Gift.

Here it is with packed in the cello bag with matching topper.
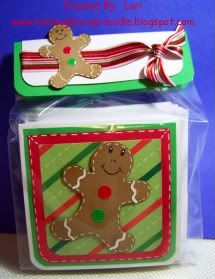
I used my Gypsy and Cricut to design & create this project.
The gingerbread man was cut from the Just Because Cart.
Faux stitching was added around the card & gingerbread man.
Glossy Accents was added to the buttons & icing trim.
Thanks for looking. Questions & comments are always welcomed. Lori

Monday, November 15, 2010

Hannah's Skate Party Invitations

I made these invitations from a very good friend's daughter.  Not to mention Hannah is one of my daughter's very best friends.  When they said that she was having a skate party, I immediately knew I wanted to make the invitations.
I did not have a cartridge with a decent skate on it so I put my Gypsy to work.  I used the hockey skate from the Sports Mania cart.  I hid contours & cut off some pieces.  I added circles from the George & Basic Shapes cart for the wheels.  I welded the circles to the hockey skate to make the shadow & base layers.  Then paper pieced the top layers together.  I adhered the skate with pop dots to give it some dimension.  The graffiti style "skate" word came from the Dude (Lite) cart.
Thanks for looking. Questions & comments are always welcomed. Lori
Tuesday, July 20, 2010

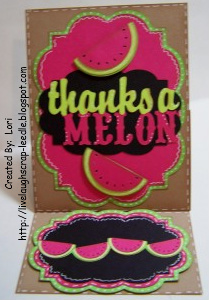
Just Because Cards: Thanks A Melon

I made this card for my daughter's principle.  I wanted to give her a thank you card for all of her help.
This is a pedestal or easel card.
You start with a piece of cardstock that is 4.25 x 11.  Score it at 2 3/4 & 5.5.  Then have some coordinating (or the same) cardstock that measures 4.25 x 5.5.  Fold the larger piece of cardstock in half - this is your card base.  Adhere the smaller cardstock to the front of the larger folded piece (it should have the score line at 2 3/4. Now fold up the front & you will see how it will stand up.  You will have to add something to the bottom piece to hold the card up.  See below:
Details:
I used my Gypsy and Cricut to design & create this card.  The only cart that was used on this card was Just Because Cards Cartridge.  I inked everything and added doodling, faux stitching, & dots with my white gel pen.  For the bottom piece I welded the 4 watermelon bases together then layered the other pieces.
Thanks for looking. Questions & comments are always welcomed. Lori

Friday, July 2, 2010

Set of 3 Tags: Ahoy Matey!!

This set of tags would be great for a baby boy's shower to birthday.  They would also be great for any nautical themed party or gift.  I made these for 2 challenges. 1) Paper Playtime:  Fit the theme "Ahoy Matey!"
2) Papertake Weekly:  "In Stitches", real, fake, faux, or doodles
Details:
I used my Gypsy & Cricut to design & create these tags.
Cartridges Used:  Life Is A Beach & Tags, Bags, Boxes, & More
Faux Stitching w/ a white gel pen
Thanks for looking. Questions & comments are always welcomed. Lori