Followers, Guestbook, & Comments

My followers are being shown in the right column. My Guestbook is at the bottom. Please follow, comment on posts, & sign my guest book. Your comments encourage me to keep sharing my work. I love hearing from you all.

When you leave a comment, I have to moderate it before it will be posted. So if you have a questions or comments, feel free to ask & if necessary note that you don't want your comment posted.
Showing posts with label Mod Podge. Show all posts

Friday, January 15, 2010

Wall Letter K - Kayla

I can finally show this post. I had to wait until I could give this to my niece.
Ok so this is about the 5th Wall Letter that I have done. I love doing them, but I stress myself out trying to make them fit the person that they are for. Last time I got the first boy one out of the way. Now this one is for my niece, but she is 20 years old. I tried to capture her personality & her interests in this. I hope I did good. She is a very good artist, so I am just praying that she will like it. What was I thinking, trying to give a craft gift to someone that is so talented herself? I can't wait for her to get this to finally stop stressing.

Details:
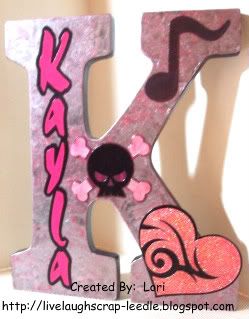
White wooden letter from Michael's.
SCAL for the letters.
Indie Art Cricut Cart. for the heart and the skull.
Stretch Your Imagination Cricut Cart. for the music symbol.
I painted the letter with black acrylic paint.
I used Tim Holtz Distress Paint (Brushed Pewter) on the top of the letter. I used my fingers to give it some texture. When that dried I brushed over it with Tim Holtz Distress Ink pad (Worn Lipstick). My niece's favorite colors are pink & black. I did the same to the cross bones of the skull.
I used UTEE mixed with glitter and heat embossed that to the top layer of the heart.
After everything was adhered to the letter, I put a layer of Mod Podge over it. Then I sprayed it with Krylon Preserve It for extra protection.
Now for the reaction:
I think she really liked it. I felt really good when she opened it and said "Wow, how did you do that?" Her brother gave me a very good compliment on it too. He said that if he could capture Kayla and put her on a letter, this would be exactly it.
Glad that is over. I think I need to have more confidence in my work. I stress over it too much. I just want the people that I am making things for to really like them.
Thanks for looking. Questions & comments are always welcomed.
Lori

Thursday, December 31, 2009

Altered Dome Tin & Stationary Set

This is what kept me busy most of the time. I made 4 of these in total 1 for my daughter & 1 for each of my 3 nieces. They range in age from 8 to 12. I made them all in different color & patterned paper schemes, but all were basically the same design.
Thank you Okieladybug for the .cut file to cover these tins. I don't think I could have done it with out you.
This is the tin that I made for my daughter. She was so excited b/c she knew I was making them for my nieces, but had no idea that one of them would be for her too.
Front & Top:

Top:

I-Top Brad in Prima Flowers coated in Mod Podge.

Complete Stationary Set Contents:

Flip up notepad with very brightly colored pages:

Altered RSVP pen & Altered mini composition notebook:

Calendar made with my Bind it All

First page inside of calendar, calendar & note card for note & upcoming dates:

Thanks for looking. Questions & comments are always welcomed.
Lori

Tuesday, December 8, 2009

Christmas Countdown Clipboard - 12 Day

Well, this is one of the projects that I have been working on. I'm not sure if I'll be keeping this one or giving it as a present. This is the first clipboard I have done & my first countdown calendar too. I am also entering it into the Practical Scrappers Challenge this week Anything Christmas. Click on over to see what everyone else has made too.
Details:
Paper Doll Dress Up Cart. for the Tree
SnowTex for the snow
SCAL for the ornaments & words
Legal size clipboard

I inked the clipboard with a light brown pigment ink then went over it with a white wash (watered down white acrylic paint). I think this gave it a really nice wood grain look. I inked the edges of the paper & the board with brown pigment ink.
I then used Mod Podge over the entire board & place the printed cardstock in place. Then Used another coat of Mod Modge. The tree was also coated in Mod Podge before adhering to the board. I glittered the ornaments & sprayed with a coat of Krylon Preserve It to keep the glitter from scraping off. Then adhered the ornaments to the tree.
I used a hook that screwed into the board to hold the numbered ornaments.
Thanks for looking. Questions & comments are always welcomed.
Lori

Friday, November 20, 2009

Christmas Party Favors - Part 5: Ornaments

Ok so this is the 5th element of my daughter's party favors.

Details:
Joys of the Season cart for the ornament.
Mini Monograms for the scallop circle.
Opposites Attract & CDS for the 2009.
Mod Podge
Diamond Dust - *See note at end of post!
Ink pads
Adhesive you choice.
For each ornament & cut it & the hanger piece out twice. Once regular & the other flipped. I adhered the 2 wrong sides together.
I inked around all edges & adhered the scallop circle to the front side of the ornament. I adhered the 2009 the the reverse side of the ornament.

Santa:
He was on some printed cardstock. I cut him out with my Tim Holtz scissors. I have to tell you, I Love These Scissors!!!!!!
Just on the white parts of Santa - I painted on some Mod Podge on then covered with the Diamond Dust. Then just on the Pom Pom & Santa's beard I added another layer of Mod Podge & Diamond Dust. Let dry. You can tell when it is getting dry b/c it turns more clear than white.

Now after all of that is dry:
I did this b/c I was giving this to kids & the experience I had with the Diamond Dust. I painted a coat of GLOSSY Mod Podge over the entire Santa, coating the Diamond Dust very well.
Reverse Side:
*Note: Just clean up this very well before moving about you house. I stepped on a piece of it & it was like having a little shard of glass in my foot. It came out easily, but very hard to see. Also didn't feel too good - LOL. This is the reason for adding a top coat of Mod Podge to keep any little pieces from falling off. And it gave a hard coat finish.

Thanks for looking. Questions & comments are always welcomed.
Lori

Wednesday, November 11, 2009

Christmas Ornaments

I made 10 of these ornaments for Christmas presents this year. I can see myself making many more in different designs. I had so much fun with these, I just want to keep going.

For the base I used wooden blocks that rubber stamps had been unmounted from. Thanks Kelly Scott from the Cricut MB for all of the blocks that yo did not want. Anyone else that wants to get rid of any of them, please let me know!!

I painted the blocks with acrylic paint. I screwed in the eye screws to the top of the block.
The front & back panels were cut from the Stretch Your Imagination Cart. I inked the light blue paper with white pigment ink to soften it a bit.
The snowmen were cut from the Doodle Charms Cart in blackout. I gave the snowmen a little dimension by edging them with light blue and white chalk. I attached the carrot noses. Using a Versamark pad, UTEE, and my heat gun I embossed the snowmen. This gave them a glass-like appearance. I then bent them to make them look like cracked ice. After all of this was set, I used black Liquid Embossing to dot on the eyes and buttons. The Liquid Embossing is shiny and raised giving even more dimension. I attached a ribbon "scarf" around each of the snowmen's necks. Thanks Tracy (Craft Junkie Too) for that idea.
I lightly painted Mod Podge onto the face of the block and the back of the blue panel & attached. When all of them were set, I added another light coat of Mod Podge and to the back of the snowmen and attached.


The 2009 is cut from the Alphalicious Cart. I used CDS to weld the numbers together. I attached the 2009 to the panel. Then used the same process as above to attach the panels to the blocks.
I then just tied a ribbon bow the the top of the block around the eye screw. I added a little drop of Glossy dimensions under the knot of the bow to make sure it stayed in place. (I am not the best decorative bow tying person .- LOL)

Here is a closer up view of the snowmen to show the crackled ice look. Not sure if it is showing up to good though.

And this is a close up of the back side. After the last layer of Mod Podge dried, I added some dots on the 2009 with a blue glitter pen. Again not sure if this is showing up to good in the pic.

Thanks for looking. Questions & comments are always welcomed.
Lori

Tuesday, November 3, 2009

Paper Flowers

Update: After I posted this, I noticed that they have a New Video for Donna's Layered Flowers. I could not go without adding it to this post. It is wonderful and Donna is so excited about them.

I just love these flowers. The inspiration came from This Video from Leah's Scrapbook Room Videos. I call them Donna's Flowers. I just love her style. She makes hers from old dictionary pages and the Accucut Die System. I used an old phone book and cut a 6 inch scallop circle with my Cricut, then just basically followed her instruction. I don't have glimmer mist or anything like that. So I just ran a pigment ink pad over my crumpled flower until it looked the way I wanted it to. Then I just lightly spritzed it with water to make it a little more pliable.
This is a single layer flower with an embellishment (adhesive backed) from a pack that I found at the Dollar Tree.

I sprayed them with Krylon Preserve It, just to help them keep. I also brushed them with some Mod Podge. This gave them a little shine & gave them a little more stability.


The next one is a double layered flower with a button in the center. I used it to embellish a sticky note holder that I made (see previous post).
Thanks for looking. Questions & comments are always welcomed.
Lori

Sticky Note Holders

I made Sticky Note Holders in several different styles. The inspiration for all of theses came from Angie & her Chic'n Scratch Live Videos.

These first 2 holders are an adaptation from the Pocket Card. I just didn't put pockets on the inside, I added sticky notes. The cardstock measurements & score line measurements are just altered to fit the sticky noted.
1st one:
Mini Monograms Cart for scallops & circle
MS Doily Border Punch
Studio G December Stamp Set
Velcro for closure
ATG

2nd one:
Mini Monograms Cart for circle & scallop
Ribbon for decoration & closure
CAD to punch holes for ribbon
Stamp- ?
ATG & Pop Dots

I got the inspiration for this one from This Video of Angie's.
Crimper Book Style:
Fiskar's Crimper
Ribbon
ATG
Mini Monograms Cart for circle & scallop
Glossy Accents
Prima flower
Making Memories Bronze Snap
CAD to attach snap

I think this one is my most favorite of all. The inspiration for this one came from This Video of Angie's.
Coaster & Binder Clip Style:
4x4 140 lb. Watercolor Paper (chipboard or coaster work well too)
4x4 Patterned cardstock for both sides.
A small piece of matching cardstock to fit on the binder clip
Ribbon
Mod Podge to cover each side after printed cardstock is attached. I also put some on the edges. I think it helps to seal it a little better.
ATG

The back side. This sticky note holder can be used either way depending on the user's mood. Also the sticky notes are not stuck down, so no damage when they are finished. Just add a new pad of sticky notes.
Thanks for looking. Questions & comments are always welcomed.
Lori