Followers, Guestbook, & Comments

My followers are being shown in the right column. My Guestbook is at the bottom. Please follow, comment on posts, & sign my guest book. Your comments encourage me to keep sharing my work. I love hearing from you all.

When you leave a comment, I have to moderate it before it will be posted. So if you have a questions or comments, feel free to ask & if necessary note that you don't want your comment posted.
Showing posts with label CAC. Show all posts

Tuesday, July 20, 2010

Note Card Set (12) Bird & Monogram

I made this set of note cards & envelopes for my daughter's principle.  I had made her  a set for Teacher Appreciation Week a couple of years ago when she was my daughter's teacher.  We are having a hard time right now & she is helping us out.  She wanted another set of cards & wanted to buy them.  But for all of her help, I made them & am giving them to her as a thank you gift.  These are different than the ones I gave her before.  I hope my techniques have improved since then.  The other ones were really simple.  These were not difficult, but I think they have a little more style.  HERE are the first ones that I made for her.
Details:
I used my Gypsy and Cricut to design & create this set.
Cartridges Used:  Gypsy Font (Monogram), Just Because Cards (Envie & Bird Sticker - Not Shown), Create A Critter (Bird & Branch), Home Decor (Scallop Circle & Circle), All Mixed Up (Title Name)
Cuttlebug with Swiss Dots Embossing Folder
MS Doily Border Punch for the bag closure.
I inked all of the pieces and added ribbon with a single knot as an accent.

Thanks for looking. Questions & comments are always welcomed. Lori

Thursday, June 24, 2010

Sailboat Card

I made this card for Challenge #15 Summer time At The Beach over at Fantabulous Cricut.  The challenge was to make any project of something you would find at the beach.  When I started this card, I really didn't know where I was going with it. It started out with just a blue background with a white edge (the card base).  Then I decided to wet the blue cardstock & crumple it up.  I liked it, but it still wasn't quite right.  So them I inked the wrinkled paper with vintage photo distress ink.  I just didn't like the white anymore.  It still just didn't feel right.  So I ripped the blue cardstock & thought "Hey, this could be the sky & water."  But I still didn't like the white background so I inked the card base with vintage photo too.  I then glued the blue pieces down.  This is where the sun & sailboat come in.  I cut, inked, & assembled them.  I edged around the card base with white acrylic paint (in a dauber bottle).  Then added some of the white acrylic paint to the sky & water.  I also added some pool blue acrylic paint to the water.
I used my Gypsy & Cricut to design & create this card.
Cartridges used: Life Is A Beach (Sailboat) & Create A Critter (Sun)
Sorry this was so long. I just thought I would take you along for the ride of my thought process for this card.  It was super fun to figure it all out.
Thanks for looking. Questions & comments are always welcomed. Lori

Friday, May 21, 2010

Bookmark Challenge @ PDE

I made this bookmark for the Challenge #2 at Pause Dream Enjoy. We had to make a bookmark - any theme, color, style, or medium. I used the little deer on the Create A Critter Cart. At my daughter's school, D.E.A.R stands for Drop Everything And Read. This is what they call their in class reading time. So I used the little deer as a play on that acronym.
Thanks for looking. Questions & comments are always welcomed. Lori

Tuesday, May 18, 2010

Terrier Card: Paper Cutz Challenge #41

I made this card for Challenge # 41 over at Paper Cutz. We had a little Yorkshire Terrier for just over 15 years. She passed away this past January. When I came across this challenge & saw this little terrier on the Create A Critter Cart. I just knew this was the image I was going to use.
Details:
Create A critter cart for the terrier & Ruff
Pop dotted the dog to the front
Cuttlebug w/ Herringbone Embossing Folder on the words
Heat Embossed the words with UTEE.
Inked & doodled on the edges of the card.
Added ribbon with a knot
Thanks for looking. Questions & comments are always welcomed. Lori

Thursday, May 13, 2010

Paper Cutz Challenge # 40: Zoo Animal

This shape card was done for Challenge #40 over at the Paper Cutz Challenge Blog.  The challenge was to make something (anything) for a child's birthday using a zoo animal.  I'm not sure if everyone has Koala Bears in their zoos, but we do.
I had this card made in my Gypsy, but had never cut it.  Thanks Mary for this challenge.  It gave me a reason to do this card.  Inside is stamped "Happy Birthday" with a Heidi Swap stamp.  I don't know why I made her blue, other than I just wanted her a little different.  I'm happy with how she turned out.
Details:
Designed & welded using my Gypsy.
Create A Critter Cart.
Glitter Glue for some sparkle & dimension
.gypsy File
Thanks for looking. Questions & comments are always welcomed. Lori

Friday, April 30, 2010

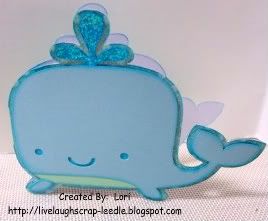
Whale Shape Card: Create A Critter

I have been designing shape cards in my Gypsy.  This is one of them.  I just love the Create A Critter cart. for this.  It is so versatile & has so many great images.
I left the inside blank so that I or (anyone else) can decide what it would be used for.  It could be a new baby boy card, birthday card for a young boy, "Get Whale Soon" card, or anything you see fit.
I added iridescent glitter glue to the water spout & inked all of the edges.
.gypsy File

Thanks for looking. Questions & comments are always welcomed. Lori

Tuesday, April 27, 2010

Paper Clip Bookmarks

Since getting my Gypsy, I have been designing a lot of projects. Some of these were cut as test cuts, others are cut with the adjusted file. These are so simple & practical. I love making them & see many more in my future. I will share my files as soon as I get it all figured out. I have been watching MadeByMomo's Videos with the Create A Critter Cart. & she got me to thinking. These "Critters" would make great bookmarks. So that's what started this whole thing.
This one is made using the book & A+ from the Locker Talk Cart. The base circle (2" RDS - yellow "a" & chain linked) is from Mini Monograms.

The apple is from Create A Critter & the scallop square (1.5" RDS - yellow "a" & chain linked) is from Mini Monograms. I re-worked this one to have the square base to be cut @ 2" instead of 1.5. I like the larger size better.

The cats are from Create A Critter. The grey cat is cut @ 1.5" I think. It was too small for me so this one is not saved. To size them, I put all of the layers together on my mat grouped. Then I sized them using the (RDS - yellow "a" w/ chain linked) to 2.5". I then separated all of the pieces on the mat to cut in their colors. I just used a blackout cut for the back of the paperclip.

The dinosaurs are from Create A Critter. The scallop squares are from Mini Monograms cut @ 2" RDS - yellow "a" w/ chain linked.

.gypsy Files:
apple, book, cat, dino
Thanks for looking. Questions & comments are always welcomed. Lori
Thursday, April 22, 2010

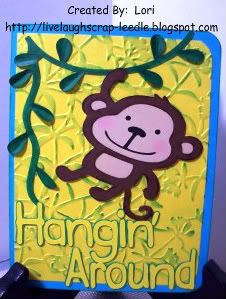
Monkey Card: Made By Momo Callenge #1

I designed this card in my Gypsy Sunday evening. I never did get a chance to cut it. Well today I was watching a video on YouTube by MadeByMomo. She mentioned that he had a challenge posted on her BLOG.
The challenge was to make a card with an animal on it. I was going to do an animal shape card, then decided to make my monkey card. I'm glad I did. I think it is so cute.
Details:
Monkey & Vines are cut from the Create A Critter Cricut Cart.
Sentiment is using the Pooh Font Cricut Cart.
I used chalk to give the monkey rosy cheeks. I also used some tan chalk on the lighter parts of his face & body to give a little something to it.
The vines & the sentiment were welded in Gypsy. I also used my Gypsy to design the LO of the card.
At the last minute & decided to add another layer. I used the Cuttlebug with the Floral Screen Embossing Folder. I rubbed my ink pad directly on the embossed parts of that layer. I also inked the edges of the monkey & the card base..
Thanks for looking. Questions & comments are always welcomed.
Lori