Followers, Guestbook, & Comments

My followers are being shown in the right column. My Guestbook is at the bottom. Please follow, comment on posts, & sign my guest book. Your comments encourage me to keep sharing my work. I love hearing from you all.

When you leave a comment, I have to moderate it before it will be posted. So if you have a questions or comments, feel free to ask & if necessary note that you don't want your comment posted.
Showing posts with label Ornaments. Show all posts

Friday, December 17, 2010

Glittered Snowman Ornaments & Giftbags

I make the favors for the holiday parties for my daughter's class.  This year I decided to do the glittered ornaments that have been going around for the past couple of years.  Then I saw a video that Momo made.  She did the glittered ornaments & decorated them to look like snowmen.  I just loved the idea & thought that the kids would enjoy them too.
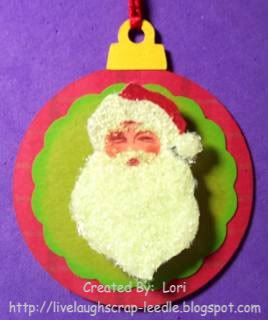
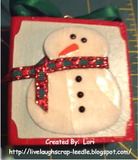
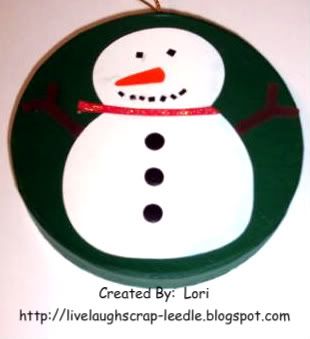
The way I made the faces was:  For the charcoal eyes & mouth, I used black Liquid Embossing.  I painted on the carrot nose with acrylic paint.  Then to protect the nose & give it some shine & dimension, I added some Aleen's Paper Glaze over it.
I also used a pipe cleaner for the loop to hang it on the tree.
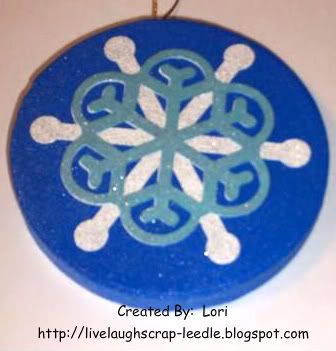
To glitter the inside of the ornament, I used the Pledge with Future Shine and Martha Stewart Fine Crystal Glitter. - I JUST LOVE THIS STUFF!!!!!!
 I also had to make the gift bags for the ornaments.  I used the 3 1/4 x6 3/4 bags from Michaels.  For the snowman (I just thought that since i was giving a snowman ornament, that it was cute to use the snowman holding an ornament. - Ha Ha - I'm so easily amused!!  LOL) I used the Jolly Holidays cart.
For the topper I scored a 2 x 3 1/4 piece of cardstock in half.  Stamped Happy Holidays (Recollection Stamp Set:  Sugar & Spice).  On the back side we just wrote From:  Alexis.  I folded down the top inch of the bag & stapled it shut.  Then adhered the topper to the folded flap of the bag.
I used my Gypsy and Cricut to design & create the gift bag part of this project.
Thanks for looking. Questions & comments are always welcomed. Lori

Friday, May 21, 2010

Something Round & Recycle, Renew, Reuse

I made this for my daughter's teacher for Teacher Appreciation Week.  It fit for 2 challenges.  They are:
Practical Scrappers May Monthly Challenge - Recycle, Renew, Reuse and Cute and Some - Showcase #7.
For the monthly Challenge at Practical Scrappers we had to recycle something.  I used an old spool from some ribbon.  For the Showcase #7 for Cute and Some we had to use something round.  So this fit the bill on both challenges.
Side 1:
Side 2:
Thanks for looking. Questions & comments are always welcomed. Lori

Tuesday, December 8, 2009

Ornament - Trent's 1st Christmas

This is the ornament that I made for my nephew (& God son) for his 1st Christmas. He will be 5 months old 3 days before Christmas. Last year when I made the ornament for his sister's first Christmas, I made it in shades of pink. So I did his in all blues.
Front:

Back:Thanks for looking. Questions & comments are always welcomed.
Lori

Friday, November 20, 2009

Christmas Party Favors - Part 5: Ornaments

Ok so this is the 5th element of my daughter's party favors.

Details:
Joys of the Season cart for the ornament.
Mini Monograms for the scallop circle.
Opposites Attract & CDS for the 2009.
Mod Podge
Diamond Dust - *See note at end of post!
Ink pads
Adhesive you choice.
For each ornament & cut it & the hanger piece out twice. Once regular & the other flipped. I adhered the 2 wrong sides together.
I inked around all edges & adhered the scallop circle to the front side of the ornament. I adhered the 2009 the the reverse side of the ornament.

Santa:
He was on some printed cardstock. I cut him out with my Tim Holtz scissors. I have to tell you, I Love These Scissors!!!!!!
Just on the white parts of Santa - I painted on some Mod Podge on then covered with the Diamond Dust. Then just on the Pom Pom & Santa's beard I added another layer of Mod Podge & Diamond Dust. Let dry. You can tell when it is getting dry b/c it turns more clear than white.

Now after all of that is dry:
I did this b/c I was giving this to kids & the experience I had with the Diamond Dust. I painted a coat of GLOSSY Mod Podge over the entire Santa, coating the Diamond Dust very well.
Reverse Side:
*Note: Just clean up this very well before moving about you house. I stepped on a piece of it & it was like having a little shard of glass in my foot. It came out easily, but very hard to see. Also didn't feel too good - LOL. This is the reason for adding a top coat of Mod Podge to keep any little pieces from falling off. And it gave a hard coat finish.

Thanks for looking. Questions & comments are always welcomed.
Lori

Wednesday, November 11, 2009

Christmas Ornaments

I made 10 of these ornaments for Christmas presents this year. I can see myself making many more in different designs. I had so much fun with these, I just want to keep going.

For the base I used wooden blocks that rubber stamps had been unmounted from. Thanks Kelly Scott from the Cricut MB for all of the blocks that yo did not want. Anyone else that wants to get rid of any of them, please let me know!!

I painted the blocks with acrylic paint. I screwed in the eye screws to the top of the block.
The front & back panels were cut from the Stretch Your Imagination Cart. I inked the light blue paper with white pigment ink to soften it a bit.
The snowmen were cut from the Doodle Charms Cart in blackout. I gave the snowmen a little dimension by edging them with light blue and white chalk. I attached the carrot noses. Using a Versamark pad, UTEE, and my heat gun I embossed the snowmen. This gave them a glass-like appearance. I then bent them to make them look like cracked ice. After all of this was set, I used black Liquid Embossing to dot on the eyes and buttons. The Liquid Embossing is shiny and raised giving even more dimension. I attached a ribbon "scarf" around each of the snowmen's necks. Thanks Tracy (Craft Junkie Too) for that idea.
I lightly painted Mod Podge onto the face of the block and the back of the blue panel & attached. When all of them were set, I added another light coat of Mod Podge and to the back of the snowmen and attached.


The 2009 is cut from the Alphalicious Cart. I used CDS to weld the numbers together. I attached the 2009 to the panel. Then used the same process as above to attach the panels to the blocks.
I then just tied a ribbon bow the the top of the block around the eye screw. I added a little drop of Glossy dimensions under the knot of the bow to make sure it stayed in place. (I am not the best decorative bow tying person .- LOL)

Here is a closer up view of the snowmen to show the crackled ice look. Not sure if it is showing up to good though.

And this is a close up of the back side. After the last layer of Mod Podge dried, I added some dots on the 2009 with a blue glitter pen. Again not sure if this is showing up to good in the pic.

Thanks for looking. Questions & comments are always welcomed.
Lori

Friday, January 30, 2009

Christmas is Over - Ornaments

Here is the last of Christmas. These are the ornaments I made as gifts for the women in my family. I won't have much description in this post, but if you have any questions feel free to contact me.


Thanks for looking. Questions and comments are always welcomed.
Lori

A Proud member of The Lime Light. Click on over to see what we are doing.

Wednesday, December 10, 2008

A Few More Ornaments

Ok, so here are a few more ornaments. A friend that I had grown up with had seen my Godchild's ornament. He wanted me to make some for his daughter. They give her six new ornaments every year & he wanted me to make four of them for her.

Angel: I made this one using CDS, George & Basic Shapes, and Paper Doll Dress Up. Click HERE for Angel .cut file. When you cut it, you will not use the head on the 2nd body. This angel is very simple, but I really don't design much with CDS. I mostly use it to size things correctly & weld letters to make words, so this was an accomplishment. I think she came out cute. I also used Peachy Keen Face Stamps (Blushing Brides). I also used the Cuttlebug for her dress, wings, & hair.
Gingerbread Man: He came from the Stretch Your Imagination cart. I used Markers to color in the colored parts of the "icing", then I used Liquid Embossing to give it a little dimension.
Christmas Stocking: I can't remember which cart this one came from. I used the MS Branch punch for the branches at the top.
Rocking Horse Wreath: I think this one is my favorite. (I have to check on this one too about the cart.) I appologize - I have been working on so much lately that I don't remember all of supplies used. I used the MS Branch punch to make the wreath. I rubbed a dark green ink pad across the horse & the wreath. I like the way it turned out. It kind of made it look antique-ish.
Thanks for looking. Questions & comments always welcomed.
Lori
A proud member of The Lime Light Design Team. Please click on over to see what we are doing.

Karissa's 1st Christmas Ornament

I can finally post some of the projects I have been working on. I gave this ornament to my brother for my Godchild's 1st Christmas. I wanted them to be able to have it on the tree this year.

Front:

Back:

I made her shower invites & favors using the baby bootie from the New Arrivals cart. So, I thought it would be fitting to use it for her 1st Christmas ornament as well. I heat embosses the word Christmas with Red Tinsle Embossing Powder. I used CDS to make sure that all of the cuts would fit on the ornament form. The form is just a paper mache form that I painted pink. I cannot remember off hand which carts I used for all of the words, I will post back later with the info.

Thanks for looking. Questions & comments always welcomed.
Lori
Proud member of The Lime Light Design Team. Please click on over to see what we are doing.