Followers, Guestbook, & Comments

My followers are being shown in the right column. My Guestbook is at the bottom. Please follow, comment on posts, & sign my guest book. Your comments encourage me to keep sharing my work. I love hearing from you all.

When you leave a comment, I have to moderate it before it will be posted. So if you have a questions or comments, feel free to ask & if necessary note that you don't want your comment posted.

Tuesday, March 31, 2009

The Lime Light Task 6

If you click the title for this post, it will take you to The Lime Light.  There you can see the cards that all of the members made for this task and everything else we are doing.
Donna is one of The Lime Light Design Team Members.  She keeps a box of handmade cards for her students to choose from when they finish reading a book.  What a wonderful incentive!!  She has some things going on in her life right now & she is having trouble keeping her box stocked for the kids.  We decided to help her out to keep her box filled for a while.
This task was so much fun.  The one thing we had to do was learn to simply our cards and kind of get back to basics.  The only things we could use on these cards were, paper, glue, glitter, and ink.  Donna, I hope the kids enjoy these.
Thanks for looking.  Questions and comments are always welcomed.
Lori
A Proud member of The Lime Light. Click on over to see what we are doing.

Friday, March 27, 2009

Cupcake Card - Serendipity & Cuttlebug

The daughter of some good friends of ours just turned 3. HAPPY BIRTHDAY MORGAN!!! I thought a pink cupcake was in order. I used the Serendipity Technique, Click HERE to go to Brigitta's Serendipity Tutorial. I was introduced to this technique by Nilda @ The Cuttlebug Spot. This technique is so much fun & there is no right or wrong way to do it. Give it a try & come back to post a comment with a link to what you made. I would love to see it.
Details:
Cuttlebug Embossing Folder: Happy Birthday on base.
Cuttlebug Embossing Folder: Devine Swirls on cupcake top.
Cricut CDS for sizing purposes & to cut 2 more candles. The cupcake only had 1 candle & since Morgan is 3, I thought it should have 3 candles.
Cricut Cart: Wild Card for cupcake
I inked around the candles & cupcake. I also inked the Devine Swirls on the cupcake topper & the lines in the cupcake wrapper. The markers I used are LePlume II. I also put iridescent glitter glue on the flames of the candles.
Thanks for looking. Questions & comments are always welcomed.
Lori
A Proud member of The Lime Light. Click on over to see what we are doing.

Friday, March 20, 2009

Book for Alyssa

This is the book I made for Alyssa. Again her room is decorated in pink & brown. She just loved it.
I used my BIA to punch the holes and bind the book with 1/2" o-wires (white). Oh, I just realized that I forgot to put ribbons on the wires. Oh well, she loved it anyway. I got more requests from the girl's that they want a book & door hanger for their b-days.
I, of course, used my ATG gun to attach all of the cardstock for the covers.
I used 140lb. watercolor paper (very strong & cuts beautifully in the cricut - I just put my blade depth on 6)
For the front cover, I cut out different size flowers from the George Cart (I think) on a strip of scrap cardstock. I used them as a template & sponged ink in the flower cut outs all over the pink part of the cover. Then I attached pink & brown prima flowers with dark pink & light pink skittles in the middle of the flowers.
Front Cover:
For the front cover, I cut out different size flowers from the George Cart (I think) on a strip of scrap cardstock. I used them as a template & sponged ink in the flower cut outs all over the pink part of the cover. Then I attached pink & brown prima flowers with dark pink & light pink skittles in the middle of the flowers.
Inside Front Cover:
 For the inside of the front cover, I just cut out the crown on the Alphalicious Cart in Shortstack Shadow in brown & Shortstack in pink. Layered them both them glittered the round tops of the crown. I then stamped a princess crown (sorry, I don't remember the name of the stamp set) on that with ColorBox Pigment Ink.
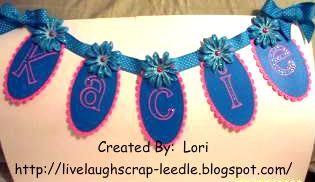


Inside Back Cover:
On the inside back cover I used the Alphalicious cart again for her name. Again cut it in shadow & regular. I used CDS to weld the name together. I used the same stamp set & ink as above for both stamps on this page.
Just like the book that I made for Gretchen, I used regular copy paper for the inside pages. I cut them the same size (5 1/2") as the covers. I also used the BIA to punch the holes.
Thanks for looking. Questions and comments are always welcomed.
Lori
A Proud member of The Lime Light. Click on over to see what we are doing.

Wednesday, March 18, 2009

Alyssa's Doorhanger

This doorhanger was made for a friend of my daughter. Her mom told me that her room is decorated in pink & brown & this is what I came up with.
Details:
Cricut Design Studio
Misc. cardstock
Misc. ribbon
Cricut Cartridges: G&BS & Alphalicious
Making Memories Eyelets
Prima Flowers & Misc. Brads.
I used my Ultimate Crafter's Companion to help make the bow along with Nilda's instructions.
ColorBox Pigment Ink Pads.
Thanks for looking. Questions and comments are always welcomed.
Lori
A Proud member of The Lime Light. Click on over to see what we are doing.

Monday, March 9, 2009

Kacie & Katelyn: Name Banners

I made these 2 name banners for some very good friends' twin daughters. They just made 10 and their room is half hot pink & half tourquois.
This first one is for Kacie. She picked the tourquois for the room.
This one is for Katelyn. She picked the pink for the room.
The picks don't show much of the detail very well.
I used the Alphalicious Cart. for this project. It is my newest cart. & I got it because of the crown. Well, while doing these projects I found that I really love this font.
Details:
I cut the scalloped oval tag for the base of each letter.
I cut the oval tag with a shadow letter for each tag.
I then cut out the regular (no shadow) of each letter.
Layered the oval on top of each scallop & placed the letters inside the shadow that was cut out.
I used my Zig 2-Way glue pen to make dots on each scallop and on the letters. I used the Martha Stewart Glitter on them. I put pink on the pink & turquoise on the turquoise. I also painted Mod Podge on the Prima flowers & misc. brads & coated them in glitter too. I must say that I am not much of a fan of glitter b/c of the mess. But this glitter really shines, it is worth the mess & the time.
I want to thank Nilda for posting her Bow Making Video. This helped me out so much in making the bows for the ends.
Thanks for looking. Questions and comments are always welcomed.
Lori
A Proud member of The Lime Light. Click on over to see what we are doing.

Thursday, March 5, 2009

Ice Cream Card & Door Hanger

This is the card that I made for Gretchen. I used CDS to weld the ice cream cone to a rectangle to fold & make a card. I cut the layers & adhered them to the front of the card. I used glitter glue in the glare spot & on the cherry. I inked around the cherry with ColorBox ink. I also inked around the ice cream cone & ice cream top with LePlume II Markers.  Click HERE for the .cut file. The door hanger was another gift for Gretchen. I used Stretch Your Imagination for the frame & backing, Tear Drop for the G, and Doodlecharms for the ladybugs. Other embellishments are: ribbon for hanging, misc. flowers & Making Memories flower eyelets.
Thanks for looking. Questions and comments are always welcomed.
Lori
A Proud member of The Lime Light. Click on over to see what we are doing.

Gretchen's Book

Here is another book that I made with my BIA & ATG. I seem to be inseparable from them lately. This "G" book was made as a present for Gretchen, a little girl in my daughter's class.

I got a wonderful idea from someone (sorry, can't remember who posted it) on the Cricut MB about using 140 lb. watercolor paper as chipboard. I like it very much. It is thinner but very sturdy, especially after being covered with cardstock.
I used CDS - mostly for sizing, to make sure everything would fit & for the multi-cut feature.
Cartridges used: Mini Monograms, Cricut Sampler, and Walk In My Garden
Embellished with: Glitter Glue, Ribbon, Misc. Flowers, Brads, & Snaps
I inked around the edges of the covers with ColorBox Pigment Ink Pads & LePlume II markers.
I used 1/2' o wires.
For the inside pages, I just used regular copy paper (12) cut to the same size as the covers. I put each cover in the BIA separately & used the bar as a guide to make sure the pages were being placed correctly.


Thanks for looking. Questions and comments are always welcomed.
Lori
A Proud member of The Lime Light. Click on over to see what we are doing.