Hi,
I am trying a new blog look. For some reason my previous blog design was going to disappear on Friday. I was using Cutest Blog On The Block. So then I started looking at the new Blogger templates & settled on this one. I also finally figured out how to add pages, so I did some work on that too. Please post comments to let me know what you think.
Thanks,
Lori
Thanks for looking. Questions & comments are always welcomed. Lori
Wednesday, July 21, 2010

Tuesday, July 20, 2010
Dream BIG Frame
My niece & Godchild just made 2 years old. I wanted to make something for her that I had not done before. I had picked up a couple of frames when they were on sale & wanted to make something different. Everything for her since she has been born has revolved around butterflies. So I thought about a scenic picture & this is what I came up with. It was fairly easy considering I don't really scrapbook. Because of that, I didn't leave a place for a picture, but this can always be modified. I just thought this would be cute hanging in her room.
Also being entered into Made By Momo's Tuesday Challenge.
 Details:
I used my Gypsy and Cricut to design & create this frame. I used lots & lots of carts on this project & lots of inking. I use a wood grain stamp on the trunk if the tree. I had to cut the tree out 3 times, twice in brown & once in tan. I cut the swing seat off of the extra brown one & the ropes off of the tan one.
Cricut Carts. Used: Just Because Cards (Sun & Tree), Everyday Paper Dolls (Clouds), Stamping (Birds & Butterfly - right), Create A Critter (grass), Gypsy Wanderings (Butterfly - lower left), Graphically Speaking (Butterfly - upper left), Walk in My Garden (Sunflowers), Home Accents (dream), A Child's Year (BIG)
Thanks for looking. Questions & comments are always welcomed. Lori
Also being entered into Made By Momo's Tuesday Challenge.
I used my Gypsy and Cricut to design & create this frame. I used lots & lots of carts on this project & lots of inking. I use a wood grain stamp on the trunk if the tree. I had to cut the tree out 3 times, twice in brown & once in tan. I cut the swing seat off of the extra brown one & the ropes off of the tan one.
Cricut Carts. Used: Just Because Cards (Sun & Tree), Everyday Paper Dolls (Clouds), Stamping (Birds & Butterfly - right), Create A Critter (grass), Gypsy Wanderings (Butterfly - lower left), Graphically Speaking (Butterfly - upper left), Walk in My Garden (Sunflowers), Home Accents (dream), A Child's Year (BIG)
Thanks for looking. Questions & comments are always welcomed. Lori
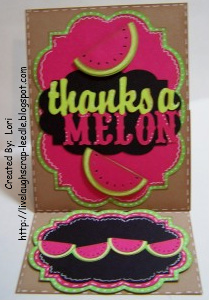
Just Because Cards: Thanks A Melon
I made this card for my daughter's principle. I wanted to give her a thank you card for all of her help.
This is a pedestal or easel card.
You start with a piece of cardstock that is 4.25 x 11. Score it at 2 3/4 & 5.5. Then have some coordinating (or the same) cardstock that measures 4.25 x 5.5. Fold the larger piece of cardstock in half - this is your card base. Adhere the smaller cardstock to the front of the larger folded piece (it should have the score line at 2 3/4. Now fold up the front & you will see how it will stand up. You will have to add something to the bottom piece to hold the card up. See below:
 Details:
I used my Gypsy and Cricut to design & create this card. The only cart that was used on this card was Just Because Cards Cartridge. I inked everything and added doodling, faux stitching, & dots with my white gel pen. For the bottom piece I welded the 4 watermelon bases together then layered the other pieces.
Thanks for looking. Questions & comments are always welcomed. Lori
This is a pedestal or easel card.
You start with a piece of cardstock that is 4.25 x 11. Score it at 2 3/4 & 5.5. Then have some coordinating (or the same) cardstock that measures 4.25 x 5.5. Fold the larger piece of cardstock in half - this is your card base. Adhere the smaller cardstock to the front of the larger folded piece (it should have the score line at 2 3/4. Now fold up the front & you will see how it will stand up. You will have to add something to the bottom piece to hold the card up. See below:
I used my Gypsy and Cricut to design & create this card. The only cart that was used on this card was Just Because Cards Cartridge. I inked everything and added doodling, faux stitching, & dots with my white gel pen. For the bottom piece I welded the 4 watermelon bases together then layered the other pieces.
Thanks for looking. Questions & comments are always welcomed. Lori
Note Card Set (12) Bird & Monogram
I made this set of note cards & envelopes for my daughter's principle. I had made her a set for Teacher Appreciation Week a couple of years ago when she was my daughter's teacher. We are having a hard time right now & she is helping us out. She wanted another set of cards & wanted to buy them. But for all of her help, I made them & am giving them to her as a thank you gift. These are different than the ones I gave her before. I hope my techniques have improved since then. The other ones were really simple. These were not difficult, but I think they have a little more style. HERE are the first ones that I made for her.
 Details:
I used my Gypsy and Cricut to design & create this set.
Cartridges Used: Gypsy Font (Monogram), Just Because Cards (Envie & Bird Sticker - Not Shown), Create A Critter (Bird & Branch), Home Decor (Scallop Circle & Circle), All Mixed Up (Title Name)
Cuttlebug with Swiss Dots Embossing Folder
MS Doily Border Punch for the bag closure.
I inked all of the pieces and added ribbon with a single knot as an accent.
Thanks for looking. Questions & comments are always welcomed. Lori
I used my Gypsy and Cricut to design & create this set.
Cartridges Used: Gypsy Font (Monogram), Just Because Cards (Envie & Bird Sticker - Not Shown), Create A Critter (Bird & Branch), Home Decor (Scallop Circle & Circle), All Mixed Up (Title Name)
Cuttlebug with Swiss Dots Embossing Folder
MS Doily Border Punch for the bag closure.
I inked all of the pieces and added ribbon with a single knot as an accent.
Thanks for looking. Questions & comments are always welcomed. Lori
Monday, July 12, 2010
Alexis' 10 (Golden) Birthday Party Favors
For my daughter's birthday this year we decided to do something different. Instead of having a party, she invited just 4 of her friends. We took them to the movie & then to a nail salon to get their nails done. It was so nice. All of the girls got along so well. They thoroughly enjoyed the movie & especially the nail salon.
Here is a pic of the party favors.
 I made the purse using the Forever Young Cricut Cartridge The emblem & fingernail polish came from the same cartridge. The light pink oval on the emblem was run through the Cuttlebug using the Swiss Dots Embossing Folder. I added some liquid embossing on the red part of the fingernail polish bottle to make it look like glass. I picked up the little bottles of polish & lip gloss from Wal-Mart. It all fit great & they loved them.
Thanks for looking. Questions & comments are always welcomed. Lori
Here is a pic of the party favors.
Thanks for looking. Questions & comments are always welcomed. Lori
Camera Photo Album & Fleur De Lis Candle Bowl
A very good friend of ours was having some visitors in from out of town. It was their first visit to see them & to our city. She had asked me to make something for them as a memento. For the mother she wanted to give her one of my candle dishes that I etched with fleur-de-lis. I used the fleur-de-lis on the Wild Card Cricut Cartridge.


 Cartridges Used: Create A Critter (Camera), Accent Essentials (Fleur de lis), Cuttin' Up (Initials), George & Basic Shapes (Background Rectangle for the initials)
All pieces of the camera were cut from water color paper & painted with acrylic paint. After assembling the camera, I sealed it with Krylon Preserve It. I then added the fleur de lis that was heat embossed with UTEE to add dimension & shine.
Thanks for looking. Questions & comments are always welcomed. Lori
The daughter likes to take a lot of pictures. So I figured I would make a photo album. It had 10 pages (front & back) that I made out of water color paper and painted with acrylic paints. I then painted cardstock and adhered it to the pages, so that it added room for at least 3 pics per page. The front & back covers were made from corrugated cardboard that I cut up from a box. I painted each of these with white Gesso & then acrylic paints.
The pages & covers are 5x7. The cardstock is 4.5 x 12 & folded so that each part of the cardstock can fit a 4x6 picture or journaling if she wishes.
I cut the camera pieces & painted them with acrylic paint as well. I added her initials & a fleur de lis as a symbol of our city. I used heat embossing with UTEE on the fleur de lis to make it glossy & to add dimension.
All pieces of the camera were cut from water color paper & painted with acrylic paint. After assembling the camera, I sealed it with Krylon Preserve It. I then added the fleur de lis that was heat embossed with UTEE to add dimension & shine.
Thanks for looking. Questions & comments are always welcomed. Lori
Friday, July 2, 2010
Set of 3 Tags: Ahoy Matey!!
This set of tags would be great for a baby boy's shower to birthday. They would also be great for any nautical themed party or gift. I made these for 2 challenges. 1) Paper Playtime: Fit the theme "Ahoy Matey!"
2) Papertake Weekly: "In Stitches", real, fake, faux, or doodles
 Details:
I used my Gypsy & Cricut to design & create these tags.
Cartridges Used: Life Is A Beach & Tags, Bags, Boxes, & More
Faux Stitching w/ a white gel pen
Thanks for looking. Questions & comments are always welcomed. Lori
2) Papertake Weekly: "In Stitches", real, fake, faux, or doodles
I used my Gypsy & Cricut to design & create these tags.
Cartridges Used: Life Is A Beach & Tags, Bags, Boxes, & More
Faux Stitching w/ a white gel pen
Thanks for looking. Questions & comments are always welcomed. Lori
Thursday, July 1, 2010
Alexis' Birthday Invitation
Alexis helped in designing & putting together her invitations this year. She is not having a party this year, but she is inviting a couple of frineds to get their nails done (hence - the nail polish) & then a movie or swimming. She picked the colors Pink & Black (it looks brown in the pic). We used the Cricut Markers to outline the polich & the wording. We used gold acrylic paint to color the center of the flower & the top for the polish. She was extremely happy with the finished product.
On the back we stamped on white cardstock the information.
 Details:
We used the Gypsy & Cricut to design & create the invitation.
Cartridges Used: Ashlyn's Alphabet (Wording), Forever Young (Fingernail Polish)
Thanks for looking. Questions & comments are always welcomed. Lori
On the back we stamped on white cardstock the information.
We used the Gypsy & Cricut to design & create the invitation.
Cartridges Used: Ashlyn's Alphabet (Wording), Forever Young (Fingernail Polish)
Thanks for looking. Questions & comments are always welcomed. Lori
Embossed Flowers Sketch Card
I made this card for 2 Sketches 4 You Challenge #55. It was super fun to do. I had not heat embossed stamps in a while so it was fun to get back to that. I distressed all of the edges using my Cricut Spatula ( a technique that I learned from Momo.) Thanks
 Details:
I used my Gypsy & Cricut to design & create this card. I used my G to layout & size all of the pieces. So them it was just quicker to have my Cricut cut all of the pieces than to do it by hand.
I used a stamp set by Studio G, Versamark, & Stampendous Embossing Powder.
Thanks for looking. Questions & comments are always welcomed. Lori

I used my Gypsy & Cricut to design & create this card. I used my G to layout & size all of the pieces. So them it was just quicker to have my Cricut cut all of the pieces than to do it by hand.
I used a stamp set by Studio G, Versamark, & Stampendous Embossing Powder.
Thanks for looking. Questions & comments are always welcomed. Lori
Uncle Sam Hat Card
This card is playing double duty for challenges too.
1) The Cuttlebug Spot: Celebrate Independence Day Challenge
2) Fantabulous Cricut: 4th of July Project
 Details:
I used my Gypsy & Cricut to design & create this card
George & Basic Shapes & Stand & Salute Cartridges were used. I welded the white rectangle to the USA border.
Cuttlebug with the Stars Embossing Folder
Thanks for looking. Questions & comments are always welcomed. Lori
1) The Cuttlebug Spot: Celebrate Independence Day Challenge
2) Fantabulous Cricut: 4th of July Project
I used my Gypsy & Cricut to design & create this card
George & Basic Shapes & Stand & Salute Cartridges were used. I welded the white rectangle to the USA border.
Cuttlebug with the Stars Embossing Folder
Thanks for looking. Questions & comments are always welcomed. Lori
Simple Flower Tag
This tag was made for 2 challenges.
1) Paper Cutz Challenge #47: Make any project incorporating either circles, stars, or squares. So on this one I used all three.
2) My Pink Stamper: Robyn gave a color challenge. The colors to use were Pink, Orange, Brown, & Green. At first, I thought "No Way!!!" But, after seeing all of the sample projects, it didn't seem so bad. Also, Craft Junkie Too was asked to be a guest designer for this challenge. On her blog she has a prize for this challenge.
So click on over to all 3 blogs to check out every one's great work & join in on the fun.
 Details:
I used my Gypsy and Cricut to design & create this project.
Cartridges used: Plantin Schoolbook (Tag), George & Basic Shapes (Star), Forever Young (Flower & Circle)
Cuttlebug with the Spots & Dots Embossing folder
Fastenator
Ribbon
MS Glitter
Thanks for looking. Questions & comments are always welcomed. Lori
1) Paper Cutz Challenge #47: Make any project incorporating either circles, stars, or squares. So on this one I used all three.
2) My Pink Stamper: Robyn gave a color challenge. The colors to use were Pink, Orange, Brown, & Green. At first, I thought "No Way!!!" But, after seeing all of the sample projects, it didn't seem so bad. Also, Craft Junkie Too was asked to be a guest designer for this challenge. On her blog she has a prize for this challenge.
So click on over to all 3 blogs to check out every one's great work & join in on the fun.
I used my Gypsy and Cricut to design & create this project.
Cartridges used: Plantin Schoolbook (Tag), George & Basic Shapes (Star), Forever Young (Flower & Circle)
Cuttlebug with the Spots & Dots Embossing folder
Fastenator
Ribbon
MS Glitter
Thanks for looking. Questions & comments are always welcomed. Lori
Monday, June 28, 2010
Another "A" for Alyssa
Ok so my friend that wanted the A for her niece Alyssa asked me to make another one. Alyssa's grandmother loved it & wants one for the picture wall where she has all of Alyssa's pictures hanging. What a great idea. So here is Alyssa's extra A.
 Details:
I used my Gypsy & Cricut to decorate this letter.
Cartridges Used: A Child's Year (Fairy), Gypsy Wanderings (Butterfly - bottom), Graphically Speaking (Butterfly - top), Ashlyn's Alphabet (Name), Accent Essentials & George & Basic Shapes (Mini Faux Prima Roses)
Homemade glitter glue for swirls & accents on cuts.
Thanks for looking. Questions & comments are always welcomed. Lori
I used my Gypsy & Cricut to decorate this letter.
Cartridges Used: A Child's Year (Fairy), Gypsy Wanderings (Butterfly - bottom), Graphically Speaking (Butterfly - top), Ashlyn's Alphabet (Name), Accent Essentials & George & Basic Shapes (Mini Faux Prima Roses)
Homemade glitter glue for swirls & accents on cuts.
Thanks for looking. Questions & comments are always welcomed. Lori
Tyler "T"
A friend requested this letter for her nephew. I will be very interested in his response to getting this as a gift. I know young boys would probably like these letters, but this is for a sophomore in High School. He plays baseball at the playground and is into bowling. I did his name in his school colors.  Details:
I used my Gypsy & Cricut to design & decorate this letter.
Cartridges used: Sports Mania (Glove, Bats, & Baseball), Paper Doll Dress Up & George & Basic Shapes (Bowling Ball & Pins) The pins are actually the caveman's club. I just stretched it a bit & added a rectangle for the stripe.
Thanks for looking. Questions & comments are always welcomed. Lori
I used my Gypsy & Cricut to design & decorate this letter.
Cartridges used: Sports Mania (Glove, Bats, & Baseball), Paper Doll Dress Up & George & Basic Shapes (Bowling Ball & Pins) The pins are actually the caveman's club. I just stretched it a bit & added a rectangle for the stripe.
Thanks for looking. Questions & comments are always welcomed. Lori
Wedding Card by Sketch
This card is playing double duty. It was made for 2 challenges. The Sketch Challenge is for Papertake Weekly and the Wedding Card Challenge is for Cricut Cardz. I had fun making this card.
 Wedding Solutions Cricut cartridge was used. I sprayed the bells with some silver glitter.
Thanks for looking. Questions & comments are always welcomed. Lori
Thanks for looking. Questions & comments are always welcomed. Lori
Spots & Dots
This card was made for Momo's Spots & Dots Challenge. As soon as I saw the topic for this challenge I knew that this was the paper that I had to use. Then I found these great balloons. So a Happy Birthday card was born.
 Details:
I used my Gypsy & Cricut to design & create this card.
Cartridges: Fabulous Finds (Bookplate), & Celebrations (Balloons)
Thanks for looking. Questions & comments are always welcomed. Lori
I used my Gypsy & Cricut to design & create this card.
Cartridges: Fabulous Finds (Bookplate), & Celebrations (Balloons)
Thanks for looking. Questions & comments are always welcomed. Lori
Embossed Tag
I made this tag for the Embossed Tags Challenge at the Cuttlebug Spot.
 Details:
Cartridges Used: Tags, Bags, Boxes & More (Tag), Celebrations (Gift), George & Basic Shapes & Accent Essentials (Mini Faux Prima Roses)
Cuttlebug using Fiskars Texture Plates (Lace)
Heat embossed the gift using UTEE.
Thanks for looking. Questions & comments are always welcomed. Lori
Cartridges Used: Tags, Bags, Boxes & More (Tag), Celebrations (Gift), George & Basic Shapes & Accent Essentials (Mini Faux Prima Roses)
Cuttlebug using Fiskars Texture Plates (Lace)
Heat embossed the gift using UTEE.
Thanks for looking. Questions & comments are always welcomed. Lori
Flower Tag
I made this tag for Practical Scrappers Flower Challenge. I didn't have time to post it in time for the deadline, cut I still wanted to show it.
I cut the tag from the Tags, Bags, Boxes & More Cartridge. I cut it twice for a little extra stability. I also add the back layer to my tags after all of the inking, edging, & decorating is done for a cleaner look on the back of the tag. I used a stamp set (Love) that I picked up at Wal-Mart & stamped it with acrylic paint, the same paint that I used to edge the tag. I used another stamp set for the flowered background & stamped it with distress ink. I built the flower with bridal flower petals, painted them w/ acrylic paint & homemade glimmer mist. Then I added other misc. flower pieces that I also used homemade glimmer mist on. I made a hat pin & added that to the flower. Added fiber & ta da!!
 Thanks for looking. Questions & comments are always welcomed. Lori
I cut the tag from the Tags, Bags, Boxes & More Cartridge. I cut it twice for a little extra stability. I also add the back layer to my tags after all of the inking, edging, & decorating is done for a cleaner look on the back of the tag. I used a stamp set (Love) that I picked up at Wal-Mart & stamped it with acrylic paint, the same paint that I used to edge the tag. I used another stamp set for the flowered background & stamped it with distress ink. I built the flower with bridal flower petals, painted them w/ acrylic paint & homemade glimmer mist. Then I added other misc. flower pieces that I also used homemade glimmer mist on. I made a hat pin & added that to the flower. Added fiber & ta da!!
Thursday, June 24, 2010
Sailboat Card
I made this card for Challenge #15 Summer time At The Beach over at Fantabulous Cricut. The challenge was to make any project of something you would find at the beach. When I started this card, I really didn't know where I was going with it. It started out with just a blue background with a white edge (the card base). Then I decided to wet the blue cardstock & crumple it up. I liked it, but it still wasn't quite right. So them I inked the wrinkled paper with vintage photo distress ink. I just didn't like the white anymore. It still just didn't feel right. So I ripped the blue cardstock & thought "Hey, this could be the sky & water." But I still didn't like the white background so I inked the card base with vintage photo too. I then glued the blue pieces down. This is where the sun & sailboat come in. I cut, inked, & assembled them. I edged around the card base with white acrylic paint (in a dauber bottle). Then added some of the white acrylic paint to the sky & water. I also added some pool blue acrylic paint to the water.
I used my Gypsy & Cricut to design & create this card.
 Cartridges used: Life Is A Beach (Sailboat) & Create A Critter (Sun)
Sorry this was so long. I just thought I would take you along for the ride of my thought process for this card. It was super fun to figure it all out.
Thanks for looking. Questions & comments are always welcomed. Lori
I used my Gypsy & Cricut to design & create this card.
Sorry this was so long. I just thought I would take you along for the ride of my thought process for this card. It was super fun to figure it all out.
Thanks for looking. Questions & comments are always welcomed. Lori
4th of July Card
This is my first 4th of July card. It's fairly simple, but I had a lot of fun making it. I got back to faux stitching & doodle dots. It's funny how the simplest things add to a card. And I always forget about doing it. I made this card for Tracy's "1st Week of Summer Challenge" over at CJ Too. The challenge was to make any type of project that represented summer. So, to me not much more says "Summer" than the 4th of July. Hop on over to add your project or to see everyone else's projects.
I used my Gypsy and my Cricut to design & create this card.
 Cartridges used are: Independence Day (Banner) and Stand and Salute (Fireworks & Frame)
I added some faux stitching and doodle dots with a white gel pen. I also used a blue glitter gel pen to add some sparkle to the fireworks (in the pic it just looks white - but it is blue glitter gel)
Thanks for looking. Questions & comments are always welcomed. Lori
I used my Gypsy and my Cricut to design & create this card.
I added some faux stitching and doodle dots with a white gel pen. I also used a blue glitter gel pen to add some sparkle to the fireworks (in the pic it just looks white - but it is blue glitter gel)
Thanks for looking. Questions & comments are always welcomed. Lori
Monday, June 21, 2010
Redfish Glass Etching
Ok, so this has been in the works since December. My dad asked if there was a way to etch a redfish. I told him that I would have to get the program and find a picture in order to be able to do it. Well, he bought me the program. I found a great picture. Then had to figure out how to convert the picture and make it cuttable. It took a little while, but I got it done. I cut it out of plain white cardstock & thought it looked pretty good. I knew there would be so much weeding of very tiny pieces that I kept putting it off to attempt the etching.
I used SCAL and my Cricut to design & create this project.
Here is the picture that I found on-line.


I used SCAL and my Cricut to design & create this project.
Here is the picture that I found on-line.

Here is the cutout from cardstock:

So now, we are on to Father's Day: I decided on Friday night that I would work on this Saturday morning. Well Saturday morning turned into 10 hours of trying to get this right. First, I thought I had the file the correct size for a 8.5 x 11 piece of glass. It was not, it was too big. So I resized it, cut it, & placed it on the glass, but it still didn't look right. I needed to add a shadow to it to give the shape of the fish - w/o having to etch all of the glass. Now, mind you, my computer is ancient & takes forever on it's own, so working with this file is what took up so much of the time. So then after 3 more tries (placing issued mostly) I finally got it right!!
So here is the final product: And he absolutely LOVED it!!!!!! Now he wants me to make another one. At least now, I don't think it would take so long.
Thanks for looking. Questions & comments are always welcomed. Lori
Subscribe to:
Posts (Atom)