
Friday, May 21, 2010
Patterned Paper Challenge
This card was made for the Patterned Paper Challenge at Practical Scrappers. I used Tinkerbell and Friends for the flower and the sentiment. The patterned paper that I used was a challenge to find something to do with it.
Thanks for looking. Questions & comments are always welcomed. Lori

3D Project Using Black
Yet another Teacher Appreciation Week gift. I made this for Challenge Me Monday #10 at Fantabulous Cricut. The challenge was to make something that is 3D and to use the color black. Oh, and it is filled with covered Hershey's Nuggets. So here is my entry:
Front View:

Side View:
 Thanks for looking. Questions & comments are always welcomed. Lori
Front View:
Side View:
Something Round & Recycle, Renew, Reuse
I made this for my daughter's teacher for Teacher Appreciation Week. It fit for 2 challenges. They are:
Practical Scrappers May Monthly Challenge - Recycle, Renew, Reuse and Cute and Some - Showcase #7.
For the monthly Challenge at Practical Scrappers we had to recycle something. I used an old spool from some ribbon. For the Showcase #7 for Cute and Some we had to use something round. So this fit the bill on both challenges.
Side 1:
 Side 2:
 Thanks for looking. Questions & comments are always welcomed. Lori
Practical Scrappers May Monthly Challenge - Recycle, Renew, Reuse and Cute and Some - Showcase #7.
For the monthly Challenge at Practical Scrappers we had to recycle something. I used an old spool from some ribbon. For the Showcase #7 for Cute and Some we had to use something round. So this fit the bill on both challenges.
Side 1:
1 Card - 2 Challenges

Laura's Sketch #52 on 2 Sketches 4 You and for the May MCPT on the Cricut MB
Thanks for looking. Questions & comments are always welcomed. Lori
Tuesday, May 18, 2010
Happy Birthday Giftcard Holder Card
My husband's birthday was this past Friday. This is his card. I want to thank Yoliebean and Momo for this idea. I am always looking for new giftcard holder ideas and this one is perfect. Yolie, my daughter loves the saying "There are no mistakes in crafting, only chances to embellish." Well girlie, you definitely showed us how to make something from a "happy little accident". Momo, thanks for making a video on this & showing your take on this project. Here is mine.
When I saw this patterned paper the saying just popped into my head. And look the giftcard even matches - LOL. So, I typed it up on the computer & printed it out on cardstock, trimmed it up & adhered it to the card.
Front:
 Inside:
 Thanks for looking. Questions & comments are always welcomed. Lori
When I saw this patterned paper the saying just popped into my head. And look the giftcard even matches - LOL. So, I typed it up on the computer & printed it out on cardstock, trimmed it up & adhered it to the card.
Front:
Kindergarten Teacher Wall Letter

Lisa, thank you and I hope she likes it.
Details:
Carts, A Child's Year, Locker Talk, and Pooh Font Set
Everything is sized to fit the letter by using my Gypsy and is cut with my Cricut.
I used Liquid Embossing on almost all of the pieces.
The letter is painted with acrylic paint & sealed with Krylon Preserve It.
All of the cardstock pieces are also sealed with Krylon Preserve It.
Thanks for looking. Questions & comments are always welcomed. Lori
Teacher Appreciation Week Day 1
 I made this card for my daughter to give to her teacher. This is the first card I have done using the Just Because Cards Cart. I used my Gypsy to size & cut all of the pieces including the envie (not pictured). The largest size that the envie would fit on a 12x12 mat was 6 1/2" (I think). So all pieces were cut @ 6 1/2". I honestly think the sentiment could have been a little smaller. But, I do like how the card turned out and her teacher loved it. We also sent her the apple paperclip bookmark, see HERE. I used the Cuttlebug w/ the Swiss Dots Embossing Folder for the "EWE" and the Divine Swirls Embossing Folder for the sheep's fur (debossed). I them Pop dotted the sheep to the card.
Thanks for looking. Questions & comments are always welcomed.Lori
Terrier Card: Paper Cutz Challenge #41
I made this card for Challenge # 41 over at Paper Cutz. We had a little Yorkshire Terrier for just over 15 years. She passed away this past January. When I came across this challenge & saw this little terrier on the Create A Critter Cart. I just knew this was the image I was going to use.
 Details:
Create A critter cart for the terrier & Ruff
Pop dotted the dog to the front
Cuttlebug w/ Herringbone Embossing Folder on the words
Heat Embossed the words with UTEE.
Inked & doodled on the edges of the card.
Added ribbon with a knot
Thanks for looking. Questions & comments are always welcomed. Lori
Create A critter cart for the terrier & Ruff
Pop dotted the dog to the front
Cuttlebug w/ Herringbone Embossing Folder on the words
Heat Embossed the words with UTEE.
Inked & doodled on the edges of the card.
Added ribbon with a knot
Thanks for looking. Questions & comments are always welcomed. Lori
Thursday, May 13, 2010
Paper Cutz Challenge # 40: Zoo Animal
This shape card was done for Challenge #40 over at the Paper Cutz Challenge Blog. The challenge was to make something (anything) for a child's birthday using a zoo animal. I'm not sure if everyone has Koala Bears in their zoos, but we do.
I had this card made in my Gypsy, but had never cut it. Thanks Mary for this challenge. It gave me a reason to do this card. Inside is stamped "Happy Birthday" with a Heidi Swap stamp. I don't know why I made her blue, other than I just wanted her a little different. I'm happy with how she turned out.
 Details:
Designed & welded using my Gypsy.
Create A Critter Cart.
Glitter Glue for some sparkle & dimension
.gypsy File
Thanks for looking. Questions & comments are always welcomed. Lori
I had this card made in my Gypsy, but had never cut it. Thanks Mary for this challenge. It gave me a reason to do this card. Inside is stamped "Happy Birthday" with a Heidi Swap stamp. I don't know why I made her blue, other than I just wanted her a little different. I'm happy with how she turned out.
Designed & welded using my Gypsy.
Create A Critter Cart.
Glitter Glue for some sparkle & dimension
.gypsy File
Thanks for looking. Questions & comments are always welcomed. Lori
Cricut Cardz Challenge #24: 3 Circles
Cricut Cardz Challenge Blog is having it's 24th Challenge. This challenge is to make a card using 3 circles. Anything else goes. This was super fun, but it was a challenge for my anyway. This is why we have a winter card in May - LOL. So this is what I came up with.
 Details:
George & Basic Shapes Cart. for the circles
Winter Woodland Cart for the trees
Studio G stamp for the sentiment
Cuttlebug w/ Divine Swirls Embossing Folder on the cirlces
Thanks for looking. Questions & comments are always welcomed. Lori
George & Basic Shapes Cart. for the circles
Winter Woodland Cart for the trees
Studio G stamp for the sentiment
Cuttlebug w/ Divine Swirls Embossing Folder on the cirlces
Thanks for looking. Questions & comments are always welcomed. Lori
Cuttlebug Challenge: A Child at Heart
I made this card for the Cuttlebug Challenge Blog. This challenge is A Child at Heart. We were to make a card for a child in our life.
This challenge was in perfect timing for me. It is for my daughter. She is 9 years old & we have been having some power struggles lately. (Those with daughters - I'm sure you know what I mean - at any age.) So, I made this card & wrote a personal note to her inside. Basically, just to tell her that she is unconditionally loved.
 Details:
Butterfly - Graphically Speaking Cricut Cart.
Stamp - From Michael's $1 Bin
Pearl Ex on the butterfly (not showing well in the pic)
Fiskar's Wavy Crimper (Joann's clearance for $2.97) Yay me!! I never find those deals!!!
Thanks for looking. Questions & comments are always welcomed.Lori
This challenge was in perfect timing for me. It is for my daughter. She is 9 years old & we have been having some power struggles lately. (Those with daughters - I'm sure you know what I mean - at any age.) So, I made this card & wrote a personal note to her inside. Basically, just to tell her that she is unconditionally loved.
 Details:
Butterfly - Graphically Speaking Cricut Cart.
Stamp - From Michael's $1 Bin
Pearl Ex on the butterfly (not showing well in the pic)
Fiskar's Wavy Crimper (Joann's clearance for $2.97) Yay me!! I never find those deals!!!
Thanks for looking. Questions & comments are always welcomed.Lori
Pause Dream Enjoy: ATC Challenge
This is the 1st ATC that I have ever made. I made it for the 1st ATC challenge over at the Pause Dream Enjoy Blog. An ATC (Artist Trading Card) has to be 2 1/2" x 3 1/2" in size. ATCs are not sold. They are traded amongst other artists. They are generally limited in number by style. For example, if you make 50 of one style they would be numbered 1 of 50, 2 of 50, & on. You usually put some kind of info about yourself on the back. This info will vary among artists. I would put my name, my blog address, the month & year that I made them, # of cards, and if made for a particular convention, meeting, or swap - the name of that convention, meeting, or swap.
For this challenge anything goes. Other than size it could be decorated in any theme, style, or medium of our choice.
I used an idea that I got from Momo. I didn't realize that I didn't use any cricut on this until I went to post it.
I had fun with this challenge. I think it cam out good for my 1st one. But, I hope to get better with the more that I make. It was quick, easy & a great way to use up scraps.
 Details:
Martha Stewart Doily Punch, Ribbon, Studio G Stamp
Thanks for looking. Questions & comments are always welcomed. Lori
For this challenge anything goes. Other than size it could be decorated in any theme, style, or medium of our choice.
I used an idea that I got from Momo. I didn't realize that I didn't use any cricut on this until I went to post it.
I had fun with this challenge. I think it cam out good for my 1st one. But, I hope to get better with the more that I make. It was quick, easy & a great way to use up scraps.
Martha Stewart Doily Punch, Ribbon, Studio G Stamp
Thanks for looking. Questions & comments are always welcomed. Lori
Wednesday, May 12, 2010
Practical Scrappers Challenge: Punches
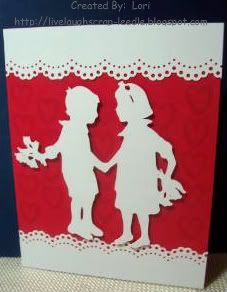
This card was made for the Practical Scrappers Challenge Blog. This challenge was to use punches of any kind on your project, you can check it out HERE.
I used my new, A Child's Year Cart., that I got for Mother's Day for this card. The punch that i used was the Martha Stewart Doily Punch. I used it to make a border along the top & bottom of the cart. Thinking the background was a little plain, I added some heart stamps (Studio G) to make a pattern on the background.
 Thanks for looking. Questions & comments are always welcomed.Lori
I used my new, A Child's Year Cart., that I got for Mother's Day for this card. The punch that i used was the Martha Stewart Doily Punch. I used it to make a border along the top & bottom of the cart. Thinking the background was a little plain, I added some heart stamps (Studio G) to make a pattern on the background.
Thanks for looking. Questions & comments are always welcomed.Lori
PTW Challenge: Shiny, Sparkly, & Special
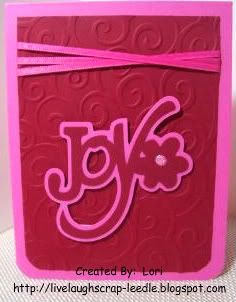
This card was made for the Papertake Weekly Challenge Blog. you can find this particular challenge HERE. The challenge was to add something shiny &/or sparkly to your project. it could be metal, gems, glitter, or whatever you want to use. Your project can be in any medium or form.
For this card I used my Gypsy with the Gypsy Wanderings Cart. I used my Cuttlebug with the Divine Swirls Embossing Folder on the background piece. In the center of the flower I added iridescent glitter glue. To add a little dimension & "something else", I wrapped some ribbon around the background paper.
 Thanks for looking. Questions & comments are always welcomed.Lori
For this card I used my Gypsy with the Gypsy Wanderings Cart. I used my Cuttlebug with the Divine Swirls Embossing Folder on the background piece. In the center of the flower I added iridescent glitter glue. To add a little dimension & "something else", I wrapped some ribbon around the background paper.
Thanks for looking. Questions & comments are always welcomed.Lori
Made By Momo Challenge #3: Child or Teen B-Day Card
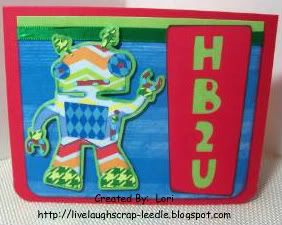
I made this card for the #3 Challenge on Momo's Blog. The challenge is to make a child or teen's birthday card. Thank You Momo for this challenge. It was super fun!!!!
I had recently gotten the Robotz Cricut Cart. and thought this would be the perfect project to use it on. I stepped out of my comfort zone with the patterned paper a bit. Other than the red cardstock all of the paper is patterned (even the green - it is a light pattern). Also let me tell you, this cart is perfect for using up scraps. This robot was cut at 3.5", but there are so many tiny pieces that you can use up so many small scraps making robots. I LOVE THIS CART!!!!! I can see plenty of robot bookmarks & cards in my future.
 Thanks for looking. Questions & comments are always welcomed. Lori
I had recently gotten the Robotz Cricut Cart. and thought this would be the perfect project to use it on. I stepped out of my comfort zone with the patterned paper a bit. Other than the red cardstock all of the paper is patterned (even the green - it is a light pattern). Also let me tell you, this cart is perfect for using up scraps. This robot was cut at 3.5", but there are so many tiny pieces that you can use up so many small scraps making robots. I LOVE THIS CART!!!!! I can see plenty of robot bookmarks & cards in my future.
Monday, May 10, 2010
FRIENDS Wordbook - A Work In Progress
This project is a work in progress. I don't usually post about unfinished work. But Cute and Some is having its Contributors Showcase #6 this week. The guidelines for the projects are: It can be any type of project. It just has to have the colors green, or purple, or both and include a flower. When I read this, I knew I had to enter this project even if unfinished.
I am making this for my niece that is turning 13 at the end of this month. Her favorite colors are green & purple.
Cover:


I will post again about this when I have the entire book finished with details (well the details that I can remember anyway).
.gypsy File (pages only not embelishments)
Thanks for looking. Questions & comments are always welcomed. Lori
I am making this for my niece that is turning 13 at the end of this month. Her favorite colors are green & purple.
Cover:

Pg. 1:

Pg. 2:

.gypsy File (pages only not embelishments)
Thanks for looking. Questions & comments are always welcomed. Lori
Thursday, May 6, 2010
.gypsy Files
My files are very simple, but they are all sized proportionally to fit. I have added the some of them to the left sidebar of my blog. Just look for the header My .gypsy Files. I will add more as they are tested & cut correctly.
Thanks for looking. Questions & comments are always welcomed.Lori
Thanks for looking. Questions & comments are always welcomed.Lori
Locker Talk - 8th Gr. Graduation Card
I made this card for one of my son's best friends. They went to school together from Kindergarten through 5th grade when my son moved on to another school. If my son had stayed at this school, this would be his graduating class. This will be an emotional night, seeing most of the kids that we have known since they were 5, graduating 8th grade.

 Details:
Cartridges Used: Locker Talk, Pooh Font, & Wild Card
Thanks for looking. Questions & comments are always welcomed. Lori
Cartridges Used: Locker Talk, Pooh Font, & Wild Card
Thanks for looking. Questions & comments are always welcomed. Lori
Happy Mother's Day - Flower Pot Slider
I started out making this as a shape card w/ the flowers sliding out. I had made a cupcake slider (on a base) & I liked this for the flowerpot too. I find that it helps me to keep from putting the flowers up too high, (I want it to fit into a regular envie.) & this keeps them within the correct frame.
These 2 cards are for my mom & grandmother. I am also entering this into Tracy's (Craft Junkie Too) Mother's Day Post and Cuttlebug Spot Challenge #4. So click on over HERE to check out every one's projects.
 Details:
Gypsy to design & cut w/ Cricut
Flowerpot is from Walk In My Garden (blackout, welded at the bottom & edges glued) Flowerpot pieces were also cut in patterned paper & layered to the front of the blackout pot. The rim was embossed using the Cuttlebug & Floral Screen & Paisley folders.
Tag was cut using the Tags, Bags, Boxes, & More cart.
The slider & base were cut from George & Basic Shapes cart.
Flowers are from Sweet Treats, Accent Essentials, & Forever Young carts. They were made using the wet & scrunch method. I then painted them with a mixture of Pearl Ex, Gum Arabic, & water.
Inked all edges & embossed pieces before assembling. Added tag with ribbon tied around one of the flowers.
.gypsy File
Thanks for looking. Questions & comments are always welcomed. Lori
These 2 cards are for my mom & grandmother. I am also entering this into Tracy's (Craft Junkie Too) Mother's Day Post and Cuttlebug Spot Challenge #4. So click on over HERE to check out every one's projects.
Gypsy to design & cut w/ Cricut
Flowerpot is from Walk In My Garden (blackout, welded at the bottom & edges glued) Flowerpot pieces were also cut in patterned paper & layered to the front of the blackout pot. The rim was embossed using the Cuttlebug & Floral Screen & Paisley folders.
Tag was cut using the Tags, Bags, Boxes, & More cart.
The slider & base were cut from George & Basic Shapes cart.
Flowers are from Sweet Treats, Accent Essentials, & Forever Young carts. They were made using the wet & scrunch method. I then painted them with a mixture of Pearl Ex, Gum Arabic, & water.
Inked all edges & embossed pieces before assembling. Added tag with ribbon tied around one of the flowers.
.gypsy File
Thanks for looking. Questions & comments are always welcomed. Lori
Friday, April 30, 2010
Whale Shape Card: Create A Critter
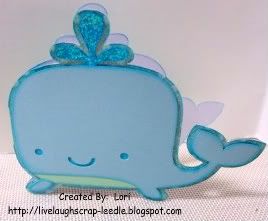
I have been designing shape cards in my Gypsy. This is one of them. I just love the Create A Critter cart. for this. It is so versatile & has so many great images.
I left the inside blank so that I or (anyone else) can decide what it would be used for. It could be a new baby boy card, birthday card for a young boy, "Get Whale Soon" card, or anything you see fit.
I added iridescent glitter glue to the water spout & inked all of the edges.
 .gypsy File
Thanks for looking. Questions & comments are always welcomed. Lori
I left the inside blank so that I or (anyone else) can decide what it would be used for. It could be a new baby boy card, birthday card for a young boy, "Get Whale Soon" card, or anything you see fit.
I added iridescent glitter glue to the water spout & inked all of the edges.
Thanks for looking. Questions & comments are always welcomed. Lori
Thursday, April 29, 2010
Girly Card - Forever Young
My niece inspired this card. So it will probably be her birthday card. She will be 13 next month & her favorite colors are green & purple.
I designed the card out in my Gypsy, but still didn't know how it would look. The girl is from the Forever Young Cart & the background shapes are from the Accent Essentials cart. I am very pleased with it after adding the ribbon & glossy accents to the flower & strip across the bottom of the dress. of course there is also a lot of inking around the edges w/ distress ink. The shadow layer of the girl is also inked up with Peeled Paint distress ink.
The only disappointment I have in it is the purse (notice it is not there). I had glossy accents on it & it got messed up. Also I attached the girl to the shadow first so the purse wouldn't fit right. Oh well, I'll know for next time.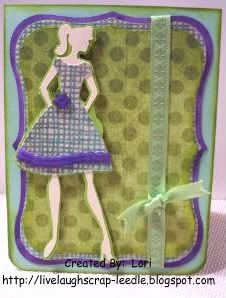 Thanks for looking. Questions & comments are always welcomed.Lori
I designed the card out in my Gypsy, but still didn't know how it would look. The girl is from the Forever Young Cart & the background shapes are from the Accent Essentials cart. I am very pleased with it after adding the ribbon & glossy accents to the flower & strip across the bottom of the dress. of course there is also a lot of inking around the edges w/ distress ink. The shadow layer of the girl is also inked up with Peeled Paint distress ink.
The only disappointment I have in it is the purse (notice it is not there). I had glossy accents on it & it got messed up. Also I attached the girl to the shadow first so the purse wouldn't fit right. Oh well, I'll know for next time.
Thanks for looking. Questions & comments are always welcomed.Lori
Shape Card - Present
I made this card for my daughter to give to her teacher for her birthday.
I used the Sweet Treats Cart, Card Feature and cut everything at 5.5". My daughter was so excited when I she saw it. She couldn't wait to give it to her teacher.
 .gypsy File
Thanks for looking. Questions & comments are always welcomed. Lori
I used the Sweet Treats Cart, Card Feature and cut everything at 5.5". My daughter was so excited when I she saw it. She couldn't wait to give it to her teacher.
Thanks for looking. Questions & comments are always welcomed. Lori
Tuesday, April 27, 2010
Paper Clip Bookmarks
Since getting my Gypsy, I have been designing a lot of projects. Some of these were cut as test cuts, others are cut with the adjusted file. These are so simple & practical. I love making them & see many more in my future. I will share my files as soon as I get it all figured out. I have been watching MadeByMomo's Videos with the Create A Critter Cart. & she got me to thinking. These "Critters" would make great bookmarks. So that's what started this whole thing.
This one is made using the book & A+ from the Locker Talk Cart. The base circle (2" RDS - yellow "a" & chain linked) is from Mini Monograms.
 The apple is from Create A Critter & the scallop square (1.5" RDS - yellow "a" & chain linked) is from Mini Monograms. I re-worked this one to have the square base to be cut @ 2" instead of 1.5. I like the larger size better.
 The cats are from Create A Critter. The grey cat is cut @ 1.5" I think. It was too small for me so this one is not saved. To size them, I put all of the layers together on my mat grouped. Then I sized them using the (RDS - yellow "a" w/ chain linked) to 2.5". I then separated all of the pieces on the mat to cut in their colors. I just used a blackout cut for the back of the paperclip.
 The dinosaurs are from Create A Critter. The scallop squares are from Mini Monograms cut @ 2" RDS - yellow "a" w/ chain linked.
 .gypsy Files:
apple, book, cat, dino
Thanks for looking. Questions & comments are always welcomed. Lori
This one is made using the book & A+ from the Locker Talk Cart. The base circle (2" RDS - yellow "a" & chain linked) is from Mini Monograms.
apple, book, cat, dino
Thanks for looking. Questions & comments are always welcomed. Lori
Thursday, April 22, 2010
Monkey Card: Made By Momo Callenge #1
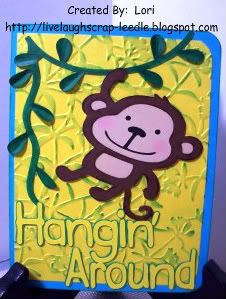
I designed this card in my Gypsy Sunday evening. I never did get a chance to cut it. Well today I was watching a video on YouTube by MadeByMomo. She mentioned that he had a challenge posted on her BLOG.
The challenge was to make a card with an animal on it. I was going to do an animal shape card, then decided to make my monkey card. I'm glad I did. I think it is so cute.
 Details:
Monkey & Vines are cut from the Create A Critter Cricut Cart.
Sentiment is using the Pooh Font Cricut Cart.
I used chalk to give the monkey rosy cheeks. I also used some tan chalk on the lighter parts of his face & body to give a little something to it.
The vines & the sentiment were welded in Gypsy. I also used my Gypsy to design the LO of the card.
At the last minute & decided to add another layer. I used the Cuttlebug with the Floral Screen Embossing Folder. I rubbed my ink pad directly on the embossed parts of that layer. I also inked the edges of the monkey & the card base..
Thanks for looking. Questions & comments are always welcomed.
Lori
The challenge was to make a card with an animal on it. I was going to do an animal shape card, then decided to make my monkey card. I'm glad I did. I think it is so cute.
Monkey & Vines are cut from the Create A Critter Cricut Cart.
Sentiment is using the Pooh Font Cricut Cart.
I used chalk to give the monkey rosy cheeks. I also used some tan chalk on the lighter parts of his face & body to give a little something to it.
The vines & the sentiment were welded in Gypsy. I also used my Gypsy to design the LO of the card.
At the last minute & decided to add another layer. I used the Cuttlebug with the Floral Screen Embossing Folder. I rubbed my ink pad directly on the embossed parts of that layer. I also inked the edges of the monkey & the card base..
Thanks for looking. Questions & comments are always welcomed.
Lori
Monday, April 19, 2010
Teacher Appreciation Gift 2010
Last year I made a few gifts for my daughter's teacher. She brought her gift almost everyday. This year, I am trying to get together some inventory to do my first craft fair. So, I decided to make just one really good gift for her 3rd grade teacher.
I put all the teacher related items, her name & a fleur di lis on it. She is a huge N.O. Saints fan, so I knew there had to be something on it to represent that part of her personality.
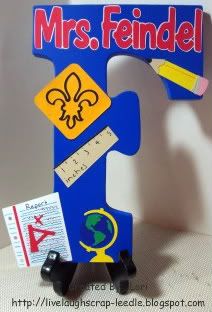 I used my Gypsy, Cricut, Pooh Font Set Cart., Locker Talk Cart., George & Basic Shapes Cart., & Accent Essentials Cart.
Thanks for looking. Questions & comments are always welcomed.
Lori
I put all the teacher related items, her name & a fleur di lis on it. She is a huge N.O. Saints fan, so I knew there had to be something on it to represent that part of her personality.
Thanks for looking. Questions & comments are always welcomed.
Lori
Friday, April 16, 2010
Grunge & Scrunch Paper Flowers
My Sister-in-Law asked me to make her some flowers. She is going to put them on some clips for my niece's hair. I do spray them with Krylon Preserve It. It gives them some protection from moisture & helps them last longer. I just wouldn't wear them on a day when it would be raining a lot - after all they are only made of cardstock.
Tip: If you are going to use the Preserve It - spray them before adding a gem or anything to the center. If you are using a Matte finish spray - the gem will not shine.
Grunge Flowers:
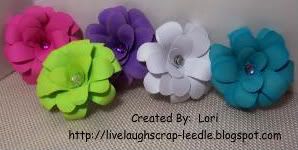 I used my Gypsy with the Sweet Treats Cartridge for this flower. I used a blackout flower & added a circle to the center. There are tons of tutorials on how to make this flower, so I have no idea who to give credit to. So to all of you with blogs & on You Tube thanks for all of the tutorials. I cut them, formed them, inked them, & assembled them. Then I added a rhinestone in the center.
Scrunch Flowers:
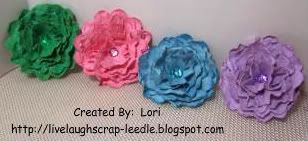 I'm not really sure what these type of flowers are called, so I am calling the Scrunch Flowers. I first saw a tutorial HERE, thanks Christina for sharing your video. I used this basic idea & changed it up a little bit. I used my Gypsy w. the Sweet Treats Cartridge. I cut a blackout scallop flower in 5 different sizes. I started at 2.5 in. & graduated down by .25 in for each flower. If I am putting them on a card, I might punch a hole & add a brad. But since these will basically be on hair clips I just added a rhinestone to the center. I added some Home Made Glimmer Mist (though it doesn't show in the pic).
Thanks for looking. Questions & comments are always welcomed.
Lori
Tip: If you are going to use the Preserve It - spray them before adding a gem or anything to the center. If you are using a Matte finish spray - the gem will not shine.
Grunge Flowers:
Scrunch Flowers:
Thanks for looking. Questions & comments are always welcomed.
Lori
Thursday, April 15, 2010
Minnie & Micky Mouse Decorated Boxes
HAPPY BIRTHDAY JULIA!!!!!!!!
My niece Julia turns 5 this month. Wow, where does the time go? Her birthday party is themed around Minnie Mouse. My sister-in-law got these really cute boxes and asked me if I could decorate them in some way with Minnie Mouse. We didn't want to cover them, since the boxes were pretty on their own. So this is what I came up with. I do not have the Cricut Micky Mouse Cartridge, so I looked around for an SVG file. Kris of Scrappinbykris had one on her blog that she was sharing. Click HERE to check it out &/or to get her file.
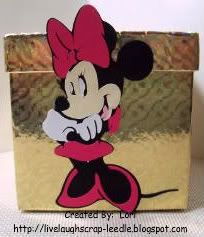
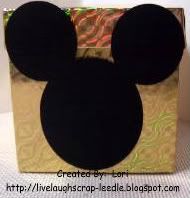
I didn't find a file for Micky, so I just made a file using my Gypsy and the George & Basic Shapes Cricut Cart. We didn't really thing that the boys would care very much for a Minnie Mouse in a pink dress - LOL.
Lori
Wednesday, April 14, 2010
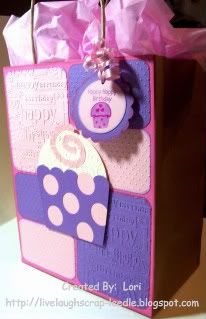
Morgan's M & Giftbag
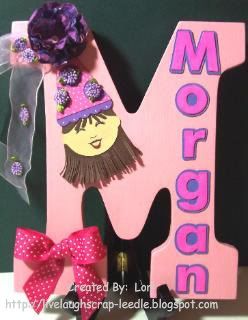
I made these in March for Morgan. A precious little girl that we know that was turning 4.
 Details:
Details:Letter:
White wooden M from Michael's painted with acrylic paint. Sprayed w/ Krylon Preserve It along with all of the pieces that were added to the letter.
Name was cut using SCAL.
Princess - Hat was cut from the Sweet Treats cart. Head & hair were cut from the Paper Doll Dress Up cart. face is peachy Keen Stamps. Ribbon is an old hair ribbon that my daughter did not use anymore. Flower is one of my Phone Book Page Flowers.
Giftbag:
Cuttlebug using the Swiss Dots, Happy Birthday & Devine Swirls Embossing Folders
Mini Monograms for the tag w/ My Pink Stamper Stamps.
Cupcake on bag is from the Sweet Treats cart.
Thanks for looking. Questions & comments are always welcomed.
Lori
Lori
Sunday, April 11, 2010
Cruise Luggage Tags
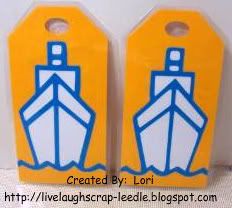
My aunt is going on a cruise next month. I made some luggage tags for her & her friend. I cut them using my Gypsy & SCAL.
Front:
The tags were cut using the Plantin Schoolbook Cart. I got the svg file for the Cruise Ship from A Southernbelle's SVG's. Please click on over to visit her blog. She is very talented & so very generous to share her work.
 Back:
Back:
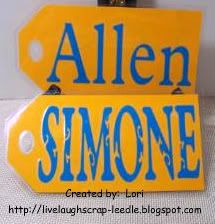
I put their names on the back.
Allen was cut out with the Plantin Schoolbook Cart.
Simone was cut out using the Gypsy Font Cart.
 Thanks for looking. Questions & comments are always welcomed.
Lori
Front:
The tags were cut using the Plantin Schoolbook Cart. I got the svg file for the Cruise Ship from A Southernbelle's SVG's. Please click on over to visit her blog. She is very talented & so very generous to share her work.
I put their names on the back.
Allen was cut out with the Plantin Schoolbook Cart.
Simone was cut out using the Gypsy Font Cart.
Lori
Friday, April 9, 2010
Fleur di Lis Bookmarks
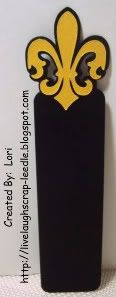
Living in New Orleans the Fleur-di-lis is really big. Now, since the Superbowl, if the Fleur-di-Lis's are black & gold, they are very popular. I made these just to have a little fun and to test out my Gypsy. They came out beautifully.
 Details:
Gypsy to design & weld
George & Basic Shapes Cart for the rectangle
Gypsy Wanderings Cart for the fleur di lis
Home Made Glimmer Mist (Sparkle Gold) on the gold fleur di lis. (doesn't show up in the pic, but in person it is beautiful!!!!)
.gypsy File
Thanks for looking. Questions & comments are always welcomed.
Lori
Details:Gypsy to design & weld
George & Basic Shapes Cart for the rectangle
Gypsy Wanderings Cart for the fleur di lis
Home Made Glimmer Mist (Sparkle Gold) on the gold fleur di lis. (doesn't show up in the pic, but in person it is beautiful!!!!)
.gypsy File
Thanks for looking. Questions & comments are always welcomed.
Lori
April's MCPT Challenge on the Cricut MB
I made this card for the April MCPT Challenge on the Cricut MB. Thanks to Aprile for sponsoring it. For info you can click HERE to join in or to see all of the projects made.
Sorry for the picture quality. I can't seem to get it right lately.
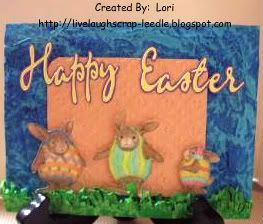 Details:
Painted & crumpled old phone book pages for the background & grass
Peach block is a paint sample from Wal-Mart that i put in the Cuttlebug w/ the Moroccan Screen Embossing Folder
Happy Easter is from the Gypsy Font Cart using the Gypsy to weld
I colored in the images & cut them out. I used Baby Oil Gel as the medium for the MCPT. I then pop dotted them on the card.
Thanks for looking. Questions & comments are always welcomed.
Lori
Sorry for the picture quality. I can't seem to get it right lately.
Details:Painted & crumpled old phone book pages for the background & grass
Peach block is a paint sample from Wal-Mart that i put in the Cuttlebug w/ the Moroccan Screen Embossing Folder
Happy Easter is from the Gypsy Font Cart using the Gypsy to weld
I colored in the images & cut them out. I used Baby Oil Gel as the medium for the MCPT. I then pop dotted them on the card.
Thanks for looking. Questions & comments are always welcomed.
Lori
Turtle Shaped Card
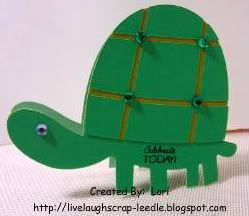
Details:
Gypsy to design & weld
Walk In My Garden Cart for the turtle
Inside (not shown) Happy Birthday is from Gypsy Wanderings Cart
Stamp is from MPS
Rhinestones for eye & to decorate the shell
.gypsy File
Thanks for looking. Questions & comments are always welcomed.
Lori
Wednesday, April 7, 2010
4 More Wall Letters - K, T, G, J
I made wall letters for my niece & 3 nephews for Easter. I still find it a little bit of a challenge to make these for boys, but I think they are turning out pretty good.
"K" for Karissa
She will be 2 in July. Everything we have done for her has been pink & purple & involves butterflies. I used the Gypsy Wanderings cart for the butterflies, Home Accents cart for the branch & flowers, & the Alphalicious Cart. for her name.
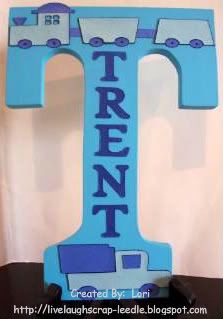
 "T" for Trent
He will be 1 in July. I knew I was going with 2 shades of blue. With him being so young, I knew that whatever I did - he will eventually grow out of it. So, I went with a truck & a train from the New Arrivals Cart. His name was cut using the Plantin Schoolbook Cart.
 "G" for Garrett
He made 3 in January. He just loves anything to do with balls. So what better cart to use than the Sports Mania Cart. His name was cut using the Plantin Schoolbook Cart.
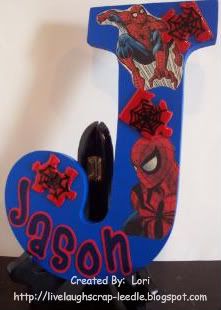
 "J" for Jason
Jason is going to be 8 in October. He is a wiz with putting puzzles together and he loves Spiderman. I found some Spiderman comic books (new ones - not collectibles) and cut some of the Spideys out. I sprayed them with Krylon Preserve It so that they will last. Then for the puzzles, I painted some pieces red, freehand painted some spider webs, & coated them with Triple Thick. I cut his name from SCAL.
 Thanks for looking. Questions & comments are always welcomed.
Lori
"K" for Karissa
She will be 2 in July. Everything we have done for her has been pink & purple & involves butterflies. I used the Gypsy Wanderings cart for the butterflies, Home Accents cart for the branch & flowers, & the Alphalicious Cart. for her name.
He will be 1 in July. I knew I was going with 2 shades of blue. With him being so young, I knew that whatever I did - he will eventually grow out of it. So, I went with a truck & a train from the New Arrivals Cart. His name was cut using the Plantin Schoolbook Cart.
He made 3 in January. He just loves anything to do with balls. So what better cart to use than the Sports Mania Cart. His name was cut using the Plantin Schoolbook Cart.
Jason is going to be 8 in October. He is a wiz with putting puzzles together and he loves Spiderman. I found some Spiderman comic books (new ones - not collectibles) and cut some of the Spideys out. I sprayed them with Krylon Preserve It so that they will last. Then for the puzzles, I painted some pieces red, freehand painted some spider webs, & coated them with Triple Thick. I cut his name from SCAL.
Lori
Easter "Easel" or "Pedestal" Card
This is the first "Easel" or "Pedestal" Card that I have made. I have to tell you that I love them. They are so easy to design & put together. I also think they make such a wonderful presentation. Thanks to Mary at Cardz TV for her video tutorial. Click on over to see it.
Front:
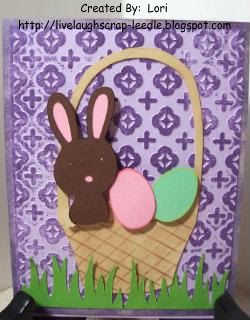 Standing: Sorry about the color - don't know what happened. The first pic is more of how it actually looks.
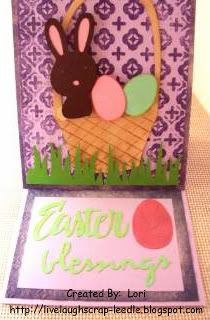 Thanks for looking. Questions & comments are always welcomed.
Lori
Front:
Lori
Subscribe to:
Posts (Atom)