Followers, Guestbook, & Comments

My followers are being shown in the right column. My Guestbook is at the bottom. Please follow, comment on posts, & sign my guest book. Your comments encourage me to keep sharing my work. I love hearing from you all.

When you leave a comment, I have to moderate it before it will be posted. So if you have a questions or comments, feel free to ask & if necessary note that you don't want your comment posted.

Friday, April 30, 2010

Whale Shape Card: Create A Critter

I have been designing shape cards in my Gypsy.  This is one of them.  I just love the Create A Critter cart. for this.  It is so versatile & has so many great images.
I left the inside blank so that I or (anyone else) can decide what it would be used for.  It could be a new baby boy card, birthday card for a young boy, "Get Whale Soon" card, or anything you see fit.
I added iridescent glitter glue to the water spout & inked all of the edges.
.gypsy File

Thanks for looking. Questions & comments are always welcomed. Lori

Thursday, April 29, 2010

Girly Card - Forever Young

My niece inspired this card. So it will probably be her birthday card. She will be 13 next month & her favorite colors are green & purple.
I designed the card out in my Gypsy, but still didn't know how it would look. The girl is from the Forever Young Cart & the background shapes are from the Accent Essentials cart. I am very pleased with it after adding the ribbon & glossy accents to the flower & strip across the bottom of the dress. of course there is also a lot of inking around the edges w/ distress ink. The shadow layer of the girl is also inked up with Peeled Paint distress ink.
The only disappointment I have in it is the purse (notice it is not there). I had glossy accents on it & it got messed up. Also I attached the girl to the shadow first so the purse wouldn't fit right. Oh well, I'll know for next time.Thanks for looking. Questions & comments are always welcomed.Lori

Shape Card - Present

I made this card for my daughter to give to her teacher for her birthday.
I used the Sweet Treats Cart, Card Feature and cut everything at 5.5". My daughter was so excited when I she saw it. She couldn't wait to give it to her teacher.
.gypsy File
Thanks for looking. Questions & comments are always welcomed. Lori

Tuesday, April 27, 2010

Paper Clip Bookmarks

Since getting my Gypsy, I have been designing a lot of projects. Some of these were cut as test cuts, others are cut with the adjusted file. These are so simple & practical. I love making them & see many more in my future. I will share my files as soon as I get it all figured out. I have been watching MadeByMomo's Videos with the Create A Critter Cart. & she got me to thinking. These "Critters" would make great bookmarks. So that's what started this whole thing.
This one is made using the book & A+ from the Locker Talk Cart. The base circle (2" RDS - yellow "a" & chain linked) is from Mini Monograms.

The apple is from Create A Critter & the scallop square (1.5" RDS - yellow "a" & chain linked) is from Mini Monograms. I re-worked this one to have the square base to be cut @ 2" instead of 1.5. I like the larger size better.

The cats are from Create A Critter. The grey cat is cut @ 1.5" I think. It was too small for me so this one is not saved. To size them, I put all of the layers together on my mat grouped. Then I sized them using the (RDS - yellow "a" w/ chain linked) to 2.5". I then separated all of the pieces on the mat to cut in their colors. I just used a blackout cut for the back of the paperclip.

The dinosaurs are from Create A Critter. The scallop squares are from Mini Monograms cut @ 2" RDS - yellow "a" w/ chain linked.

.gypsy Files:
apple, book, cat, dino
Thanks for looking. Questions & comments are always welcomed. Lori

Thursday, April 22, 2010

Monkey Card: Made By Momo Callenge #1

I designed this card in my Gypsy Sunday evening. I never did get a chance to cut it. Well today I was watching a video on YouTube by MadeByMomo. She mentioned that he had a challenge posted on her BLOG.
The challenge was to make a card with an animal on it. I was going to do an animal shape card, then decided to make my monkey card. I'm glad I did. I think it is so cute.
Details:
Monkey & Vines are cut from the Create A Critter Cricut Cart.
Sentiment is using the Pooh Font Cricut Cart.
I used chalk to give the monkey rosy cheeks. I also used some tan chalk on the lighter parts of his face & body to give a little something to it.
The vines & the sentiment were welded in Gypsy. I also used my Gypsy to design the LO of the card.
At the last minute & decided to add another layer. I used the Cuttlebug with the Floral Screen Embossing Folder. I rubbed my ink pad directly on the embossed parts of that layer. I also inked the edges of the monkey & the card base..
Thanks for looking. Questions & comments are always welcomed.
Lori

Monday, April 19, 2010

Teacher Appreciation Gift 2010

Last year I made a few gifts for my daughter's teacher. She brought her gift almost everyday. This year, I am trying to get together some inventory to do my first craft fair. So, I decided to make just one really good gift for her 3rd grade teacher.
I put all the teacher related items, her name & a fleur di lis on it. She is a huge N.O. Saints fan, so I knew there had to be something on it to represent that part of her personality.
I used my Gypsy, Cricut, Pooh Font Set Cart., Locker Talk Cart., George & Basic Shapes Cart., & Accent Essentials Cart.

Thanks for looking. Questions & comments are always welcomed.
Lori

Friday, April 16, 2010

Grunge & Scrunch Paper Flowers

My Sister-in-Law asked me to make her some flowers. She is going to put them on some clips for my niece's hair. I do spray them with Krylon Preserve It. It gives them some protection from moisture & helps them last longer. I just wouldn't wear them on a day when it would be raining a lot - after all they are only made of cardstock.
Tip: If you are going to use the Preserve It - spray them before adding a gem or anything to the center. If you are using a Matte finish spray - the gem will not shine.
Grunge Flowers:
I used my Gypsy with the Sweet Treats Cartridge for this flower. I used a blackout flower & added a circle to the center. There are tons of tutorials on how to make this flower, so I have no idea who to give credit to. So to all of you with blogs & on You Tube thanks for all of the tutorials. I cut them, formed them, inked them, & assembled them. Then I added a rhinestone in the center.

Scrunch Flowers:
I'm not really sure what these type of flowers are called, so I am calling the Scrunch Flowers. I first saw a tutorial HERE, thanks Christina for sharing your video. I used this basic idea & changed it up a little bit. I used my Gypsy w. the Sweet Treats Cartridge. I cut a blackout scallop flower in 5 different sizes. I started at 2.5 in. & graduated down by .25 in for each flower. If I am putting them on a card, I might punch a hole & add a brad. But since these will basically be on hair clips I just added a rhinestone to the center. I added some Home Made Glimmer Mist (though it doesn't show in the pic).
Thanks for looking. Questions & comments are always welcomed.
Lori

Thursday, April 15, 2010

Minnie & Micky Mouse Decorated Boxes

HAPPY BIRTHDAY JULIA!!!!!!!!
My niece Julia turns 5 this month. Wow, where does the time go? Her birthday party is themed around Minnie Mouse. My sister-in-law got these really cute boxes and asked me if I could decorate them in some way with Minnie Mouse. We didn't want to cover them, since the boxes were pretty on their own. So this is what I came up with. I do not have the Cricut Micky Mouse Cartridge, so I looked around for an SVG file. Kris of Scrappinbykris had one on her blog that she was sharing. Click HERE to check it out &/or to get her file.
I didn't find a file for Micky, so I just made a file using my Gypsy and the George & Basic Shapes Cricut Cart. We didn't really thing that the boys would care very much for a Minnie Mouse in a pink dress - LOL.
Thanks for looking. Questions & comments are always welcomed.
Lori

Wednesday, April 14, 2010

Morgan's M & Giftbag

I made these in March for Morgan. A precious little girl that we know that was turning 4.
Details:
Letter:
White wooden M from Michael's painted with acrylic paint. Sprayed w/ Krylon Preserve It along with all of the pieces that were added to the letter.
Name was cut using SCAL.
Princess - Hat was cut from the Sweet Treats cart. Head & hair were cut from the Paper Doll Dress Up cart. face is peachy Keen Stamps. Ribbon is an old hair ribbon that my daughter did not use anymore. Flower is one of my Phone Book Page Flowers.
Giftbag:
Cuttlebug using the Swiss Dots, Happy Birthday & Devine Swirls Embossing Folders
Mini Monograms for the tag w/ My Pink Stamper Stamps.
Cupcake on bag is from the Sweet Treats cart.

Thanks for looking. Questions & comments are always welcomed.
Lori

Sunday, April 11, 2010

Cruise Luggage Tags

My aunt is going on a cruise next month. I made some luggage tags for her & her friend. I cut them using my Gypsy & SCAL.
Front:
The tags were cut using the Plantin Schoolbook Cart. I got the svg file for the Cruise Ship from A Southernbelle's SVG's. Please click on over to visit her blog. She is very talented & so very generous to share her work.
Back:
I put their names on the back.
Allen was cut out with the Plantin Schoolbook Cart.
Simone was cut out using the Gypsy Font Cart.
Thanks for looking. Questions & comments are always welcomed.
Lori

Friday, April 9, 2010

Fleur di Lis Bookmarks

Living in New Orleans the Fleur-di-lis is really big. Now, since the Superbowl, if the Fleur-di-Lis's are black & gold, they are very popular. I made these just to have a little fun and to test out my Gypsy. They came out beautifully.

Details:
Gypsy to design & weld
George & Basic Shapes Cart for the rectangle
Gypsy Wanderings Cart for the fleur di lis
Home Made Glimmer Mist (Sparkle Gold) on the gold fleur di lis. (doesn't show up in the pic, but in person it is beautiful!!!!)
.gypsy File
Thanks for looking. Questions & comments are always welcomed.
Lori

April's MCPT Challenge on the Cricut MB

I made this card for the April MCPT Challenge on the Cricut MB. Thanks to Aprile for sponsoring it. For info you can click HERE to join in or to see all of the projects made.
Sorry for the picture quality. I can't seem to get it right lately.
Details:
Painted & crumpled old phone book pages for the background & grass
Peach block is a paint sample from Wal-Mart that i put in the Cuttlebug w/ the Moroccan Screen Embossing Folder
Happy Easter is from the Gypsy Font Cart using the Gypsy to weld
I colored in the images & cut them out. I used Baby Oil Gel as the medium for the MCPT. I then pop dotted them on the card.

Thanks for looking. Questions & comments are always welcomed.
Lori

Turtle Shaped Card

My grandmother is going to 85 this month. She likes turtles, so I thought I thought I would make her a cute card that is shaped like a turtle.
Details:
Gypsy to design & weld
Walk In My Garden Cart for the turtle
Inside (not shown) Happy Birthday is from Gypsy Wanderings Cart
Stamp is from MPS
Rhinestones for eye & to decorate the shell

.gypsy File
Thanks for looking. Questions & comments are always welcomed.
Lori

Wednesday, April 7, 2010

4 More Wall Letters - K, T, G, J

I made wall letters for my niece & 3 nephews for Easter. I still find it a little bit of a challenge to make these for boys, but I think they are turning out pretty good.

"K" for Karissa
She will be 2 in July. Everything we have done for her has been pink & purple & involves butterflies. I used the Gypsy Wanderings cart for the butterflies, Home Accents cart for the branch & flowers, & the Alphalicious Cart. for her name.
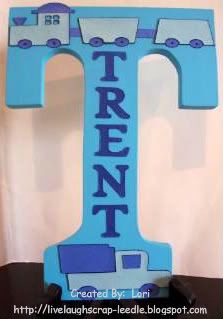
"T" for Trent
He will be 1 in July. I knew I was going with 2 shades of blue. With him being so young, I knew that whatever I did - he will eventually grow out of it. So, I went with a truck & a train from the New Arrivals Cart. His name was cut using the Plantin Schoolbook Cart.
"G" for Garrett
He made 3 in January. He just loves anything to do with balls. So what better cart to use than the Sports Mania Cart. His name was cut using the Plantin Schoolbook Cart.
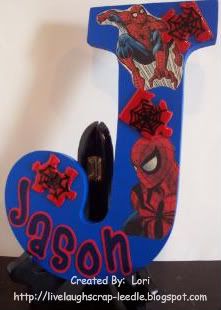
"J" for Jason
Jason is going to be 8 in October. He is a wiz with putting puzzles together and he loves Spiderman. I found some Spiderman comic books (new ones - not collectibles) and cut some of the Spideys out. I sprayed them with Krylon Preserve It so that they will last. Then for the puzzles, I painted some pieces red, freehand painted some spider webs, & coated them with Triple Thick. I cut his name from SCAL.
Thanks for looking. Questions & comments are always welcomed.
Lori

Easter "Easel" or "Pedestal" Card

This is the first "Easel" or "Pedestal" Card that I have made.  I have to tell you that I love them.  They are so easy to design & put together.  I also think they make such a wonderful presentation.  Thanks to Mary at Cardz TV for her video tutorial.  Click on over to see it.

Front:
Standing:  Sorry about the color - don't know what happened.  The first pic is more of how it actually looks.
Thanks for looking. Questions & comments are always welcomed.
Lori