Followers, Guestbook, & Comments

My followers are being shown in the right column. My Guestbook is at the bottom. Please follow, comment on posts, & sign my guest book. Your comments encourage me to keep sharing my work. I love hearing from you all.

When you leave a comment, I have to moderate it before it will be posted. So if you have a questions or comments, feel free to ask & if necessary note that you don't want your comment posted.
Showing posts with label Paper Flowers. Show all posts

Monday, November 15, 2010

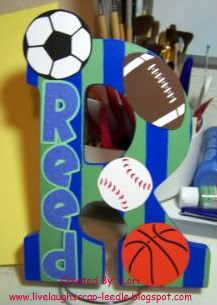
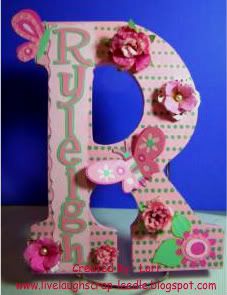
"R" Ryleigh & "R" Reed

This set of letters were made for some friends with twins.  They are fraternal twins, a boy & a girl.  The green was added to both letters to tie in the room color, since they share a room.
Ryleigh:  Pink & Sage Green, Girly
Reed:  Blue & Sage Green, Variety of Sports
I used my Gypsy and Cricut to design & create these projects.
Thanks for looking. Questions & comments are always welcomed. Lori

Friday, July 23, 2010

Wall Letter: E - Elise

Here's yet another wall letter.  This one is for a little girl that is 8 years old.  She likes soccer, dogs, & butterflies.  Her room is a peachy color.  This is the letter that I came up with to represent her.  Sorry the pic doesn't show some of the detail.  I used water colors to tint the flowers & give them some shading & dimension.  I also added some Glossy Accents and MS Fine Crystal Glitter to the edges of the flowers to make them look dewey & sparkle.  Also the eyes on the dogs are glossy too (the dalmatian's don't even show up in the pic).
Details:
Cartridges Used:  Accent Essentials & George & Basic Shapes (Flowers), George & Basic Shapes (Name), Everyday Paper Dolls (Grass & Brown Dog), Create A Critter (Dalmatian & Butterflies), & Sports Mania (Soccer Ball)

Thanks for looking. Questions & comments are always welcomed. Lori

Monday, June 28, 2010

Embossed Tag

I made this tag for the Embossed Tags Challenge at the Cuttlebug Spot.
Details:
Cartridges Used:  Tags, Bags, Boxes & More (Tag), Celebrations (Gift), George & Basic Shapes & Accent Essentials (Mini Faux Prima Roses)
Cuttlebug using Fiskars Texture Plates (Lace)
Heat embossed the gift using UTEE.
Thanks for looking. Questions & comments are always welcomed. Lori

Tuesday, June 15, 2010

Wall Letter - J for Julia

OK, so here is another one.  My friends are keeping me busy.  That's ok, because I love making these.  One of my very good friends wanted this one for her niece.  She liked the last "A" (Alyssa) that I made & Julia's room is dark pink.  Julia also takes Taekwondo.  So here is her letter; pink, butterfly, flower, glitter, & Taekwondo.  I like the style of each letter to represent the person it is for in some way, so that they know it was made just for them.  I also (even for the very young children) don't want them to outgrow the style of the design.  So that if I make a letter for a young child, I would like to think that they would still want to hang it when they are teenagers.
I used my Gypsy and Cricut to design & create this letter.
Cartridges used:  Sports Mania (Martial Arts Figure), Storybook (Name), Everyday Paper Dolls (Butterfly), Walk In My Garden (Scrunch Flower & Leaves), Accent Essentials and George & Basic Shapes (Mini Roses)
I used large bubble bubble wrap to make the background on the letter.  I then made some glitter glue (MS glitter & glossy Mod Podge) and painted some accents in the spots.  I coated the butterfly with Triple Thick & added Diamond Dust the the body of the butterfly.  I made the scrunch flower & painted each layer with home made glimmer mist before assembling and added a rhinestone to the center.  I made the Faux Mini Prima Roses, added a glass pearl to the centered, & clustered them at the bottom of the letter.  The name didn't show well so I made a background for it with some wavy decorative scissors & inked the edges.  I wanted the Martial Arts Figure to stand out, so I placed it prominently at the top of the "J" hook.
Thanks for looking. Questions & comments are always welcomed. Lori

Monday, June 14, 2010

Wall Letters - Jenna & Alyssa

My best friend from high school had seen some of my wall letters & called to see if I could make some for her. She wanted to give them to her nieces for their birthdays.
I used my Gypsy and Cricut to design & create these letters.
Jenna is 5 years old, likes animals and the color blue. This is the letter that I designed for her.
The cartridges I used to make Jenna's letter are: Cuttin' Up (Name), Create A Critter (Poodle, Bird, & Monkey w/ Vine), & Animal Kingdom (Cat). I pop-dotted the wing on the bird & the head on the cat to give some dimension. As always I inked the cuts for some dimension & design.
Alyssa is 4years old and likes pink and butterflies.
I used my Gypsy and Cricut to design & create these letters.
The cartridges I used to make Alyssa's letter are: Ashlyn's Alphabet (Name), A Child's Year (Fairy), Designer's Calendar (Butterfly - I cut it out 4 times, cut the pieces apart, colored them all, & pieced them all together with their different layers.), George & Basic Shapes and Accent Essentials (Paper Roses - HERE is my post about them.) I made a template for the flourishes on the base of the letter, but I can't remember which cart they came from. I used it as a stencil, drew on the flourishes, made my own glitter glue and painted over my markings with the glitter glue.

Thanks for looking. Questions & comments are always welcomed. Lori

Wednesday, June 2, 2010

Roses Using Kathy Orta's Video Tutorial

As promised from my Swap Post, here are the close ups of the flowers that I made.  You can see how to do these HERE.  Thank you so much Kathy ( Paper Phenomenon & YouTube) for sharing your techniques with us.  I personally have bought Prima flowers, but I have not used the mini roses.  Using your technique it is so easy & fun to make them.  Also, like you said, you always have the color (and size - in my case) that you need.  The paper that I used was actually manila folders.
 
 
And here are the projects (again - for those of you that saw my swap post).
Sign:
 Tag:

Thanks for looking. Questions & comments are always welcomed. Lori

Monday, May 31, 2010

Cricut Cut Swap for Joyce (1fotojoy) on YouTube

Momo from MadeByMomo hosted a Cricut Cut Swap. I was lucky enough to get in it. I was paired up with Joyce (1fotojoy) on YouTube. This is what I am sending her. Now, these pics aren't very exciting to see, but let me explain. Joyce is very talented - check out her YouTube channel to see for yourself. The cuts that she wanted, she wanted left plain & cut in either white, black, manila, brown or grey. she is going to decorate & embellish them to fit the projects she will be using them on. So I made multiples of all of the cuts. I do have some extras that I don't have pics of yet.

Joyce I am so sorry that these are getting to you a little late (explained in my email). Since they cannot go out into the mail until tomorrow due to the holiday I am making some extras for you too. I also have a surprise for you, SO IF YOU DON'T WANT A SPOILER - LOOK NO FURTHER!!!!!!!
Here are the cuts that I have pics of for her.


HERE IS HER SURPRISE:
It is a sign for her craft room (space). I really hope she likes it. I had a ton of fun making it. The pic is OK, but it truly does look so much better in person. I can't wait for her to see it.
Here is the tag that I made for her too. I just wrote a note on the back for her.
Special thanks to Momo for hosting such a fun swap. I also want to thank Kathy Orta YouTube & Paper Phenomenon for THIS tutorial. I just had a ball making these roses. I cut mine at 1", 1 1/2", & 2". I will show close ups in a later post.
To see what everyone is making for this swap click on the title of this post.
Thanks for looking. Questions & comments are always welcomed. Lori

Monday, May 10, 2010

FRIENDS Wordbook - A Work In Progress

This project is a work in progress. I don't usually post about unfinished work. But Cute and Some is having its Contributors Showcase #6 this week. The guidelines for the projects are: It can be any type of project. It just has to have the colors green, or purple, or both and include a flower. When I read this, I knew I had to enter this project even if unfinished.
I am making this for my niece that is turning 13 at the end of this month. Her favorite colors are green & purple.
Cover:


Pg. 1:


Pg. 2:


I will post again about this when I have the entire book finished with details (well the details that I can remember anyway).
.gypsy File (pages only not embelishments)
Thanks for looking. Questions & comments are always welcomed. Lori

Thursday, May 6, 2010

Happy Mother's Day - Flower Pot Slider

I started out making this as a shape card w/ the flowers sliding out. I had made a cupcake slider (on a base) & I liked this for the flowerpot too. I find that it helps me to keep from putting the flowers up too high, (I want it to fit into a regular envie.) & this keeps them within the correct frame.
These 2 cards are for my mom & grandmother. I am also entering this into Tracy's (Craft Junkie Too) Mother's Day Post and Cuttlebug Spot Challenge #4. So click on over HERE to check out every one's projects.
Details:
Gypsy to design & cut w/ Cricut
Flowerpot is from Walk In My Garden (blackout, welded at the bottom & edges glued) Flowerpot pieces were also cut in patterned paper & layered to the front of the blackout pot. The rim was embossed using the Cuttlebug & Floral Screen & Paisley folders.
Tag was cut using the Tags, Bags, Boxes, & More cart.
The slider & base were cut from George & Basic Shapes cart.
Flowers are from Sweet Treats, Accent Essentials, & Forever Young carts. They were made using the wet & scrunch method. I then painted them with a mixture of Pearl Ex, Gum Arabic, & water.
Inked all edges & embossed pieces before assembling. Added tag with ribbon tied around one of the flowers.
.gypsy File
Thanks for looking. Questions & comments are always welcomed. Lori

Friday, April 16, 2010

Grunge & Scrunch Paper Flowers

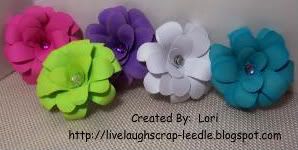
My Sister-in-Law asked me to make her some flowers. She is going to put them on some clips for my niece's hair. I do spray them with Krylon Preserve It. It gives them some protection from moisture & helps them last longer. I just wouldn't wear them on a day when it would be raining a lot - after all they are only made of cardstock.
Tip: If you are going to use the Preserve It - spray them before adding a gem or anything to the center. If you are using a Matte finish spray - the gem will not shine.
Grunge Flowers:
I used my Gypsy with the Sweet Treats Cartridge for this flower. I used a blackout flower & added a circle to the center. There are tons of tutorials on how to make this flower, so I have no idea who to give credit to. So to all of you with blogs & on You Tube thanks for all of the tutorials. I cut them, formed them, inked them, & assembled them. Then I added a rhinestone in the center.

Scrunch Flowers:
I'm not really sure what these type of flowers are called, so I am calling the Scrunch Flowers. I first saw a tutorial HERE, thanks Christina for sharing your video. I used this basic idea & changed it up a little bit. I used my Gypsy w. the Sweet Treats Cartridge. I cut a blackout scallop flower in 5 different sizes. I started at 2.5 in. & graduated down by .25 in for each flower. If I am putting them on a card, I might punch a hole & add a brad. But since these will basically be on hair clips I just added a rhinestone to the center. I added some Home Made Glimmer Mist (though it doesn't show in the pic).
Thanks for looking. Questions & comments are always welcomed.
Lori

Wednesday, April 14, 2010

Morgan's M & Giftbag

I made these in March for Morgan. A precious little girl that we know that was turning 4.
Details:
Letter:
White wooden M from Michael's painted with acrylic paint. Sprayed w/ Krylon Preserve It along with all of the pieces that were added to the letter.
Name was cut using SCAL.
Princess - Hat was cut from the Sweet Treats cart. Head & hair were cut from the Paper Doll Dress Up cart. face is peachy Keen Stamps. Ribbon is an old hair ribbon that my daughter did not use anymore. Flower is one of my Phone Book Page Flowers.
Giftbag:
Cuttlebug using the Swiss Dots, Happy Birthday & Devine Swirls Embossing Folders
Mini Monograms for the tag w/ My Pink Stamper Stamps.
Cupcake on bag is from the Sweet Treats cart.

Thanks for looking. Questions & comments are always welcomed.
Lori

Friday, March 12, 2010

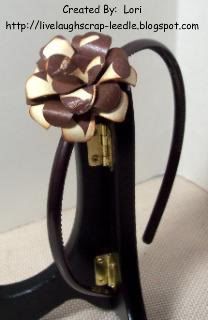
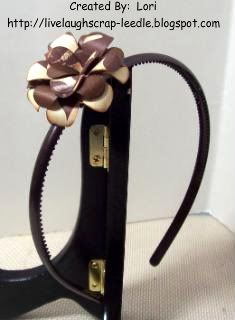
My First Flower Headband Using Cricut

OK, so I have had this idea since I started making my phone book page flowers. Well this is not using one of them, but it is the same idea.
A friend of mine - Hi Nicole!, asked if I could make her a headband with one of my flowers. She liked this flower so I attached it & Waalaa!!!


A little different view point.


Details:
Nicole supplied the headband
Grunge Style Flower cut flower from the Sweet Treats Cricut Cart
I cut, inked, and assembled the flower.
The one thing I did, so that hopefully it will be a little more protected was: I sprayed the flower pieces on both sides (after cutting & inking) with Krylon Preserve It. I used glossy, but they also have a matte finish one. (There are so many tutorials on blogs & YouTube as to how to make these flowers.)

To attach the flower to the headband:
I cut a small piece of felt and wrapped it around the headband - attaching it with E6000 glue. Let that sit to get secure. Then I attached the flower to the felt (making sure that there is no felt showing from around the flower) with the E6000. You may have to hold it for a bit until it takes, then just let it sit to get secure. This morning - that flower is not going anywhere.

Thanks for looking. Questions & comments are always welcomed.
Lori

Monday, March 8, 2010

A for Alyssa

This wall letter is for my daughter's friend. Her birthday party is next weekend and this is what my daughter wanted me to make for her. Alexis loved it, so let's hope Alyssa will feel the same way. I'm seriously not too worried about that though. Click HERE and HERE to see what I made for her last year. Her favorite colors are pink & brown and her room is done is those colors too.

White wooden wall letter. (Letter & all embellishments were coated with Krylon Preserve It - Glossy before adhering to make sure they will last.)
Acrylic paint: base color is brown. 2 shades of pink was dabbed all over the brown using a crumpled up plastic grocery bag dipped in the paint.
Name was cut out using SCAL and my Cricut. I Cuttlebugged w/ Floral Fantasy Embossing Folder the top layer of letters & coated with Triple Thick Glaze - thanks to Yoliebean.
The little brown flowers were cut from the George & Basic Shapes Cricut Cart. I glittered them with Martha Stewart Brownstone glitter and added different sized & shades of pink rhinestones in the centers. This is one of my phone book page flowers with a rhinestone center. It's a little hard to tell in the pic, but I added some Diamond Dust randomly to the flower to give the impression of dew. You can check out Scrapsofmine's Video on how to do this. The only thing I do differently is after it is all dry, I add a coat of Glossy Mod Podge over the top to make sure none of the Diamond Dust falls off. These things are like very tiny shards of glass & hurt if stepped on. Ask me how I know!!!!
The butterfly is from the Amanda Blu Summer Solstice paper stack. I cut out 2 matching butterflies, layered them 0 attaching in the center. I curled the wings a bit & attached near the flower.
This flower was made using the grunge flower technique. The flower that I used was cut from the Sweet Treats Cricut Cart. I used 2 different printed cardstocks, inked the edges & the back sides of the flowers. I added Martha Stewart Tourmaline glitter for some sparkle.

Thanks for looking. Questions & comments are always welcomed.
Lori

Friday, February 5, 2010

Some News, Flowers, and a Thank You Card

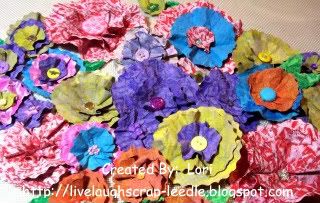
So the news is that I spoke to someone that owns a local craft store in Maine. I asked her if she would consider selling some hand made embellishments in her store. I asked if I could send her some of my flowers to see if she liked them & if she would be able to sell them in her store. She said, yes & that she would run them past some groups to see if this is something that they would buy that come in to craft.

This is a pic of the flowers that I sent her to "test" to see if they are "sellable".
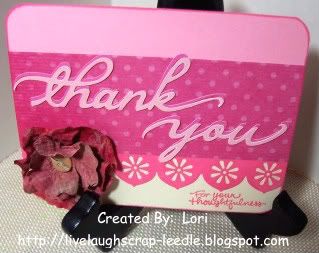
This is a pic (using one of my flowers) of the Thank You card that I sent to her for giving me this opportunity.
I used the Beyond Birthdays Cricut Cart. for the Thank You.
Tonic Border Punch System with the Pinwheels Punch for the border.
Stamp (unk. stamp set)
One of my Paper Flowers
Thanks for looking. Questions & comments are always welcomed.
Lori

Tuesday, January 26, 2010

Giftcard Bag & Mini Card

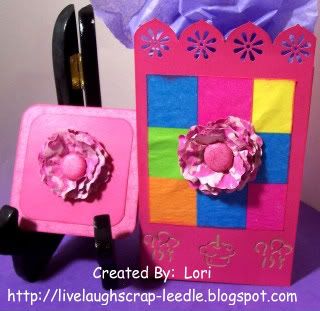
My son had a birthday party to go to for a 14 yo girl. I didn't know too much about her, so just went with pink, flowers, & bright colors. I found theses packs of mini giftbags at Michael's during Christmas & found that they come in great for making giftbags for small presents & they are wonderful for giftcards.
Details:
I-Top for brad in center of flower. I found that one of the flowers on the Sweet Treats Cricut Cart. is perfect for making the circles for the I-Top. I have a file that I will make a post on later. I have one for each size I-top brad.
My phone book page painted flowers.
Tonic Border Punch System for the balloons & cupcakes (at the bottom of the bag) & pinwheels punch for the border at the top
Yoliebean has a great video tutorial on how to fuse napkins to freezer paper to make your own patterned paper. This is what I used for the bright colored squares on the bag. Mine looks a little bubbly, but you can watch her video & how to do it perfectly.

Thanks for looking. Questions & comments are always welcomed.
Lori

Tuesday, January 19, 2010

More Paper Flowers & A Question

Please tell me what you think about selling hand made embellishments at craft shows. Do you think they would sell? Is it a good idea?

I am just loving making these flowers. I have been flattening out the back so that I can use them on cards & such. But, I think I have to try to make some 3-D Bouquets too. I also started making leaves for them. I painted the phone book pages the same way, then I just cut the leaves freehand with deco edge scissors.
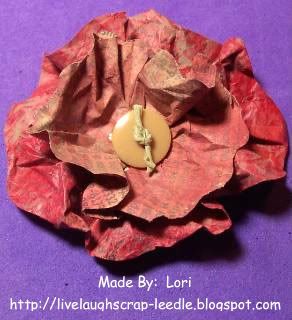
These were done with orange (mixed yellow & red) and lightly went over them with yellow. Two of them have yellow skittles in the center. The other has an orange button threaded with natural hemp twine in the center. Some of these, the top layer was put together with torn pieces of the painted paper. Others, I tore the petals of the flower & arranged freehand & glued.

The bottom flower was made with light & dark blue. The top is one of the orange & yellow flowers. The orange one is one of the torn flowers. I covered an I-Top brad with some similarly colored cardstock for the center. The phone book pages, I find are too thin to use in the I-Top, they tend to tear. I have also found that thick cardstock is sometimes too think for the I-Top. I crinkle or rumple it up to soften it a bit. Once it goes through the I-Top it is smoothed out & looks great.
Thanks for looking. Questions & comments are always welcomed.
Lori

Friday, January 15, 2010

Making Embellishments - Paper Flowers

As you may or may not know I am trying to get together some inventory to do craft fairs in my area. I still want to make some projects to have on hand to sell. But, I also had a thought to make embellishments to sell also. I know I go to craft shows a lot of the time to get ideas. I'm sure I am not the only one. It's good to have our crafts for those that don't crafts. But I thought that it would be nice to have some handmade embellishments for those that do craft. I mean - we all still buy embellishments that we see & like even though we can make them. I think that is the nature of the beast we call crafting - LOL.

So last night I sat down to make some paper flowers. This VIDEO is what first inspired me to make these flowers. Then Donna came out with VIDEO 2. You really need to see both videos that are wonderful. Although I did put my spin on them. I don't have all of the materials that Donna has, so I improvised & I think I really like how they came out.

I used a roll of electrical tape and one of my rolls of sticky strip as a guide to cut the circles. I was not worried about them being perfect. I just tore the paper while holding down the rolls of tape.

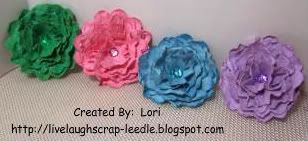
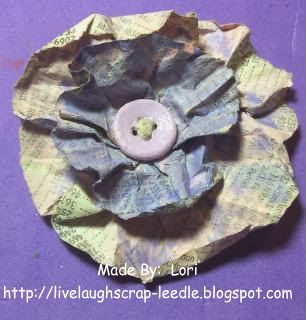
For this one, I made the flowers with the bare paper. Then (The colors are off in this pic. They are actually lt. purple & lt. pink.), I watered down some acrylic paint and just kind of splattered it on them. I used my heat gun to help dry them faster (I tend to be impatient.). I then glues them together, painted a button with the acrylic paint, threaded it with some hemp twine, and coated the button with Mod Podge & attached to the center of the flower.


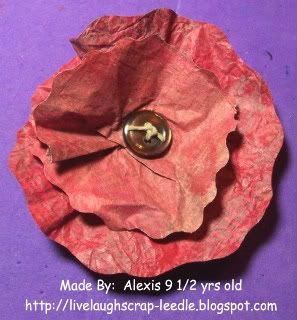
The following 2 were done a little differently & I think I like this method better. I watered down the paint, dried it, crumpled it, then went over it again with wither a lighter or darker paint color. I did this until I liked the look of the paper. Then after the circles were torn, I went around them with wavy deco edges scissors.

This one is Alexis' very first paper flower. She did hers as I showed her while making mine. Its a little more flat, but that's how she wanted it. I think she did a wonderful job for her first time trying. I actually think it looks better than my first paper flower. My first one can be seen HERE.

I really like the rustic look about these flowers. I am in the process of making many different colored ones. Forgot to mention, the paper I am using is old phone book pages. Way to RECYCLE, and it's FREE!!!!
Thanks for looking. Questions & comments are always welcomed.
Lori

Tuesday, November 3, 2009

Paper Flowers

Update: After I posted this, I noticed that they have a New Video for Donna's Layered Flowers. I could not go without adding it to this post. It is wonderful and Donna is so excited about them.

I just love these flowers. The inspiration came from This Video from Leah's Scrapbook Room Videos. I call them Donna's Flowers. I just love her style. She makes hers from old dictionary pages and the Accucut Die System. I used an old phone book and cut a 6 inch scallop circle with my Cricut, then just basically followed her instruction. I don't have glimmer mist or anything like that. So I just ran a pigment ink pad over my crumpled flower until it looked the way I wanted it to. Then I just lightly spritzed it with water to make it a little more pliable.
This is a single layer flower with an embellishment (adhesive backed) from a pack that I found at the Dollar Tree.

I sprayed them with Krylon Preserve It, just to help them keep. I also brushed them with some Mod Podge. This gave them a little shine & gave them a little more stability.


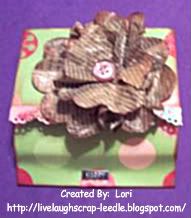
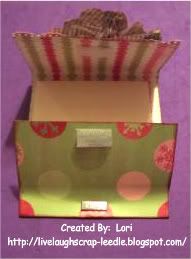
The next one is a double layered flower with a button in the center. I used it to embellish a sticky note holder that I made (see previous post).
Thanks for looking. Questions & comments are always welcomed.
Lori