OK, so this month our challenge is to do a scrapbook page. This is truly a challenge for me. You all can look through my blog to see how many lay outs I have previously done. NONE!!! I have made a 12x12 frame once, but that was it. Then to add stamps to a lay out!!? Robyn makes everything look so easy!!
So I made this layout using a picture of my kids that my mom had. I loved the black & white photo set on the brown tone card stock. This pic is about 6yrs old (4 & 8 - now 10 & 14). When I saw this pic & was going through my MPS Stamps, I found the perfect sentiment stamp for this pic in the More Faithful Sayings Set. (It's hard to get pics of my kids actually looking like they love each other - LOL)
Since I don't scrapbook I painted & distressed a 12x12 canvas & adhered my lay out to the canvas. It was funny b/c my mom didn't want me to take her photo. She wanted to keep it in the frame that she had it in. When I showed her the finished project she asked if she could keep it. LOL - that was my plan all along!!!
Closeup of pic & stamp:
The following pics are closeups of the flowers with a characteristic that we want to instill in our children. All of these characteristics also came from the More Faithful Sayings Stamp Set.
True: We want to instill truth & always want our children to be true.
Knowledge: We want to instill the knowledge of right & wrong & of course for them to embrace the opportunities for education that they have.
Grateful: We always want them to grateful & appreciative for everything that they have.
Integrity: We want them to have all of the moral & ethical principles that they should have to be honest & sincere.
Humble: We always want our kids to be humble in everything they do.
Details:
The polka dotted scalloped oval in the background is from the Imagine stock images & colored with the Imagine More Cart.
Flowers are from the Accent Essential Cart.
I tore & distressed all of the edges. I used distress inks & gold paint.
For the canvas, I painted it with brown paint. I used Crackle medium then painted with antique white paint. I then used several colors of distress ink, walnut stains, brown paint, antique white paint, & gold paint.
Thanks for looking. Questions & comments are always welcomed. Lori
Followers, Guestbook, & Comments
My followers are being shown in the right column. My Guestbook is at the bottom. Please follow, comment on posts, & sign my guest book. Your comments encourage me to keep sharing my work. I love hearing from you all.
When you leave a comment, I have to moderate it before it will be posted. So if you have a questions or comments, feel free to ask & if necessary note that you don't want your comment posted.
Showing posts with label Imagine. Show all posts
Tuesday, March 22, 2011
Friday, March 11, 2011
My Pinkalicious Blog Hop
Welcome to the My Pinkalicious Blog Hop for My Pink Stamper's Design Team. If you cam here from Julie's Blog ReadySetStamp. You are right on track. If you just happened onto this post, click HERE to get to Robyn's blog to start from the beginning. While you're there you can pick up her Blog Hop Blinkie & join in on the hop with us. I also want to welcome Kristal from Getting Cricky, she is our guest hopper this month.
This month our challenge was to make any type of project that was Spring Themed & to use any of Robyn's stamps (new or old). Well to me nothing says Spring more than Easter. So I made this tag to use on an Easter present.
I just love the patterns on the Nursery Tails Cart and I just fell in love with these butterflies & dragonfly.
Details:
Imagine
Nursery Tails for everything: Tag (pg. 22), Pattern (pg. 36), butterflies & dragonfly (pg. 21)
I inked all of the pieces with distress in. I also used distress in for the stamp.
I added Frosted Lace Stickles to the bodies of the butterflies & dragonfly.
I love dimension, so I cut the butterflies & dragonfly twice. I layered then adhering nly the bodies, leaving the wings to fly.
Stamp: My Pink Stamper's Happiest Moments Set.
Your next stop on the hop is: Christi's Blog
Here's the entire list of our very talented designers in order fro this hop:
Thanks for looking. Questions & comments are always welcomed. Lori
This month our challenge was to make any type of project that was Spring Themed & to use any of Robyn's stamps (new or old). Well to me nothing says Spring more than Easter. So I made this tag to use on an Easter present.
I just love the patterns on the Nursery Tails Cart and I just fell in love with these butterflies & dragonfly.
Details:
Imagine
Nursery Tails for everything: Tag (pg. 22), Pattern (pg. 36), butterflies & dragonfly (pg. 21)
I inked all of the pieces with distress in. I also used distress in for the stamp.
I added Frosted Lace Stickles to the bodies of the butterflies & dragonfly.
I love dimension, so I cut the butterflies & dragonfly twice. I layered then adhering nly the bodies, leaving the wings to fly.
Stamp: My Pink Stamper's Happiest Moments Set.
Your next stop on the hop is: Christi's Blog
Here's the entire list of our very talented designers in order fro this hop:
Robyn - Start & Join In Here
Julie—readysetstamp
Lori - You Are here
Cristi - Next Hop Stop
Shelley
Anges—Flowerdisco
Andrea
Raechel
Bling Queen Wendy
Sonia
Pam
Helen
Edna
Angela’s Simple Creations
Tracy—Craft Junkie Too
Shauna at Craftee She
CarrieAnne
Michelle—Meesh’s Pieces
Kassidy
Courtney—Court’s Crafts
Kristal--Getting Cricky (This Month’s Special Guest Hopper)
Maria
Thanks for looking. Questions & comments are always welcomed. Lori
Labels:
Blog Hop,
Imagine,
MPS DT,
Nursery Tails,
Tags
Saturday, March 5, 2011
You're TWEET Imagine Card
This is another Thank You card that I made for some more well wishers. I have some amazing & talents friends in blog world. You are all so very sweet. All of the cards & wishes for my quick recovery is so very much appreciated!!!!!!
Details:
Imagine
Best Friends Imagine Cart for the frame (pg. 20), bird, wing, & banner (pg. 13)
I pop dotted the banner & the wing on the bird.
I used an Action Wobble for the bird.
I used distress ink to ink all of the cut pieces & around the entire card.
Thanks for looking. Questions & comments are always welcomed. Lori
Details:
Imagine
Best Friends Imagine Cart for the frame (pg. 20), bird, wing, & banner (pg. 13)
I pop dotted the banner & the wing on the bird.
I used an Action Wobble for the bird.
I used distress ink to ink all of the cut pieces & around the entire card.
Thanks for looking. Questions & comments are always welcomed. Lori
Labels:
Best Friends,
Cards,
Imagine
Sunday, February 27, 2011
Thank You Berry Much Card
I made several of these for some really special people. Thank you all for your get well wishes.
Details:
Imagine & the Imagine More Cart. for all papers (except for card base) & images.
The flower is from pg. 16 & the strawberry is from pg. 17. The background paper is from pg. 44.
Stamp Set: My Pink Stamper's Fruit & Veggie Puns
I layered all of the pieces & pop dotted the strawberry. I then put the entire image on an Action Wobble.
Thanks for looking. Questions & comments are always welcomed. Lori
Details:
Imagine & the Imagine More Cart. for all papers (except for card base) & images.
The flower is from pg. 16 & the strawberry is from pg. 17. The background paper is from pg. 44.
Stamp Set: My Pink Stamper's Fruit & Veggie Puns
I layered all of the pieces & pop dotted the strawberry. I then put the entire image on an Action Wobble.
Thanks for looking. Questions & comments are always welcomed. Lori
Labels:
Cards,
Imagine,
Imagine More,
MPS DT
Saturday, February 26, 2011
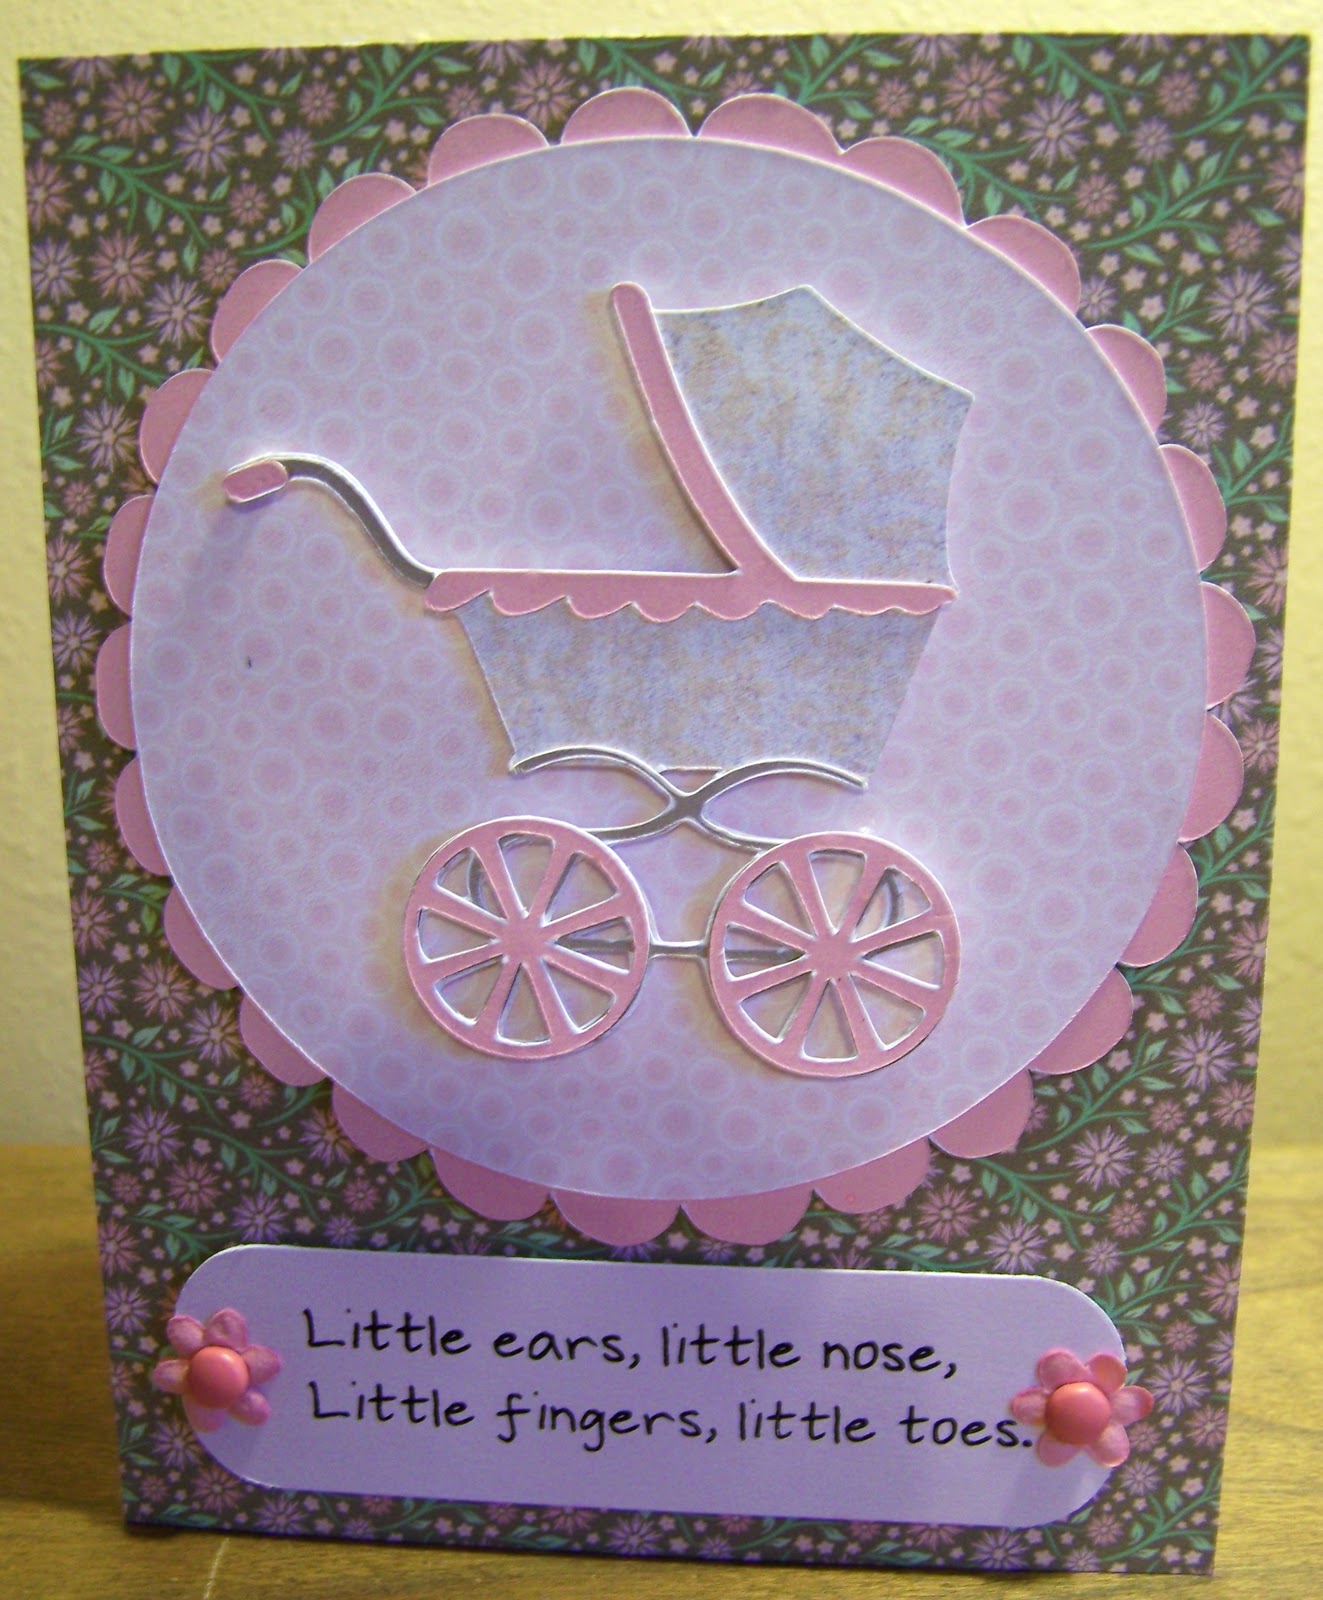
Pink Baby Carriage Card
I just love how this card came out. It was so much fun to make.
Details:
Gypsy for designing & sizing.
Imagine for cutting, printing, & stock shapes - circle & scallop
Nursery Tails for all of the papers.
Wrap It Up for the baby carriage.
Stamp Set: My Pink Stamper's Sweet Baby
I added some brads & little flowers to the end of the sentiment tag.
Thanks for looking. Questions & comments are always welcomed. Lori
Details:
Gypsy for designing & sizing.
Imagine for cutting, printing, & stock shapes - circle & scallop
Nursery Tails for all of the papers.
Wrap It Up for the baby carriage.
Stamp Set: My Pink Stamper's Sweet Baby
I added some brads & little flowers to the end of the sentiment tag.
Thanks for looking. Questions & comments are always welcomed. Lori
Labels:
Gypsy,
Imagine,
MPS DT,
Nursery Tails,
Wrap It Up
Whoot Whoot Basketball Card
This was a really simple & quick card to make. Details:
I used my Gypsy & Imagine to design & create this card.
Boys Will Be Boys Cart for the basketball net
Stamp: My Pink Stamper's Sport-tastic Stamp Set
I added pen stitching around the card & basketball net as a finishing touch.
Thanks for looking. Questions & comments are always welcomed. Lori
I used my Gypsy & Imagine to design & create this card.
Boys Will Be Boys Cart for the basketball net
Stamp: My Pink Stamper's Sport-tastic Stamp Set
I added pen stitching around the card & basketball net as a finishing touch.
Thanks for looking. Questions & comments are always welcomed. Lori
Labels:
Boys Will Be Boys,
Cards,
Imagine,
MPS DT
Let Your Light Shine Card
I have been wanting to use my Inspired Heart Cart. since I got it just after Christmas. When Robyn came out with her More Faithful Sayings Stamp Set, I had the perfect stamp for this card.
Details:
Gypsy for sizing.
Imagine & Imagine More Cart for the background paper.
Inspired Heart for the image.
Stamp Set: My Pink Stamper's More Faithful Sayings
I added gold stickles for some "shine".
I used distress ink to edge the card & the image. I think it adds a little depth & dimension to the card.
Thanks for looking. Questions & comments are always welcomed. Lori
Details:
Gypsy for sizing.
Imagine & Imagine More Cart for the background paper.
Inspired Heart for the image.
Stamp Set: My Pink Stamper's More Faithful Sayings
I added gold stickles for some "shine".
I used distress ink to edge the card & the image. I think it adds a little depth & dimension to the card.
Thanks for looking. Questions & comments are always welcomed. Lori
Labels:
Cards,
Imagine,
Imagine More,
Inspired Heart,
MPS DT
Friday, February 25, 2011
Imagine More Sun Challenge
I found a challenge on the Cricut MB & Jen's Scrap Closet for the Imagine. I thought it would be fun. We had to use the sun on page 4 of the Imagine More Cartridge. Here is the card that I made for the challenge.
Details:
Imagine
Imagine More Cart.
I used the Imagine More Cart for all of the cuts & papers except for the craft card stock base.
I popped up the sun & the "good times".
Thanks for looking. Questions & comments are always welcomed. Lori
Details:
Imagine
Imagine More Cart.
I used the Imagine More Cart for all of the cuts & papers except for the craft card stock base.
I popped up the sun & the "good times".
Thanks for looking. Questions & comments are always welcomed. Lori
Labels:
Cards,
Challenges,
Imagine,
Imagine More
Tuesday, February 22, 2011
My Pink Designers: Baby Card
Welcome to my February post for My Pink Designers. In this post I am spotlighting the Sweet Baby Stamp Set from My Pink Stamper. Before I get to my project, here is a look at the stamp set:
Now, here is my project:
Details:
A2 size card (4.25 x 5.5)
Imagine Nursery Tails Cart. (paper & images) for the dress, background shape, & card base.
My Pink Stamper's Sweet Baby Stamp Set
I edged all of the pieces with distress ink.
The stamp was stamped with Distress ink too.
Please go to Robyn's blog to see what all of the very talented designers have made. She will have a link to all of their blogs so that you can show them some love too. Don't forget to stop by Robyn's products page to pick up some of these very inspiring stamps.
Thanks for looking. Questions & comments are always welcomed. Lori
Now, here is my project:
Details:
A2 size card (4.25 x 5.5)
Imagine Nursery Tails Cart. (paper & images) for the dress, background shape, & card base.
My Pink Stamper's Sweet Baby Stamp Set
I edged all of the pieces with distress ink.
The stamp was stamped with Distress ink too.
Please go to Robyn's blog to see what all of the very talented designers have made. She will have a link to all of their blogs so that you can show them some love too. Don't forget to stop by Robyn's products page to pick up some of these very inspiring stamps.
Thanks for looking. Questions & comments are always welcomed. Lori
Tuesday, January 18, 2011
Owl B-Day Card
This card was for my husband's step mother. She loves owls & I wanted to used this stamp from My Pink Stamper Tweetie Hoo Puns. I thought they went very well together. This is also the first card that I have made using the new Action Wobbles. They are for sale now, YAY!!!! The entire branch & owl wobble on the front of the card.
Recipe:
Hoot and Hollar Cart. - Owl & Branch
Lacy Labels Cart - Label for stamp
MPS Stamps Tweetie Hoo Puns
Cuttlebug - Polka Dots 5x7 embossing folder
Imagine - Colors for Branch & Leaves - used custom colors
Nursery Tails Cart - Color for Owl & Label
Action Wobble for dimension & movement
I used my Gypsy & Imagine to design & create this card.
(Gypsy used to design - not used to cut w/ imagine - still need update)
Thanks for looking. Questions & comments are always welcomed. Lori
Recipe:
Hoot and Hollar Cart. - Owl & Branch
Lacy Labels Cart - Label for stamp
MPS Stamps Tweetie Hoo Puns
Cuttlebug - Polka Dots 5x7 embossing folder
Imagine - Colors for Branch & Leaves - used custom colors
Nursery Tails Cart - Color for Owl & Label
Action Wobble for dimension & movement
I used my Gypsy & Imagine to design & create this card.
(Gypsy used to design - not used to cut w/ imagine - still need update)
Thanks for looking. Questions & comments are always welcomed. Lori
Labels:
Action Wobble,
Cuttlebug,
Gypsy,
Hoot and Hollar,
Imagine,
Lacy Labels,
Nursery Tails
Imagine Update
OK, so Friday my new Imagine was returned to me. At first I thought I was going to have problems. After turning on the machine, I was supposed to insert the Imagine More Cart & it was supposed to do an update. Nothing happened. I turned off the machine & entered in the cart 3 times. It still did no update, it never even prompted me (like the instructions said that it would) to enter the cartI tested everything that was going wrong with my original one. I even tried the Nursery Tails Cart (That came w/ my original) & that did not work either. The 3rd time that I entered in the IM Cart the black bar that blocks the ink carts finally moved, but that's it. I put in the ink carts - all fine. It never did prompt me to do the calibration. So I just decided to plug it into my computer & do the sync w/ Cricut Sync. All worked fine. I have the latest version. I tested everything that was going wrong with my original machine. It worked with the Cut Only, Print & Cut w/ an Imagine Cart, Print & Cut w/ a regular cart, & cut w/ my Gypsy. All was great. I used my I Saturday to make a card (I'll post after this one). It worked like a charm. Sunday i showed my Sister in Law my new toy. Again it worked. YAY!! All is wonderful!!
Yesterday I tried to cut something that I had in my Gypsy. Now nothing happens. Gypsy & Imagine do not connect. Nothing was changed on either my Gypsy or my Imagine since the last time they were used together. The only thing I did was use my G with my E on Sunday. Then on Monday it does not connect with my I. So what I needed to cut, I did on my E. It worked! So it is not my Gypsy that is not working.
I asked Chris about this on the Provo Craft MB. (He has been a doll. He is doing so much for so many with technical difficulties.) BUT, I did not like the answer that I got about this. Here is my post & his answer:
Me: "My I was working great until today. I have not tested everything again, but I tried to cut something using my Gypsy and they would not connect. Nothing had changed with my I or my G since Friday when I received it. The only thing that I did differently was that yesterday (Sunday) was use my G with my Expression. Now it will not connect to my Imagine. Will keep you posted as to if anything else is not working."
Chris: "Sometimes the G and the I don't see each other. I'm not sure why that is but it usually just requires disconnecting the cable and reinserting it or turning the Imagine off and back on again."
Well this has been done numerous times in many different combinations. I know PC is working hard to satisfy all of us. But a $300 Gypsy & a $500 Imagine should communicate when the update is done to allow it. It worked & then it didn't. I need a solution or even "This is something we are aware of & are working on it." Not, "Sometimes they don't communicate & we don't know why."
Sorry, but I needed to vent a little. Hopefully, this little matter will be addressed soon. I really do love all of my machines. I'm just hoping this is a little glitch.
** Ok I just got an update: The big update that will happen either later this week or next week, will improve compatibility with the G & the I. So hopefully this will correct this problem.**
**Even another update: Chris is sending me out a new cable that connects my G to the Cricuts. I was having trouble before Christmas with my G being connected to my Expression. it would cut them in the middle stop & say that they were not connected. Hopefully either the new cable or the update will help. I really don't want to send it back again. I want to get to know it, especially with everything that is in store for it.**
Thanks for looking. Questions & comments are always welcomed. Lori
Yesterday I tried to cut something that I had in my Gypsy. Now nothing happens. Gypsy & Imagine do not connect. Nothing was changed on either my Gypsy or my Imagine since the last time they were used together. The only thing I did was use my G with my E on Sunday. Then on Monday it does not connect with my I. So what I needed to cut, I did on my E. It worked! So it is not my Gypsy that is not working.
I asked Chris about this on the Provo Craft MB. (He has been a doll. He is doing so much for so many with technical difficulties.) BUT, I did not like the answer that I got about this. Here is my post & his answer:
Me: "My I was working great until today. I have not tested everything again, but I tried to cut something using my Gypsy and they would not connect. Nothing had changed with my I or my G since Friday when I received it. The only thing that I did differently was that yesterday (Sunday) was use my G with my Expression. Now it will not connect to my Imagine. Will keep you posted as to if anything else is not working."
Chris: "Sometimes the G and the I don't see each other. I'm not sure why that is but it usually just requires disconnecting the cable and reinserting it or turning the Imagine off and back on again."
Well this has been done numerous times in many different combinations. I know PC is working hard to satisfy all of us. But a $300 Gypsy & a $500 Imagine should communicate when the update is done to allow it. It worked & then it didn't. I need a solution or even "This is something we are aware of & are working on it." Not, "Sometimes they don't communicate & we don't know why."
Sorry, but I needed to vent a little. Hopefully, this little matter will be addressed soon. I really do love all of my machines. I'm just hoping this is a little glitch.
** Ok I just got an update: The big update that will happen either later this week or next week, will improve compatibility with the G & the I. So hopefully this will correct this problem.**
**Even another update: Chris is sending me out a new cable that connects my G to the Cricuts. I was having trouble before Christmas with my G being connected to my Expression. it would cut them in the middle stop & say that they were not connected. Hopefully either the new cable or the update will help. I really don't want to send it back again. I want to get to know it, especially with everything that is in store for it.**
Thanks for looking. Questions & comments are always welcomed. Lori
Tuesday, January 4, 2011
Cricut Imagine: Said Goodbye Today
OK, so my disfunctional Cricut Imagine is on it's way back to Provo Craft. I packed it up along with the Imagine More Cart & all the other doo dads that go along with it. Hopefully, it won't be long before I have my new replacement.
I'll keep you posted on the progress.
Thanks for looking. Questions & comments are always welcomed. Lori
I'll keep you posted on the progress.
Thanks for looking. Questions & comments are always welcomed. Lori
Monday, January 3, 2011
Provo Craft Customer Service: Cricut Imagine
I was able to get in touch with Provo Craft this morning. There was a little hold time, but all in all it was not too bad. (I have learned to call as soon as they open.) My customer service rep. was Jenny. She was very courteous, nice, & helpful. She listened to my entire problem & concerns, asked me a few questions. She put me on hold to check with a technical representative & came back to tell me that with what I am experiencing they will have to replace it. She did ensure me that it would be a brand new Imagine, not a refurbished one.
I had to return my original baby bug (at that time - they would send out a new one w/ a return label & you would return the broken one after you received the new one.) My experience then was very good. Now they are emailing me a label to send this one back first. She said turn around time is about 2 wks. Hopefully this goes smoothly & my next Imagine will not be sick.
Thank you Provo Craft & Jenny for very professional customer service.
Thanks for looking. Questions & comments are always welcomed. Lori
I had to return my original baby bug (at that time - they would send out a new one w/ a return label & you would return the broken one after you received the new one.) My experience then was very good. Now they are emailing me a label to send this one back first. She said turn around time is about 2 wks. Hopefully this goes smoothly & my next Imagine will not be sick.
Thank you Provo Craft & Jenny for very professional customer service.
Thanks for looking. Questions & comments are always welcomed. Lori
Saturday, January 1, 2011
Sad Day: Cricut Imagine
I have not had much time to play with my new toy or get to know it much. I made the one card, & made some cuts with my Gypsy on the Imagine, but that's about it. I did not touch it for the past 2 days - too busy w/ family & holiday stuff.
I tried to test some things on it tonight & it will not cut at all. It will print, but not go through to the cutting system. When I cut only, it pulles the mat in, stops, & the screen goes back to the mat image. It will not release the mat. It just prints & sticks out of the back of the machine. I have to manually pull it out & turn off the machine. I also cannot get my G to attach to the I. The I says that it is connected, but the G says that it is not connected to a Cricut. It does however connect to my E & cut.
I have faith in Provo Craft. Hopefully this will be taken care of quickly & painlessly. Well, as painless as it can be when I have to ship it back to them. I will be calling PC Monday.
Thanks for looking. Questions & comments are always welcomed. Lori
I tried to test some things on it tonight & it will not cut at all. It will print, but not go through to the cutting system. When I cut only, it pulles the mat in, stops, & the screen goes back to the mat image. It will not release the mat. It just prints & sticks out of the back of the machine. I have to manually pull it out & turn off the machine. I also cannot get my G to attach to the I. The I says that it is connected, but the G says that it is not connected to a Cricut. It does however connect to my E & cut.
I have faith in Provo Craft. Hopefully this will be taken care of quickly & painlessly. Well, as painless as it can be when I have to ship it back to them. I will be calling PC Monday.
Thanks for looking. Questions & comments are always welcomed. Lori
Tuesday, December 28, 2010
My 1st Imagine Project: Thank You Card
This was a really quick test project. It's not perfect, but I'm happy with it for not playing with my machine at all. All I did was select the images, load the paper, print, & cut.
Background paper, oval frame, & color for Thank You are from the Imagine More Cart. The Thank You is from the Sweethearts Cart.
Thanks for looking. Questions & comments are always welcomed. Lori
Background paper, oval frame, & color for Thank You are from the Imagine More Cart. The Thank You is from the Sweethearts Cart.
Thanks for looking. Questions & comments are always welcomed. Lori
Labels:
Cards,
Cricut,
Gypsy,
Imagine,
Imagine More,
Sweethearts
Subscribe to:
Posts (Atom)

