I made wall letters for my niece & 3 nephews for Easter. I still find it a little bit of a challenge to make these for boys, but I think they are turning out pretty good.
"K" for Karissa
She will be 2 in July. Everything we have done for her has been pink & purple & involves butterflies. I used the Gypsy Wanderings cart for the butterflies, Home Accents cart for the branch & flowers, & the Alphalicious Cart. for her name.
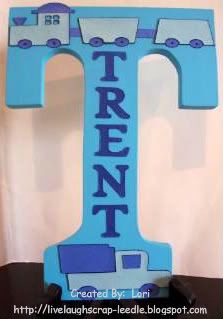
"T" for Trent
He will be 1 in July. I knew I was going with 2 shades of blue. With him being so young, I knew that whatever I did - he will eventually grow out of it. So, I went with a truck & a train from the New Arrivals Cart. His name was cut using the Plantin Schoolbook Cart.
"G" for Garrett
He made 3 in January. He just loves anything to do with balls. So what better cart to use than the Sports Mania Cart. His name was cut using the Plantin Schoolbook Cart.
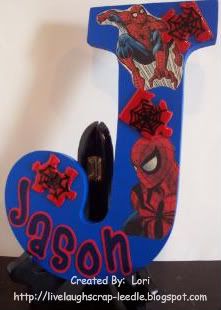
"J" for Jason
Jason is going to be 8 in October. He is a wiz with putting puzzles together and he loves Spiderman. I found some Spiderman comic books (new ones - not collectibles) and cut some of the Spideys out. I sprayed them with Krylon Preserve It so that they will last. Then for the puzzles, I painted some pieces red, freehand painted some spider webs, & coated them with Triple Thick. I cut his name from SCAL.
Thanks for looking. Questions & comments are always welcomed.
Lori
Followers, Guestbook, & Comments
My followers are being shown in the right column. My Guestbook is at the bottom. Please follow, comment on posts, & sign my guest book. Your comments encourage me to keep sharing my work. I love hearing from you all.
When you leave a comment, I have to moderate it before it will be posted. So if you have a questions or comments, feel free to ask & if necessary note that you don't want your comment posted.
Showing posts with label Alpha. Show all posts
Wednesday, April 7, 2010
4 More Wall Letters - K, T, G, J
Labels:
Acrylic Paint,
Alpha,
Door Hanger,
GW,
Gypsy,
Gypsy Wanderings,
NA,
PSB,
SCAL,
SM,
Wall Letters
Saturday, January 16, 2010
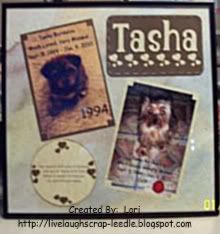
Tasha's Memorial Frame
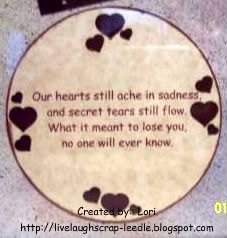
I made this frame as a memorial to Tasha. I have a picture of her from 1994 and a picture of her in 2009.
The saying, I thought fit perfectly. I had seen it in a magazine selling a cement paw with the saying on it.
Details:
Alphalicious Cricut Cart. was used for her name. I cut it in cardstock and 140 lb. watercolor paper to give it a little dimension (kind of like chipboard) and layered it. I inked the edges of the letters.
George Cricut Cart. was used to cut the circle. I printed the saying on my computer onto the circle.
Tonic Border Punch System w/ Hearts Punch was used on the base rectangle. I added the punched out hearts to the circle. Inked the circle. I used natural hemp twine threaded around the rectangle.
Tonic Arrowhead 2 in 1 Corner Punch was used on both mats for the pictures. Tucked the corners of each picture into the cut out corner slots.
Thanks for looking. Questions & comments are always welcomed.
Lori
The saying, I thought fit perfectly. I had seen it in a magazine selling a cement paw with the saying on it.
Details:
Alphalicious Cricut Cart. was used for her name. I cut it in cardstock and 140 lb. watercolor paper to give it a little dimension (kind of like chipboard) and layered it. I inked the edges of the letters.
George Cricut Cart. was used to cut the circle. I printed the saying on my computer onto the circle.
Tonic Border Punch System w/ Hearts Punch was used on the base rectangle. I added the punched out hearts to the circle. Inked the circle. I used natural hemp twine threaded around the rectangle.
Tonic Arrowhead 2 in 1 Corner Punch was used on both mats for the pictures. Tucked the corners of each picture into the cut out corner slots.
Thanks for looking. Questions & comments are always welcomed.
Lori
Labels:
Alpha,
Cricut,
GBS,
Hemp Twine,
Layout,
Tasha,
Tonic Border Punch System
Wednesday, November 11, 2009
Christmas Ornaments
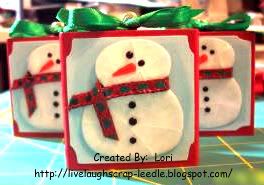
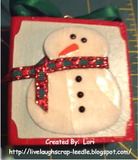
I made 10 of these ornaments for Christmas presents this year. I can see myself making many more in different designs. I had so much fun with these, I just want to keep going.
For the base I used wooden blocks that rubber stamps had been unmounted from. Thanks Kelly Scott from the Cricut MB for all of the blocks that yo did not want. Anyone else that wants to get rid of any of them, please let me know!!
I painted the blocks with acrylic paint. I screwed in the eye screws to the top of the block.
The front & back panels were cut from the Stretch Your Imagination Cart. I inked the light blue paper with white pigment ink to soften it a bit.
The snowmen were cut from the Doodle Charms Cart in blackout. I gave the snowmen a little dimension by edging them with light blue and white chalk. I attached the carrot noses. Using a Versamark pad, UTEE, and my heat gun I embossed the snowmen. This gave them a glass-like appearance. I then bent them to make them look like cracked ice. After all of this was set, I used black Liquid Embossing to dot on the eyes and buttons. The Liquid Embossing is shiny and raised giving even more dimension. I attached a ribbon "scarf" around each of the snowmen's necks. Thanks Tracy (Craft Junkie Too) for that idea.
I lightly painted Mod Podge onto the face of the block and the back of the blue panel & attached. When all of them were set, I added another light coat of Mod Podge and to the back of the snowmen and attached.
Lori
For the base I used wooden blocks that rubber stamps had been unmounted from. Thanks Kelly Scott from the Cricut MB for all of the blocks that yo did not want. Anyone else that wants to get rid of any of them, please let me know!!
I painted the blocks with acrylic paint. I screwed in the eye screws to the top of the block.
The front & back panels were cut from the Stretch Your Imagination Cart. I inked the light blue paper with white pigment ink to soften it a bit.
The snowmen were cut from the Doodle Charms Cart in blackout. I gave the snowmen a little dimension by edging them with light blue and white chalk. I attached the carrot noses. Using a Versamark pad, UTEE, and my heat gun I embossed the snowmen. This gave them a glass-like appearance. I then bent them to make them look like cracked ice. After all of this was set, I used black Liquid Embossing to dot on the eyes and buttons. The Liquid Embossing is shiny and raised giving even more dimension. I attached a ribbon "scarf" around each of the snowmen's necks. Thanks Tracy (Craft Junkie Too) for that idea.
I lightly painted Mod Podge onto the face of the block and the back of the blue panel & attached. When all of them were set, I added another light coat of Mod Podge and to the back of the snowmen and attached.
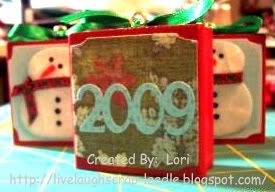
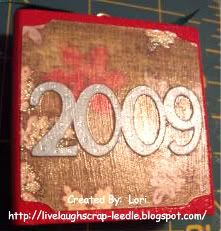
The 2009 is cut from the Alphalicious Cart. I used CDS to weld the numbers together. I attached the 2009 to the panel. Then used the same process as above to attach the panels to the blocks.
I then just tied a ribbon bow the the top of the block around the eye screw. I added a little drop of Glossy dimensions under the knot of the bow to make sure it stayed in place. (I am not the best decorative bow tying person .- LOL)
Here is a closer up view of the snowmen to show the crackled ice look. Not sure if it is showing up to good though.
And this is a close up of the back side. After the last layer of Mod Podge dried, I added some dots on the 2009 with a blue glitter pen. Again not sure if this is showing up to good in the pic.
Thanks for looking. Questions & comments are always welcomed.Lori
Tuesday, November 3, 2009
Christmas Rectangular Album
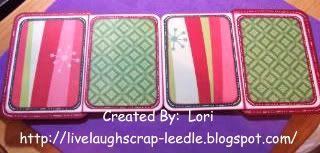
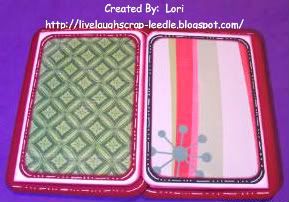
Again the inspiration for this album came from Angie's video for her Rectangular Coaster Album. Instead of using coasters I used 140 lb. watercolor paper & cut everything on my Cricut.
Front:
Front Inside (4 sides):
Back Inside (2 sides): Oops - I forgot some of my doodling on the sides of these pages. I will have to fix that later.
Back:
Thanks for looking. Questions & comments are always welcomed.Lori
Labels:
Alpha,
ATG,
Beyond Birthdays,
Chic 'n Scratch,
Coaster Album,
JOTS,
MS Glitter,
WC
Friday, March 20, 2009
Book for Alyssa
This is the book I made for Alyssa. Again her room is decorated in pink & brown. She just loved it.
I used my BIA to punch the holes and bind the book with 1/2" o-wires (white). Oh, I just realized that I forgot to put ribbons on the wires. Oh well, she loved it anyway. I got more requests from the girl's that they want a book & door hanger for their b-days.
I, of course, used my ATG gun to attach all of the cardstock for the covers.
I used 140lb. watercolor paper (very strong & cuts beautifully in the cricut - I just put my blade depth on 6)
For the front cover, I cut out different size flowers from the George Cart (I think) on a strip of scrap cardstock. I used them as a template & sponged ink in the flower cut outs all over the pink part of the cover. Then I attached pink & brown prima flowers with dark pink & light pink skittles in the middle of the flowers.
Front Cover:
Inside Front Cover:
For the inside of the front cover, I just cut out the crown on the Alphalicious Cart in Shortstack Shadow in brown & Shortstack in pink. Layered them both them glittered the round tops of the crown. I then stamped a princess crown (sorry, I don't remember the name of the stamp set) on that with ColorBox Pigment Ink.
Inside Back Cover:
On the inside back cover I used the Alphalicious cart again for her name. Again cut it in shadow & regular. I used CDS to weld the name together. I used the same stamp set & ink as above for both stamps on this page.Just like the book that I made for Gretchen, I used regular copy paper for the inside pages. I cut them the same size (5 1/2") as the covers. I also used the BIA to punch the holes.
Thanks for looking. Questions and comments are always welcomed.
Lori
A Proud member of The Lime Light. Click on over to see what we are doing.
Wednesday, March 18, 2009
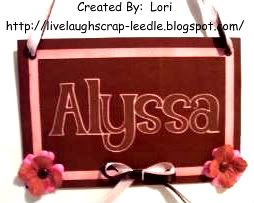
Alyssa's Doorhanger
This doorhanger was made for a friend of my daughter. Her mom told me that her room is decorated in pink & brown & this is what I came up with.
Details:
Cricut Design Studio
Misc. cardstock
Misc. ribbon
Cricut Cartridges: G&BS & Alphalicious
Making Memories Eyelets
Prima Flowers & Misc. Brads.
I used my Ultimate Crafter's Companion to help make the bow along with Nilda's instructions.
ColorBox Pigment Ink Pads.
Thanks for looking. Questions and comments are always welcomed.
LoriA Proud member of The Lime Light. Click on over to see what we are doing.
Labels:
Alpha,
CDS,
Crop-A-Dile,
Door Hanger,
GBS,
Gifts,
UCC
Monday, March 9, 2009
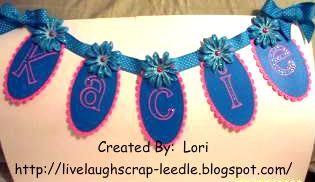
Kacie & Katelyn: Name Banners
I made these 2 name banners for some very good friends' twin daughters. They just made 10 and their room is half hot pink & half tourquois.
This first one is for Kacie. She picked the tourquois for the room.
This one is for Katelyn. She picked the pink for the room.
The picks don't show much of the detail very well.
I used the Alphalicious Cart. for this project. It is my newest cart. & I got it because of the crown. Well, while doing these projects I found that I really love this font.
Details:
I cut the scalloped oval tag for the base of each letter.
I cut the oval tag with a shadow letter for each tag.
I then cut out the regular (no shadow) of each letter.
Layered the oval on top of each scallop & placed the letters inside the shadow that was cut out.
This first one is for Kacie. She picked the tourquois for the room.
I used the Alphalicious Cart. for this project. It is my newest cart. & I got it because of the crown. Well, while doing these projects I found that I really love this font.
Details:
I cut the scalloped oval tag for the base of each letter.
I cut the oval tag with a shadow letter for each tag.
I then cut out the regular (no shadow) of each letter.
Layered the oval on top of each scallop & placed the letters inside the shadow that was cut out.
I used my Zig 2-Way glue pen to make dots on each scallop and on the letters. I used the Martha Stewart Glitter on them. I put pink on the pink & turquoise on the turquoise. I also painted Mod Podge on the Prima flowers & misc. brads & coated them in glitter too. I must say that I am not much of a fan of glitter b/c of the mess. But this glitter really shines, it is worth the mess & the time.
I want to thank Nilda for posting her Bow Making Video. This helped me out so much in making the bows for the ends.
Thanks for looking. Questions and comments are always welcomed.
Lori
Lori
A Proud member of The Lime Light. Click on over to see what we are doing.
Subscribe to:
Posts (Atom)