
Showing posts with label Etching. Show all posts
Showing posts with label Etching. Show all posts
Tuesday, June 7, 2011
Ballet Slippers Glass Etching
I etch these little bowls and use them as candle/candy bowls. They can also be used for a catch all dish or anything that you wish. A friend of a friend saw them & asked me to do some with a dancing theme for dance teacher gifts. I loved how they came out. The pic does not do them justice.
 Thanks for looking. Questions & comments are always welcomed. Lori

Monday, July 12, 2010
Camera Photo Album & Fleur De Lis Candle Bowl
A very good friend of ours was having some visitors in from out of town. It was their first visit to see them & to our city. She had asked me to make something for them as a memento. For the mother she wanted to give her one of my candle dishes that I etched with fleur-de-lis. I used the fleur-de-lis on the Wild Card Cricut Cartridge.


 Cartridges Used: Create A Critter (Camera), Accent Essentials (Fleur de lis), Cuttin' Up (Initials), George & Basic Shapes (Background Rectangle for the initials)
All pieces of the camera were cut from water color paper & painted with acrylic paint. After assembling the camera, I sealed it with Krylon Preserve It. I then added the fleur de lis that was heat embossed with UTEE to add dimension & shine.
Thanks for looking. Questions & comments are always welcomed. Lori
The daughter likes to take a lot of pictures. So I figured I would make a photo album. It had 10 pages (front & back) that I made out of water color paper and painted with acrylic paints. I then painted cardstock and adhered it to the pages, so that it added room for at least 3 pics per page. The front & back covers were made from corrugated cardboard that I cut up from a box. I painted each of these with white Gesso & then acrylic paints.
The pages & covers are 5x7. The cardstock is 4.5 x 12 & folded so that each part of the cardstock can fit a 4x6 picture or journaling if she wishes.
I cut the camera pieces & painted them with acrylic paint as well. I added her initials & a fleur de lis as a symbol of our city. I used heat embossing with UTEE on the fleur de lis to make it glossy & to add dimension.
All pieces of the camera were cut from water color paper & painted with acrylic paint. After assembling the camera, I sealed it with Krylon Preserve It. I then added the fleur de lis that was heat embossed with UTEE to add dimension & shine.
Thanks for looking. Questions & comments are always welcomed. Lori
Monday, June 21, 2010
Redfish Glass Etching
Ok, so this has been in the works since December. My dad asked if there was a way to etch a redfish. I told him that I would have to get the program and find a picture in order to be able to do it. Well, he bought me the program. I found a great picture. Then had to figure out how to convert the picture and make it cuttable. It took a little while, but I got it done. I cut it out of plain white cardstock & thought it looked pretty good. I knew there would be so much weeding of very tiny pieces that I kept putting it off to attempt the etching.
I used SCAL and my Cricut to design & create this project.
Here is the picture that I found on-line.


I used SCAL and my Cricut to design & create this project.
Here is the picture that I found on-line.

Here is the cutout from cardstock:

So now, we are on to Father's Day: I decided on Friday night that I would work on this Saturday morning. Well Saturday morning turned into 10 hours of trying to get this right. First, I thought I had the file the correct size for a 8.5 x 11 piece of glass. It was not, it was too big. So I resized it, cut it, & placed it on the glass, but it still didn't look right. I needed to add a shadow to it to give the shape of the fish - w/o having to etch all of the glass. Now, mind you, my computer is ancient & takes forever on it's own, so working with this file is what took up so much of the time. So then after 3 more tries (placing issued mostly) I finally got it right!!
So here is the final product: And he absolutely LOVED it!!!!!! Now he wants me to make another one. At least now, I don't think it would take so long.
Thanks for looking. Questions & comments are always welcomed. Lori
Thursday, December 31, 2009
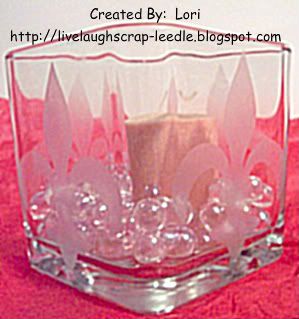
Fleur-Di-Lis Glass Etched Candle Bowl
I made these for a couple of very good friends this Christmas. For those of you that don't know, I am from the New Orleans area. With the way the Saints are going this year, I think I have to get more etching cream. I already have people that have said that they want some of these without even seeing them. I think I will be making them in different sizes too.
Lori
Wednesday, December 9, 2009
More Glass Etching
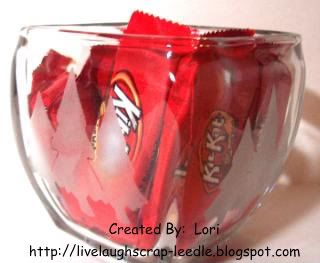
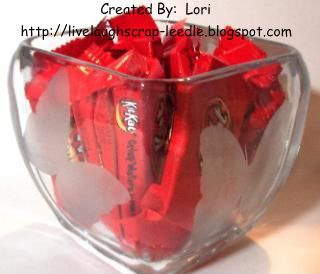
Here are 2 more glass etchings that I have done for Christmas. I made these with my Cricut Expression, Clear Contact Paper, Amour Etch, and designs on SCAL.
This first one is of Christmas Trees, with the design on all 4 sides. I found the .svg file at ScrappingTable under Free Shapes. If you are using SCAL, you really need to check out this site. It is really a wealth of information.
 The next one is for my mom. She loves butterflies, again I put an image on all 4 sides of the bowl. I found a picture of a butterfly online & asked for someone to convert it to a .svg file for me on the SCAL MB. (I still can't get the hang of inkscape to convert files.) Thanks goes out to JO-ANNEB (Sweetness4713) on the SCAL MB for converting this file for me.

Thanks for looking. Questions & comments are always welcomed.
Lori
This first one is of Christmas Trees, with the design on all 4 sides. I found the .svg file at ScrappingTable under Free Shapes. If you are using SCAL, you really need to check out this site. It is really a wealth of information.
Lori
Monday, November 30, 2009
Glass Etching - Candle Bowl
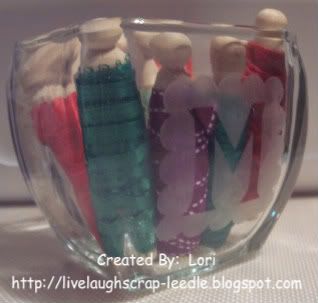
I made this candle bowl for my grandmother Mamie for Christmas. (Yes, I know there are ribbon spools in the bowl.) Than bowl would not photograph well with the candle in it, so I added the colorful ribbon. This was the first etching I had done since high school, too many years ago to worry about. But it was fun & I will be making several more to Christmas gifts.
Details:
The scallop square is cut from the Mini Monograms Cart.
The M is from the Plantin Schoolbook Cart.
I used clear contact paper to cut the design out of & layered it onto the glass.
Armour Etch. I left it on for a good 30-45 min with great results. I knew I had to leave it on longer that recommended, so I really didn't time it. I put it on 7 started working on some other stuff then just checked it a while later. I scraped off as much as I could & put it back into the bottle. Then I rinsed it off thoroughly before removing the contact paper. Wash well & dry.

Thanks for looking. Questions & comments are always welcomed.
Lori
Details:
The scallop square is cut from the Mini Monograms Cart.
The M is from the Plantin Schoolbook Cart.
I used clear contact paper to cut the design out of & layered it onto the glass.
Armour Etch. I left it on for a good 30-45 min with great results. I knew I had to leave it on longer that recommended, so I really didn't time it. I put it on 7 started working on some other stuff then just checked it a while later. I scraped off as much as I could & put it back into the bottle. Then I rinsed it off thoroughly before removing the contact paper. Wash well & dry.
Lori
Subscribe to:
Posts (Atom)