Followers, Guestbook, & Comments

My followers are being shown in the right column. My Guestbook is at the bottom. Please follow, comment on posts, & sign my guest book. Your comments encourage me to keep sharing my work. I love hearing from you all.

When you leave a comment, I have to moderate it before it will be posted. So if you have a questions or comments, feel free to ask & if necessary note that you don't want your comment posted.
Showing posts with label WIMG. Show all posts

Tuesday, July 20, 2010

Dream BIG Frame

My niece & Godchild just made 2 years old.  I wanted to make something for her that I had not done before.  I had picked up a couple of frames when they were on sale & wanted to make something different.  Everything for her since she has been born has revolved around butterflies.  So I thought about a scenic picture & this is what I came up with.  It was fairly easy considering I don't really scrapbook.  Because of that, I didn't leave a place for a picture, but this can always be modified.  I just thought this would be cute hanging in her room.
Also being entered into Made By Momo's Tuesday Challenge.
Details:
I used my Gypsy and Cricut to design & create this frame.  I used lots & lots of carts on this project & lots of inking.  I use a wood grain stamp on the trunk if the tree.  I had to cut the tree out 3 times, twice in brown & once in tan.  I cut the swing seat off of the extra brown one & the ropes off of the tan one.
Cricut Carts. Used:  Just Because Cards (Sun & Tree), Everyday Paper Dolls (Clouds), Stamping (Birds & Butterfly - right), Create A Critter (grass), Gypsy Wanderings (Butterfly - lower left), Graphically Speaking (Butterfly - upper left), Walk in My Garden (Sunflowers), Home Accents (dream), A Child's Year (BIG)
Thanks for looking. Questions & comments are always welcomed. Lori

Tuesday, June 15, 2010

Wall Letter - J for Julia

OK, so here is another one.  My friends are keeping me busy.  That's ok, because I love making these.  One of my very good friends wanted this one for her niece.  She liked the last "A" (Alyssa) that I made & Julia's room is dark pink.  Julia also takes Taekwondo.  So here is her letter; pink, butterfly, flower, glitter, & Taekwondo.  I like the style of each letter to represent the person it is for in some way, so that they know it was made just for them.  I also (even for the very young children) don't want them to outgrow the style of the design.  So that if I make a letter for a young child, I would like to think that they would still want to hang it when they are teenagers.
I used my Gypsy and Cricut to design & create this letter.
Cartridges used:  Sports Mania (Martial Arts Figure), Storybook (Name), Everyday Paper Dolls (Butterfly), Walk In My Garden (Scrunch Flower & Leaves), Accent Essentials and George & Basic Shapes (Mini Roses)
I used large bubble bubble wrap to make the background on the letter.  I then made some glitter glue (MS glitter & glossy Mod Podge) and painted some accents in the spots.  I coated the butterfly with Triple Thick & added Diamond Dust the the body of the butterfly.  I made the scrunch flower & painted each layer with home made glimmer mist before assembling and added a rhinestone to the center.  I made the Faux Mini Prima Roses, added a glass pearl to the centered, & clustered them at the bottom of the letter.  The name didn't show well so I made a background for it with some wavy decorative scissors & inked the edges.  I wanted the Martial Arts Figure to stand out, so I placed it prominently at the top of the "J" hook.
Thanks for looking. Questions & comments are always welcomed. Lori

Friday, May 21, 2010

3D Project Using Black

Yet another Teacher Appreciation Week gift.  I made this for Challenge Me Monday #10 at Fantabulous Cricut.  The challenge was to make something that is 3D and to use the color black.  Oh, and it is filled with covered Hershey's Nuggets.  So here is my entry:

Front View:

 Side View:
Thanks for looking. Questions & comments are always welcomed. Lori

Thursday, May 6, 2010

Happy Mother's Day - Flower Pot Slider

I started out making this as a shape card w/ the flowers sliding out. I had made a cupcake slider (on a base) & I liked this for the flowerpot too. I find that it helps me to keep from putting the flowers up too high, (I want it to fit into a regular envie.) & this keeps them within the correct frame.
These 2 cards are for my mom & grandmother. I am also entering this into Tracy's (Craft Junkie Too) Mother's Day Post and Cuttlebug Spot Challenge #4. So click on over HERE to check out every one's projects.
Details:
Gypsy to design & cut w/ Cricut
Flowerpot is from Walk In My Garden (blackout, welded at the bottom & edges glued) Flowerpot pieces were also cut in patterned paper & layered to the front of the blackout pot. The rim was embossed using the Cuttlebug & Floral Screen & Paisley folders.
Tag was cut using the Tags, Bags, Boxes, & More cart.
The slider & base were cut from George & Basic Shapes cart.
Flowers are from Sweet Treats, Accent Essentials, & Forever Young carts. They were made using the wet & scrunch method. I then painted them with a mixture of Pearl Ex, Gum Arabic, & water.
Inked all edges & embossed pieces before assembling. Added tag with ribbon tied around one of the flowers.
.gypsy File
Thanks for looking. Questions & comments are always welcomed. Lori

Friday, April 9, 2010

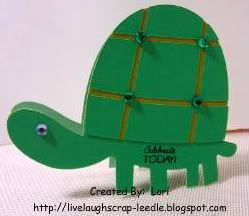
Turtle Shaped Card

My grandmother is going to 85 this month. She likes turtles, so I thought I thought I would make her a cute card that is shaped like a turtle.
Details:
Gypsy to design & weld
Walk In My Garden Cart for the turtle
Inside (not shown) Happy Birthday is from Gypsy Wanderings Cart
Stamp is from MPS
Rhinestones for eye & to decorate the shell

.gypsy File
Thanks for looking. Questions & comments are always welcomed.
Lori

Wednesday, May 13, 2009

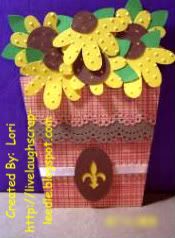
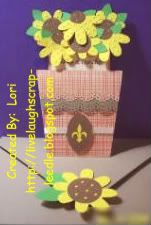
Flower Pot Card

I had first seen a flower pot card posted on the Cricut MB by Janet Waters. I thought the idea was so cute. Then I had seen a video on Dawn's Blog on how to make them. She had originally seen the instructions & measurements on Stephanie's Blog. To make this one, I used a combination of Dawn's & Stephanie's instructions & added a little of my own touches too.
It was made as a Thank You Card for some very good friends (honorary family), my daughter's Parran & his wife.


I used the instruction to cut the card & fold to make the flower pot. I also used their measurements to cut the pullout card. For the front top part of the pot I used my MS Doily Border Punch & added another bordered piece of cardstock for some contrast. I used pop-dots to have the top edge stand out a little. To hold pocket of the card, I just added a very small piece of Terrifcally Tacky Tape (red liner tape)to the top corners.
I cut the sunflowers from the Walk in my Garden Cart. in varying sizes. I used the Swiss Dots embossing folder with my Cuttlebug on the flowers to give some texture. I then added them to the top of the pull out card with pop-dots.
I decorated with a ribbon & I cut the oval from the George cart. & the fleur-de-lis from the Wild card cart.I used my Ultimate Crafter's Companion to make the envelope.
Thanks for looking. Comments and questions are always welcomed.
Lori
A Proud member of The Lime Light. Click on over to see what we are doing.

Tuesday, May 5, 2009

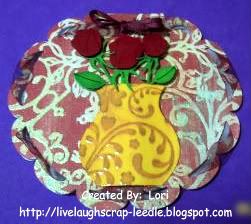
Mamie's Mother's Day Card 2009

This is the card that I made for my grandmother for Mother's day. This card was so much fun to make. I used printed cardstock, I inked, I made the vase dimensional, & the roses are paper pieced & dimensional. This card is so different than what I usually do. It is fun to step out of your comfort zone sometimes.
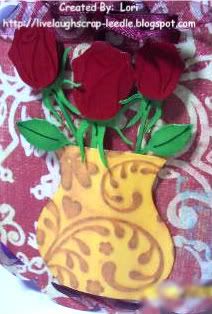
Close up pic of the vase & flowers.

Details:
I used the Wild Card Cricut Cartridge for the Doily Card & the roses.
On the inside I cut Happy Mother's Day & You are so Special from the Wild card cart.
I cut the vase from the Walk in My Garden Cart & played with the size & shape in Design Studio.
I cut the roses out 4 times, twice in red & twice in green. I cut all of the red flowers from the stems & did the same to one set of the green flowers. I used one full green rose for the base. I layered a red flower on top of the green base. I Inked the green stems that were cut from the flower & inked the red flowers. I layered the inked stems onto the base. I then layered the inked flowers to roses.
I used my Cuttle Bug & Floral Fantasy Embossing folder on the vase & inked with Gold ColorBox Pigment Ink. I also coated the vase & the roses with Mod Podge to give them a glossy or glassy look.
To give the vase dimension, I used pop-dots down the center of the vase. I used my ATG gun for the edges of the vase & adhered it to the card front.
I them arranged the flowers in the vase & attached them with a pop-dot to give them dimension too.

Updated 10/23/09:

I also entered this card into the Paper Blooms Circle Card Challenge. I had made it so much earlier, but figured I would show it anyway.

Thanks for looking. Questions & comments are always welcomed.

Lori

A Proud member of The Lime Light. Click on over to see what we are doing.

Thursday, March 5, 2009

Gretchen's Book

Here is another book that I made with my BIA & ATG. I seem to be inseparable from them lately. This "G" book was made as a present for Gretchen, a little girl in my daughter's class.

I got a wonderful idea from someone (sorry, can't remember who posted it) on the Cricut MB about using 140 lb. watercolor paper as chipboard. I like it very much. It is thinner but very sturdy, especially after being covered with cardstock.
I used CDS - mostly for sizing, to make sure everything would fit & for the multi-cut feature.
Cartridges used: Mini Monograms, Cricut Sampler, and Walk In My Garden
Embellished with: Glitter Glue, Ribbon, Misc. Flowers, Brads, & Snaps
I inked around the edges of the covers with ColorBox Pigment Ink Pads & LePlume II markers.
I used 1/2' o wires.
For the inside pages, I just used regular copy paper (12) cut to the same size as the covers. I put each cover in the BIA separately & used the bar as a guide to make sure the pages were being placed correctly.


Thanks for looking. Questions and comments are always welcomed.
Lori
A Proud member of The Lime Light. Click on over to see what we are doing.

Friday, September 19, 2008

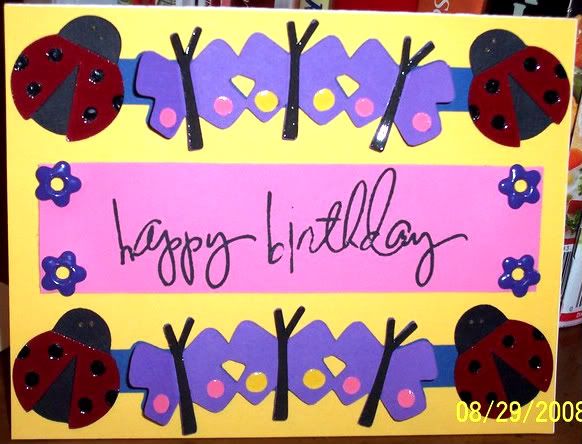
Happy Birthday Mom

Well, I have not been around for a while. We had Gustave & Ike to worry about. I'm still not totally back to my cardmaking & blogging, but I'm working on it.

I did get my mom's b-day card done & given to her on time & before we had to evacuate. But I am just getting to post it.

Before Katrina my mom had a beautiful butterfly garden. So I knew she would love this card.
Details:
Ladybugs - Doodlecharms, Butterfly Border - Walk In My Garden, Liquid Embossing on the ladybug wings & dots & body of the butterflys, Stamp is from Heidi Swap.
Thanks for looking. Comments & questions always welcomed.
Lori