When I got my I-Top, I had asked on the Cricut MB if anyone had a .cut file for the different size circles to make the I-Top brads. I got no answer, not sure if no had one or if everyone that has the I-Top just bought all of the I-Top Punches. Well, I could only find 1 size punch & figured that somehow I could make or someone would have a cheaper way to make this, rather than buying all 3 punches.
So then I got the Sweet Treats Cricut Cartridge. I thought the Flower4 (Pg. 52 in the Sweet Treats Handbook) would be perfect. I could make it the right size and the way the petals were split it would work. And it did - PERFECTLY!
So this is not so much a .cut file, but a little cheat sheet in .cut file format. It's nice to have this on hand to cut 1 or as many as you need to have on hand. My file has a page for each size. I have all of the score marks hidden and each page is set up for 4 flowers. You can hide some if you want to only cut 1 or copy more to add more. If you copy them though - you will have to save, close, & re-open the file in order to hide the other score marks.
HERE is the .cut file and it will also be on the left side of my blog under My .cut Files.
And for those of you that don't have CDS, I'll list the size of the flowers that you can cut straight from your Cricut. Again, use Flower4 on pg. 52 of the Sweet Treats handbook, the blackout cut.
Small - 1 1/4
Medium - 1 3/4
Large - 2 /14
I hope this helps.
Thanks for looking. Questions & comments are always welcomed.
Lori
Friday, January 29, 2010
Tuesday, January 26, 2010
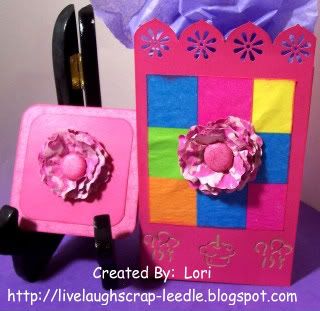
Giftcard Bag & Mini Card
My son had a birthday party to go to for a 14 yo girl. I didn't know too much about her, so just went with pink, flowers, & bright colors. I found theses packs of mini giftbags at Michael's during Christmas & found that they come in great for making giftbags for small presents & they are wonderful for giftcards.
 Details:
I-Top for brad in center of flower. I found that one of the flowers on the Sweet Treats Cricut Cart. is perfect for making the circles for the I-Top. I have a file that I will make a post on later. I have one for each size I-top brad.
Details:My phone book page painted flowers.
Tonic Border Punch System for the balloons & cupcakes (at the bottom of the bag) & pinwheels punch for the border at the top
Yoliebean has a great video tutorial on how to fuse napkins to freezer paper to make your own patterned paper. This is what I used for the bright colored squares on the bag. Mine looks a little bubbly, but you can watch her video & how to do it perfectly.
Thanks for looking. Questions & comments are always welcomed.
Lori
Lori
Monday, January 25, 2010
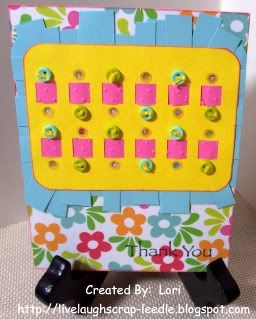
A Simple Card
I started making this card on that day my dog passed away. I needed to do something to just occupy my mind, and something that was somewhat happy or cheery.
I needed a Thank You card & thought this could fill the bill, so I completed it and am sending it out.
Details:
I used my Ribblets Punch in the Tonic Border Punch System
Used the Cuttlebug w/ the Swiss Dots Embossing Folder to emboss some thin pink strips of cardstock.
I then threaded the pink strips through the slots.
Threaded & knotted the mini buttons.
Added the mini buttons & sequins to the holes.
Staggered small pieces of cardstock around the main piece.
Stamped Thank You (unk. stamp set) near the bottom of card.
Thanks for looking. Questions & comments are always welcomed.
Lori
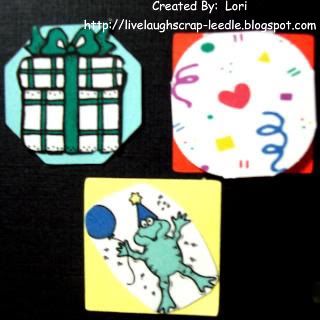
School & Birthday Inchies
I picked up a few more spots in some of the inchie swaps I was in. Some others have backed out or just didn't hold up their end, so I offered to help Kelly out.
Here are my School Swap Extras:

Here are my School Swap Extras:
Here are my Birthday Swap Extras:
Thanks for looking. Questions & comments are always welcomed.
Lori
Tuesday, January 19, 2010
More Paper Flowers & A Question
Please tell me what you think about selling hand made embellishments at craft shows. Do you think they would sell? Is it a good idea?
I am just loving making these flowers. I have been flattening out the back so that I can use them on cards & such. But, I think I have to try to make some 3-D Bouquets too. I also started making leaves for them. I painted the phone book pages the same way, then I just cut the leaves freehand with deco edge scissors.
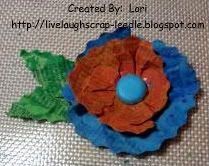
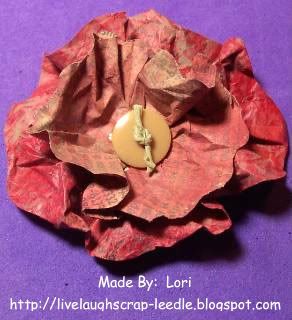
These were done with orange (mixed yellow & red) and lightly went over them with yellow. Two of them have yellow skittles in the center. The other has an orange button threaded with natural hemp twine in the center. Some of these, the top layer was put together with torn pieces of the painted paper. Others, I tore the petals of the flower & arranged freehand & glued.

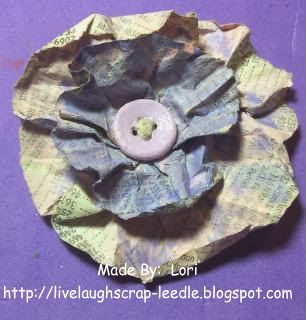
The bottom flower was made with light & dark blue. The top is one of the orange & yellow flowers. The orange one is one of the torn flowers. I covered an I-Top brad with some similarly colored cardstock for the center. The phone book pages, I find are too thin to use in the I-Top, they tend to tear. I have also found that thick cardstock is sometimes too think for the I-Top. I crinkle or rumple it up to soften it a bit. Once it goes through the I-Top it is smoothed out & looks great.
 Thanks for looking. Questions & comments are always welcomed.
Lori
I am just loving making these flowers. I have been flattening out the back so that I can use them on cards & such. But, I think I have to try to make some 3-D Bouquets too. I also started making leaves for them. I painted the phone book pages the same way, then I just cut the leaves freehand with deco edge scissors.
These were done with orange (mixed yellow & red) and lightly went over them with yellow. Two of them have yellow skittles in the center. The other has an orange button threaded with natural hemp twine in the center. Some of these, the top layer was put together with torn pieces of the painted paper. Others, I tore the petals of the flower & arranged freehand & glued.
The bottom flower was made with light & dark blue. The top is one of the orange & yellow flowers. The orange one is one of the torn flowers. I covered an I-Top brad with some similarly colored cardstock for the center. The phone book pages, I find are too thin to use in the I-Top, they tend to tear. I have also found that thick cardstock is sometimes too think for the I-Top. I crinkle or rumple it up to soften it a bit. Once it goes through the I-Top it is smoothed out & looks great.
Thanks for looking. Questions & comments are always welcomed.Lori
Birthday Giftbag
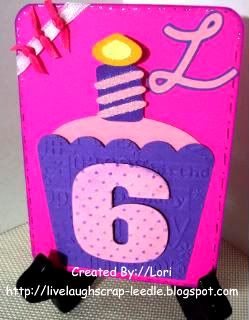
Happy Birthday Laici!! I made this giftbag for a very special little girl that just made 6. I made her card with the Cupcake theme, so went with that for the bag too. It is a little different, but still cupcakes. HERE is her card.
So now for the bag. 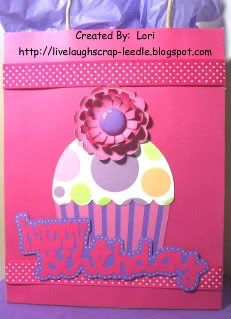 Details:
Details:I used my I-Top to make the brad in the center of the flower.
Cupcake, Flowers, & Happy Birthday were all cut from the Sweet Treats Cricut Cart.
White Gel Pen to make doodle dots around the Happy Birthday.
Iridescent Glitter Glue on the dot for the "i" in birthday and on the gleam on the brad.
Thanks for looking. Questions & comments are always welcomed.
Lori
Lori
Birthday Card - Jean
I made this birthday card for my husband's step mom for her birthday. Happy Birthday Jean. We Love You!!!!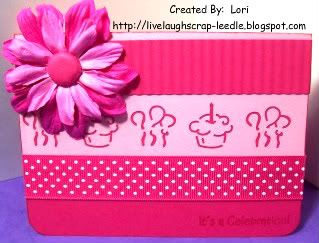
Details:
Tonic Border Punch System with the Cupcake & Balloon Punches.
Fiskars Paper Crimper
Prima Flowers
I made the brad in the center of the flower using my I-Top.
Stamps ( I can't remember the stamp sets at the moment) Front: It's a Celebration, Inside: Happy Birthday
Corner Rounder
Thanks for looking. Questions & comments are always welcomed.
Lori
Saturday, January 16, 2010
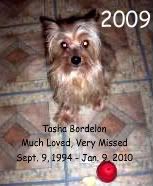
Tasha's Memorial Frame
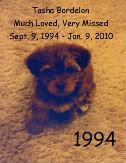
I made this frame as a memorial to Tasha. I have a picture of her from 1994 and a picture of her in 2009.
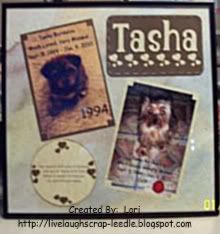
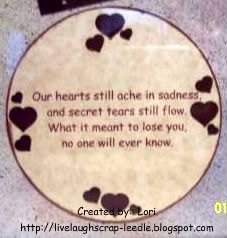
The saying, I thought fit perfectly. I had seen it in a magazine selling a cement paw with the saying on it.
Details:
Alphalicious Cricut Cart. was used for her name. I cut it in cardstock and 140 lb. watercolor paper to give it a little dimension (kind of like chipboard) and layered it. I inked the edges of the letters.
George Cricut Cart. was used to cut the circle. I printed the saying on my computer onto the circle.
Tonic Border Punch System w/ Hearts Punch was used on the base rectangle. I added the punched out hearts to the circle. Inked the circle. I used natural hemp twine threaded around the rectangle.
Tonic Arrowhead 2 in 1 Corner Punch was used on both mats for the pictures. Tucked the corners of each picture into the cut out corner slots.
Thanks for looking. Questions & comments are always welcomed.
Lori
Friday, January 15, 2010
Making Embellishments - Paper Flowers
As you may or may not know I am trying to get together some inventory to do craft fairs in my area. I still want to make some projects to have on hand to sell. But, I also had a thought to make embellishments to sell also. I know I go to craft shows a lot of the time to get ideas. I'm sure I am not the only one. It's good to have our crafts for those that don't crafts. But I thought that it would be nice to have some handmade embellishments for those that do craft. I mean - we all still buy embellishments that we see & like even though we can make them. I think that is the nature of the beast we call crafting - LOL.
So last night I sat down to make some paper flowers. This VIDEO is what first inspired me to make these flowers. Then Donna came out with VIDEO 2. You really need to see both videos that are wonderful. Although I did put my spin on them. I don't have all of the materials that Donna has, so I improvised & I think I really like how they came out.
I used a roll of electrical tape and one of my rolls of sticky strip as a guide to cut the circles. I was not worried about them being perfect. I just tore the paper while holding down the rolls of tape.
For this one, I made the flowers with the bare paper. Then (The colors are off in this pic. They are actually lt. purple & lt. pink.), I watered down some acrylic paint and just kind of splattered it on them. I used my heat gun to help dry them faster (I tend to be impatient.). I then glues them together, painted a button with the acrylic paint, threaded it with some hemp twine, and coated the button with Mod Podge & attached to the center of the flower.
The following 2 were done a little differently & I think I like this method better. I watered down the paint, dried it, crumpled it, then went over it again with wither a lighter or darker paint color. I did this until I liked the look of the paper. Then after the circles were torn, I went around them with wavy deco edges scissors.
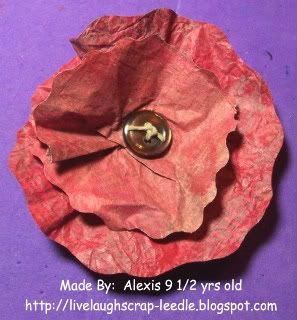
This one is Alexis' very first paper flower. She did hers as I showed her while making mine. Its a little more flat, but that's how she wanted it. I think she did a wonderful job for her first time trying. I actually think it looks better than my first paper flower. My first one can be seen HERE.
I really like the rustic look about these flowers. I am in the process of making many different colored ones. Forgot to mention, the paper I am using is old phone book pages. Way to RECYCLE, and it's FREE!!!!
Thanks for looking. Questions & comments are always welcomed.
Lori
Wall Letter K - Kayla
I can finally show this post. I had to wait until I could give this to my niece.
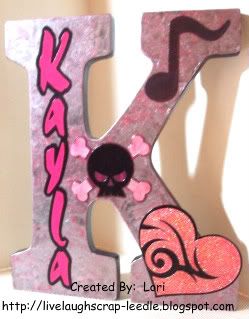
Ok so this is about the 5th Wall Letter that I have done. I love doing them, but I stress myself out trying to make them fit the person that they are for. Last time I got the first boy one out of the way. Now this one is for my niece, but she is 20 years old. I tried to capture her personality & her interests in this. I hope I did good. She is a very good artist, so I am just praying that she will like it. What was I thinking, trying to give a craft gift to someone that is so talented herself? I can't wait for her to get this to finally stop stressing.
Ok so this is about the 5th Wall Letter that I have done. I love doing them, but I stress myself out trying to make them fit the person that they are for. Last time I got the first boy one out of the way. Now this one is for my niece, but she is 20 years old. I tried to capture her personality & her interests in this. I hope I did good. She is a very good artist, so I am just praying that she will like it. What was I thinking, trying to give a craft gift to someone that is so talented herself? I can't wait for her to get this to finally stop stressing.
Details:
White wooden letter from Michael's.
SCAL for the letters.
Indie Art Cricut Cart. for the heart and the skull.
Stretch Your Imagination Cricut Cart. for the music symbol.
I painted the letter with black acrylic paint.
I used Tim Holtz Distress Paint (Brushed Pewter) on the top of the letter. I used my fingers to give it some texture. When that dried I brushed over it with Tim Holtz Distress Ink pad (Worn Lipstick). My niece's favorite colors are pink & black. I did the same to the cross bones of the skull.
I used UTEE mixed with glitter and heat embossed that to the top layer of the heart.
After everything was adhered to the letter, I put a layer of Mod Podge over it. Then I sprayed it with Krylon Preserve It for extra protection.
Now for the reaction:
I think she really liked it. I felt really good when she opened it and said "Wow, how did you do that?" Her brother gave me a very good compliment on it too. He said that if he could capture Kayla and put her on a letter, this would be exactly it.
Glad that is over. I think I need to have more confidence in my work. I stress over it too much. I just want the people that I am making things for to really like them.
Thanks for looking. Questions & comments are always welcomed.
Lori
Monday, January 11, 2010
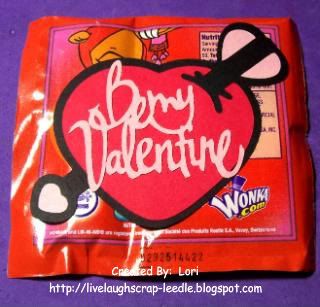
Valentines & Valentine's Party Favors
I made these for my daughter to give out for Valentine's Day. The heart and arrow were cut from the Hello Kitty Greeting Cricut Cart.
The Be My Valentine was cut from the Wild Card Cricut Cart.
Then I just adhered them to individual Valentine Lik-N-Dip Packs and wrote her name in the From space on the other side.
Tonic Border Punch System Information:
To see videos about it:
Tonic Border Punch System Videos parts 1 & 2
Tonic Boot Punch Videos parts 1 & 2
Tonic Border Punch System Information: Click HERE
To order or for more info, contact Cheryl Horton / Inspire Me HERE
Cheryl is a dear to work with and will answer any questions that you have.
Thanks for looking. Questions & comments are always welcomed.
Lori
The Be My Valentine was cut from the Wild Card Cricut Cart.
Then I just adhered them to individual Valentine Lik-N-Dip Packs and wrote her name in the From space on the other side.
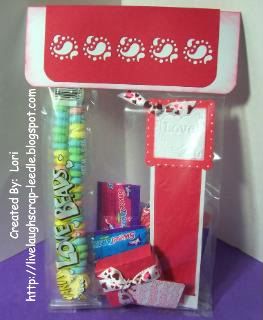
This pic is of the Valentine's Party favor bags that I made for my daughter's class.
For the topper I just cut white cardstock & scored down the middle, rounded the corners & inked with Tim Holtz's Distress Ink Pad (Worn Lipstick). I cut the red cardstock a little smaller, scored down the middle & rounded the corners. Then I used my Tonic Border Punch System with the Paisley II Punch to make the design across the front. (Info about the Tonic Border punch System is at the bottom of this post.) I have the Heats Punch on its way to me, but I was impatient & wanted to get these done over the weekend. I still think it is cute & the boys will like it too. I filled with Misc. Candy, Candy Love Beads, Bookmark, and Decorated Mini Nerds. I then stapled the white part of the topper to the bag. I layered the red part of the topper over the white (adhered with ATG), this hid the staple. From is stamped on the back of the topper & my daughter wrote in her name.
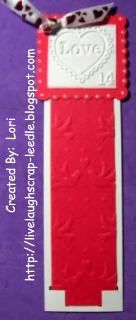
This is the bookmark that I made.
I cut red & white rectangles, just using my paper trimmer. I cut the red ones a little smaller for layering.
I used my Marvy 2 1/2" Scallop Square Punch (red - 2 for each bookmark) and the 2" Square Punch for the white. I ran the white squares through my Cuttlebug using the Love Stamp Embossing Folder. Then I used the Tonic 2-in-1 Arrowhead Corner Punch on the bottom of the white rectangles. The red rectangles were run through my Cuttlebug using the Doves & Hearts (Christmas Set) Sizzix Embossing Plates. I adhered the red rectangles the the white ones tucking the corners into the punched corners. I adhered the red squares on the top, white on top of that. I white doodle dots around the scallop square. I used a 2 slot hole punch on the top left corner & threaded ribbon & tied a knot bow. I then adhered the other red square to the back for a finished off look.
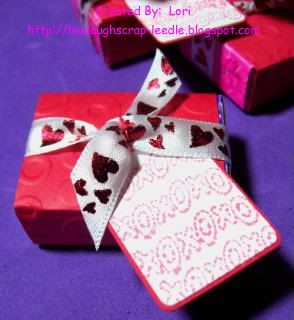
This is the covered Mini Nerds that I decorated.
The inspiration for this came from Angie @ Chic'n Scratch Live. You can see her video for her Valentine Nerds HERE. I'm sure her instructions were clear, but I was doing these in the middle of the night & was confused for some reason (not unusual for me in the middle of the night or not when it comes to measurements - LOL). So this is how I did them.
Red cardstock 4 5/16" x 1 5/8" - Scored @ 5 /16" on both ends then on one end @ 1 13/16" & 2 7/16". I ran it through my Cuttlebug using the Spots & Dots Embossing Folder
I cut the scallop tag from the Plantin School Book Cricut Cart. @ 1 1/2" in white & 1 1/2" shadow in red. I stamped in Worn Lipstick Distressed Inkpad the xoxoxo Studio G $1 Clear Stamps (Feb. Set) on the white tags. layered the white & red tags.
Tied a ribbon knot bow around the box. Using red thread attached the tags to the ribbon.
To see videos about it:
Tonic Border Punch System Videos parts 1 & 2
Tonic Boot Punch Videos parts 1 & 2
Tonic Border Punch System Information: Click HERE
To order or for more info, contact Cheryl Horton / Inspire Me HERE
Cheryl is a dear to work with and will answer any questions that you have.
Thanks for looking. Questions & comments are always welcomed.
Lori
Saturday, January 9, 2010
Not Scrap Related - R.I.P. Tasha
We had to lay our beloved dog-child down today. She was 15 years old and 4 months exactly today. She was older than my first born and will be very missed. 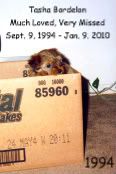
 Thanks for looking. Questions & comments are always welcomed.
Lori
Here are some pics of her:
Thanks for looking. Questions & comments are always welcomed.Lori
Friday, January 8, 2010
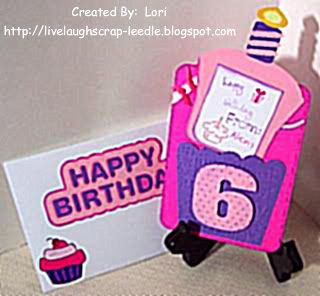
Slide Up Cupcake Birthday Card
The idea for this card came from the Flower Pot Card that I had made a while back. I just recently got the Sweet Treats Cricut Cart & thought that it would be nice to make a similar card with a cupcake. I really like the way this came out.
A good friend of our's daughter is turning 6 shortly. I thought I would make a special card for her. Happy Birthday Laici!!
This is the card. It does not open up. There is a pic further down showing the message.
I just cut a rectangle for the base & rounded the corners.
Sweet Treats Cart (cupcake 2) for all of the cupcake parts & the 6
Pop dotted the 6 on top of the wrapper
Opposites Attract Cart for the L
Cuttlebug & Happy Birthday Embossing Folder & Swiss Dots Embossing Folder
Added some ribbon & gel marker stitching
This is the "opened" card and the envelope. Just pull up on the cupcake & it slides out of the wrapper.
On the slide out:
Inked around the edges of a smaller piece of white cardstock & stamped message (Stampendous - Everything happy Stamp Set)
Tonic Cupcake Punch (can also be used in the Border System to make borders) in the bottom corner
Martha Stewart Course Crystal Glitter on the flame, candle stripes, & punched cupcake
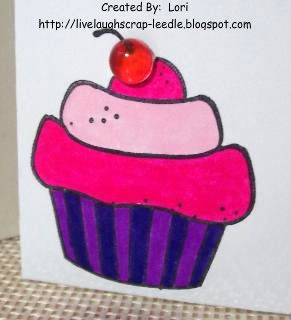
Envelope:
I made the envie using my Crafter's Companion
Hello Kitty Greetings Cart for the Happy Birthday
Studio G $1 Cupcake Stamp from Michael's
Colored in the stamp with LePlume II markers
Added a clear skittle on top of the Cherry for a dimensional effect.
Close up of the cupcake on the envie:
Thanks for looking. Questions & comments are always welcomed.
Lori
A good friend of our's daughter is turning 6 shortly. I thought I would make a special card for her. Happy Birthday Laici!!
This is the card. It does not open up. There is a pic further down showing the message.
Sweet Treats Cart (cupcake 2) for all of the cupcake parts & the 6
Pop dotted the 6 on top of the wrapper
Opposites Attract Cart for the L
Cuttlebug & Happy Birthday Embossing Folder & Swiss Dots Embossing Folder
Added some ribbon & gel marker stitching
This is the "opened" card and the envelope. Just pull up on the cupcake & it slides out of the wrapper.
Inked around the edges of a smaller piece of white cardstock & stamped message (Stampendous - Everything happy Stamp Set)
Tonic Cupcake Punch (can also be used in the Border System to make borders) in the bottom corner
Martha Stewart Course Crystal Glitter on the flame, candle stripes, & punched cupcake
Envelope:
I made the envie using my Crafter's Companion
Hello Kitty Greetings Cart for the Happy Birthday
Studio G $1 Cupcake Stamp from Michael's
Colored in the stamp with LePlume II markers
Added a clear skittle on top of the Cherry for a dimensional effect.
Close up of the cupcake on the envie:
Lori
Monday, January 4, 2010
Test Cut for Redfish Etching
Well, my dad bought SCAL (Sure Cuts A Lot) for me at the end of November. Why, you might ask?!! Because I had been doing some glass etching. He asked me how hard it would be for my Cricut to cut a detailed fish with scales & all. So I told him that if I had SCAL it would be no problem. That I could cut any image that I can copy & paste from the internet or on any image that is on my computer.
With Christmas & all I really did not have time to work on it. And the times that I did try were very unsuccessful & frustrating. I was beginning to think that I had made a mistake in getting this program. You had to use inkscape (a free program) to clean up the images & I just was not able to figure it all out. I posted a picture of the fish on the SCAL MB, asking for help. DogCarbon was nice enough to try,Thanks, but the file was not exactly what I was looking for.
I decided yesterday morning to sit down & try to figure it out. To make the .svg file I imported the original picture into Inkscape. Then I went into Path > Trace Bitmap. When there all I did was change the Edge Detection to .450. That's it, nothing else. Then I Imported it into SCAL and made a few little changes there. You will see the little (very little) changes in the .scut2 file & the .svg file). Oh yeah, SCAL made some updates on 1/2/09 that makes it easier & less dependent on inkscape!!!
Well, after all of that - sorry it was so long. Here is a pic of my sample cut. I am proud of myself.
 I cut it out of white cardstock an placed it over a dark piece of cardstock. When etched, the white parts will be clear class & the dark areas will be etched. When I get a pane of glass I will do the etching & post that pic then. This particular image will fit on an 8x10 picture frame glass. It can be sized up or down, but to size any smaller would loose some of the detail. It was hard to weed out at this size. I would love to try it a little bigger. It would also be nice to try it on t-shirts too. Yeah that's right - forgot to mention that I also got a Yudu for Christmas. I have done the Freezer Paper Technique on T-shirts & would love to see the contrast between the two ways to do this.
HERE is the .svg file.
HERE is the .scut2 file.
Thanks for looking. Questions & comments are always welcomed.
Lori
With Christmas & all I really did not have time to work on it. And the times that I did try were very unsuccessful & frustrating. I was beginning to think that I had made a mistake in getting this program. You had to use inkscape (a free program) to clean up the images & I just was not able to figure it all out. I posted a picture of the fish on the SCAL MB, asking for help. DogCarbon was nice enough to try,Thanks, but the file was not exactly what I was looking for.
I decided yesterday morning to sit down & try to figure it out. To make the .svg file I imported the original picture into Inkscape. Then I went into Path > Trace Bitmap. When there all I did was change the Edge Detection to .450. That's it, nothing else. Then I Imported it into SCAL and made a few little changes there. You will see the little (very little) changes in the .scut2 file & the .svg file). Oh yeah, SCAL made some updates on 1/2/09 that makes it easier & less dependent on inkscape!!!
Well, after all of that - sorry it was so long. Here is a pic of my sample cut. I am proud of myself.
I cut it out of white cardstock an placed it over a dark piece of cardstock. When etched, the white parts will be clear class & the dark areas will be etched. When I get a pane of glass I will do the etching & post that pic then. This particular image will fit on an 8x10 picture frame glass. It can be sized up or down, but to size any smaller would loose some of the detail. It was hard to weed out at this size. I would love to try it a little bigger. It would also be nice to try it on t-shirts too. Yeah that's right - forgot to mention that I also got a Yudu for Christmas. I have done the Freezer Paper Technique on T-shirts & would love to see the contrast between the two ways to do this.HERE is the .svg file.
HERE is the .scut2 file.
Thanks for looking. Questions & comments are always welcomed.
Lori
Subscribe to:
Posts (Atom)