Above Rubies Studio is giving away some great prizes from Oct 15 through Oct. 30. Megan will be drawing names for each day on Oct. 31. Go there to check it out.
Enfys is also giving away some great things that we might not otherwise ever get to try. Go to Going Buggy to see how to enter & what a great idea this is. She is drawing for these awesome things on Nov. 9.
Thanks for looking. Questions & comments are always welcomed.
Lori
Friday, October 23, 2009
Monday, October 19, 2009
Enfys Is Offering Great Blog Candy
Click the title of this post to see how you can have a chance at it. She is doing something that I have not seen before. If you live in the US or Canada you have a chance to get some great UK items. If you are from the UK, you have a chance to get some wonderful US items.
Thanks for looking. Questions & comments are always welcomed.
Lori
Thanks for looking. Questions & comments are always welcomed.
Lori
Inchie Swaps: Due Jan 15, Jan, 30, & Feb. 15 2010
For those of you that may need a reminder as to what inchies are: They are 1 inch shapes uses as a base. They can be any shape as long as they are 1"x 1". There are also Twinchies 2"x 2" & and Trinchies 3"x 3". These were all made for swaps hosted by KellyScott on the Cricut MB. You can see more of my inchies, twinchies, & trinchies by clicking on those words.
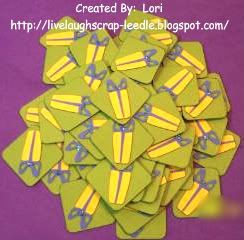
Birthday Theme Swap:
Details: Base was cut from George & Basic Shapes Cart. Present was the icon from the Wild Cards Cart. I added a dot of opal glitter glue at the center of the bow (doesn't show well in pic).
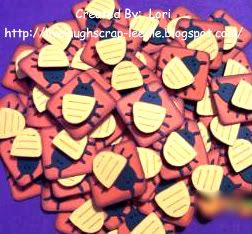
Kid Theme Swap:
Details: Base was cut from the George & Basic Shapes Cart. Bug was cut from the Doodlecharms Cart. I used pop dots to add dimension to the back of the bug.
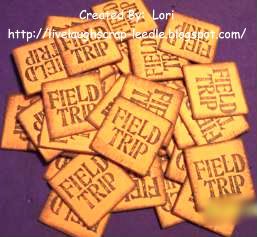
School Theme Swap:
Details: Base was cut from the George & Basic Shapes Cart. Stamp is Studio G $1 stamps from the September set. I also edges around the base with brown pigment ink for a little distressed look.
 Thanks for looking. Questions & comments are always welcomed.
Lori
Birthday Theme Swap:
Details: Base was cut from George & Basic Shapes Cart. Present was the icon from the Wild Cards Cart. I added a dot of opal glitter glue at the center of the bow (doesn't show well in pic).
Kid Theme Swap:
Details: Base was cut from the George & Basic Shapes Cart. Bug was cut from the Doodlecharms Cart. I used pop dots to add dimension to the back of the bug.
School Theme Swap:
Details: Base was cut from the George & Basic Shapes Cart. Stamp is Studio G $1 stamps from the September set. I also edges around the base with brown pigment ink for a little distressed look.
Thanks for looking. Questions & comments are always welcomed.Lori
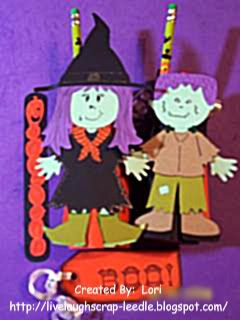
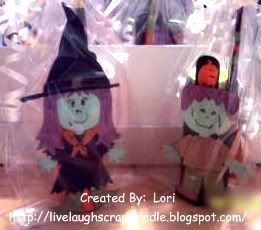
Halloween Party Favors
These are the Halloween Party Favors that I made for my daughter's class. I covered toilet paper rolls with either orange or black cardstock. The I attached the Paper Doll Witches & Frankensteins to them. I cut out circles and attached them to the bottoms of the rolls with Zip Dry Glue (This stuff made an excellent bottom - holds great even when filled.)
I filled them with Skittles, Starbursts, Halloween Kaleidoscopes, Halloween Pencils, and Halloween Bookmarks.
Details:
Dolls are all Paper Doll Dress Up Cart.
Faces are Peachy Keen Stamps & hand doodled.
I used markers & gel pens to hand embellish the dolls & clothing.
Bookmarks: Base is from the Tags Bags Boxes & More Cart. The stacked pumpkins are from the Stretch Your Imagination Cart. I cut off the feet, arms, & scarf.
Tag is from the Plantin Schoolbook Cart. "BOO" is stamped from a Martha Stewart Halloween stamp set that I got on clearance at M's last year. I also edged with a black stamp pad
 Thanks for looking. Questions & comments are always welcomed.
Lori
I filled them with Skittles, Starbursts, Halloween Kaleidoscopes, Halloween Pencils, and Halloween Bookmarks.
Details:
Dolls are all Paper Doll Dress Up Cart.
Faces are Peachy Keen Stamps & hand doodled.
I used markers & gel pens to hand embellish the dolls & clothing.
Bookmarks: Base is from the Tags Bags Boxes & More Cart. The stacked pumpkins are from the Stretch Your Imagination Cart. I cut off the feet, arms, & scarf.
Tag is from the Plantin Schoolbook Cart. "BOO" is stamped from a Martha Stewart Halloween stamp set that I got on clearance at M's last year. I also edged with a black stamp pad
Standing & wrapped in Cello bags.
Lori
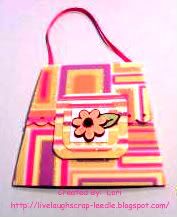
Purse Shaped Giftcard Holder (Pocket Card Holder)
Well here is the pic of the purse shaped giftcard holder that I mentioned in my last post. You can check out my previous post HERE, I have a link to where I found the directions for these. The only thing I did different on this one is that I cut the sides at angles & punched holes in the top to add the ribbon strap. This one also only has 1 pocket. I added the message on the inside of the flap.
For the embellishment, I used an inchie from one of the swaps I was in. Kelly Scott (from the Cricut MB) made the inchie which is the flower on the white 1 inch square base. I layered that on a 1 1/2 inch base & then layered that onto a 2 inch base. I added pop dots below the embellishment to close the top & be able to open it.
I used the Threading Water border punch for the ebge of the top flap. The paper (I think) is from a Nana's Kid's stack.
 Thanks for looking. Questions & comments are always welcomed.
Lori
For the embellishment, I used an inchie from one of the swaps I was in. Kelly Scott (from the Cricut MB) made the inchie which is the flower on the white 1 inch square base. I layered that on a 1 1/2 inch base & then layered that onto a 2 inch base. I added pop dots below the embellishment to close the top & be able to open it.
I used the Threading Water border punch for the ebge of the top flap. The paper (I think) is from a Nana's Kid's stack.
Thanks for looking. Questions & comments are always welcomed.Lori
Friday, October 16, 2009
Above Rubies Studio
 Click the title (or the badge in the left column of my blog) to check out this great new site. Megan has great tips and info for Cricut, Gypsy, SCAL, PRIZES and more!!! She also has videos. And we all know we ALL just love videos.
PS: Also check out It's Spectacular. They are the sposor for Megan's Day 1 give away. Keep checking Above Rubies Studio all week for great prizes. The drawings will be held on 10/31/09.
Thanks for looking. Questions & comments are always welcomed.
Lori
Tuesday, October 13, 2009
Crafting Status
Well, I still don't have anything to show yet. But, I did start getting a little of my crafting fever back again slowly. I had a 40th b-day party to go to so I made a gift box & tag card for the present (no pics - oops!). I also made a giftcard holder (purse shaped) for my niece (pic soon). I also have started on my daughter's Halloween class favors. This is getting me back into things. I am having fun again figuring out what I am going to do with them. I'm not rushing myself & I'm having fun. As soon as I get them made I will be posting the pics of them too. I'm still not getting any inventory to keep on hand done. I also think I am just burnt out on doing cards & such. I think projects will get me back into the swing of things. I will probably do something for Thanksgiving then start on Christmas. Hopefully after that I will be back to my normal Craft Obsessed self. Wish me luck.
Thanks for looking. Questions & comments are always welcomed.
Lori
A Proud member of The Lime Light. Click on over to see what we are doing.
Thanks for looking. Questions & comments are always welcomed.
Lori
A Proud member of The Lime Light. Click on over to see what we are doing.
Subscribe to:
Posts (Atom)